Managing Physical Trades
- IT Support
- MAF Intern (Unlicensed)
With MAF Cloud, commodity trading businesses can seamlessly integrate the front, middle and back office activities to manage their physical commodities trading transactions, cargo & vessel operations and shipping logistics efficiently. The lifecycle of physical trades and deals can be monitored closely, beginning from the contractual and execution phase to the risk monitoring and settlement phase. This allows you and your team to collaborate on trade contracts and manage your paper and physical trading books/portfolios, and monitor their performance, positions, settlement and risks exposure according to your business requirements efficiently.
The features include:
- Capturing, recording and monitoring of physical trades, deals, trade executions and pricing strategies
- Providing auto-calculations of P/L positions and inventory management
- Performing hedging through paper trades to mitigate associated risks
- Organising and managing of paper and physical trades in portfolios to monitor P/L positions and exposures
- Generating of quantitative analysis models such as Position Matrix and VaR model to monitor portfolio performance and risks
To access the 'Physical Trade' page, click 'Trade' from the navigation sidebar on the left, followed by 'Physical Trade'.
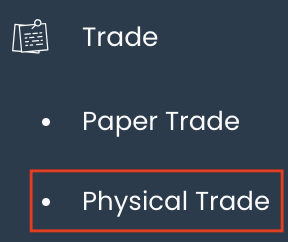
TABLE OF CONTENTS:
Managing Physical Trade Table
All physical trades created will be displayed in the 'Physical Trade Data' table.
There are 5 tabs to select from:
- TRADES: Manage your trades and their associated trade executions.
- DEALS: Display the details of your deals and their associated trades.
- TERMS DETAILS: Manage the details of your term contracts.
- SHIPPING INSTRUCTION: Display the details of shipping instructions.
- EXPENSES & INCOMES: Display the details of your expenses and incomes.
- PAYMENT RECORDS: Display the details of your payment records.
- BULK TRADES UPLOAD: Upload physical trades in bulk.
- PHYSICAL PRICING SETTINGS: Pre-set pricing index for physical trades.
*Manage = Create, update, view and delete
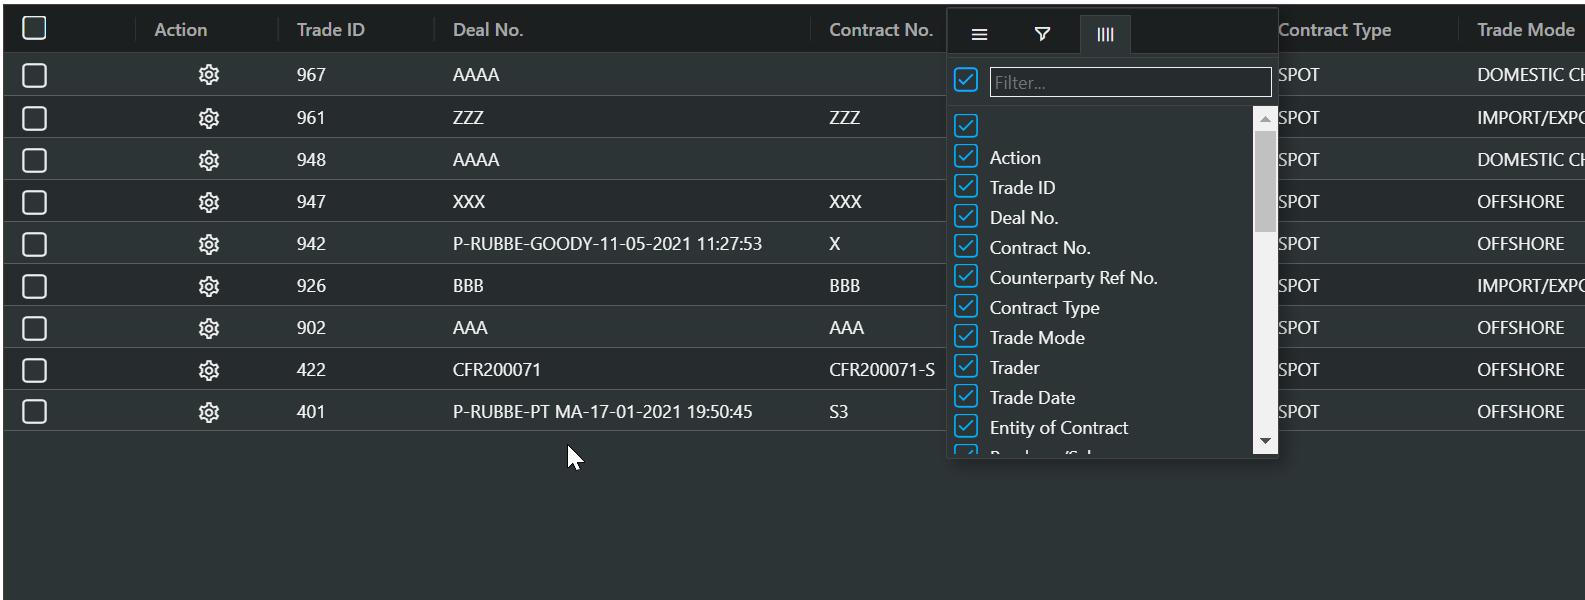
Several functions are available to assist in the selection of physical trade data:
- Search bar: Search for keywords in the search bar for relevant data to be displayed.
- Table Headers: 'Sort' and 'Filter' data using the functions in the table headers (Please refer to Table Settings for table functionalities).
- Rows per page: Select to show the number of rows to be shown per page.
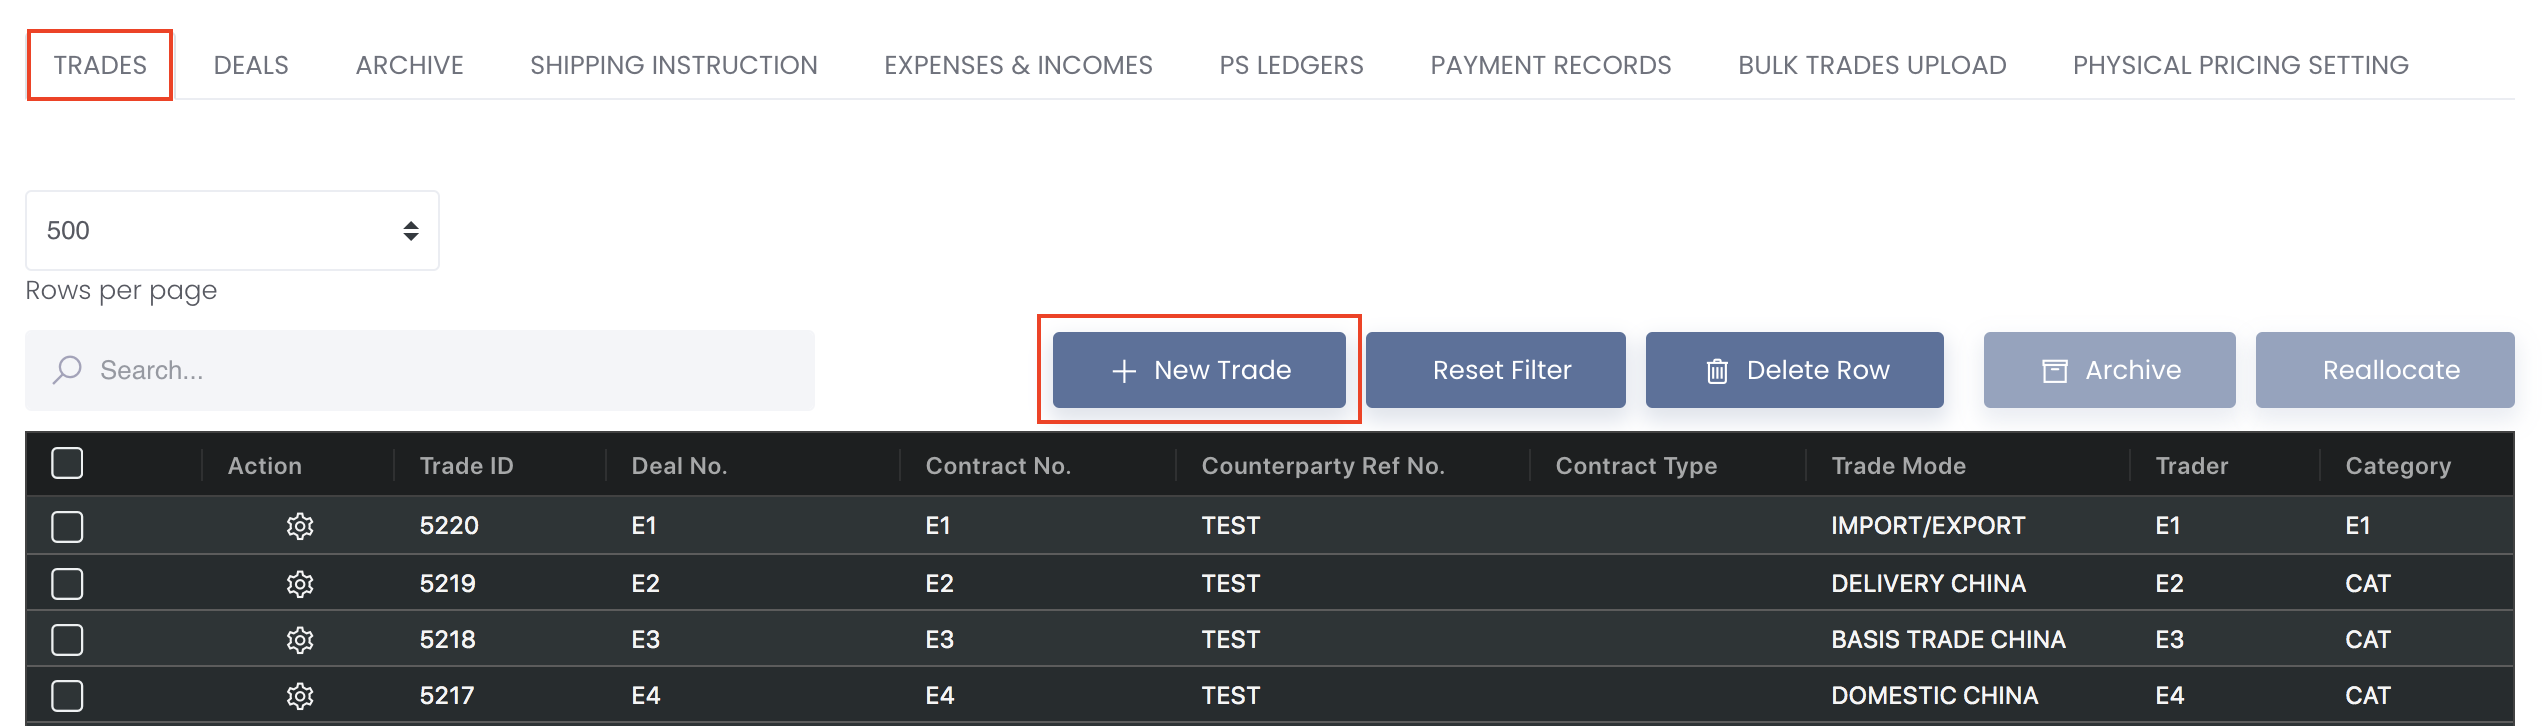
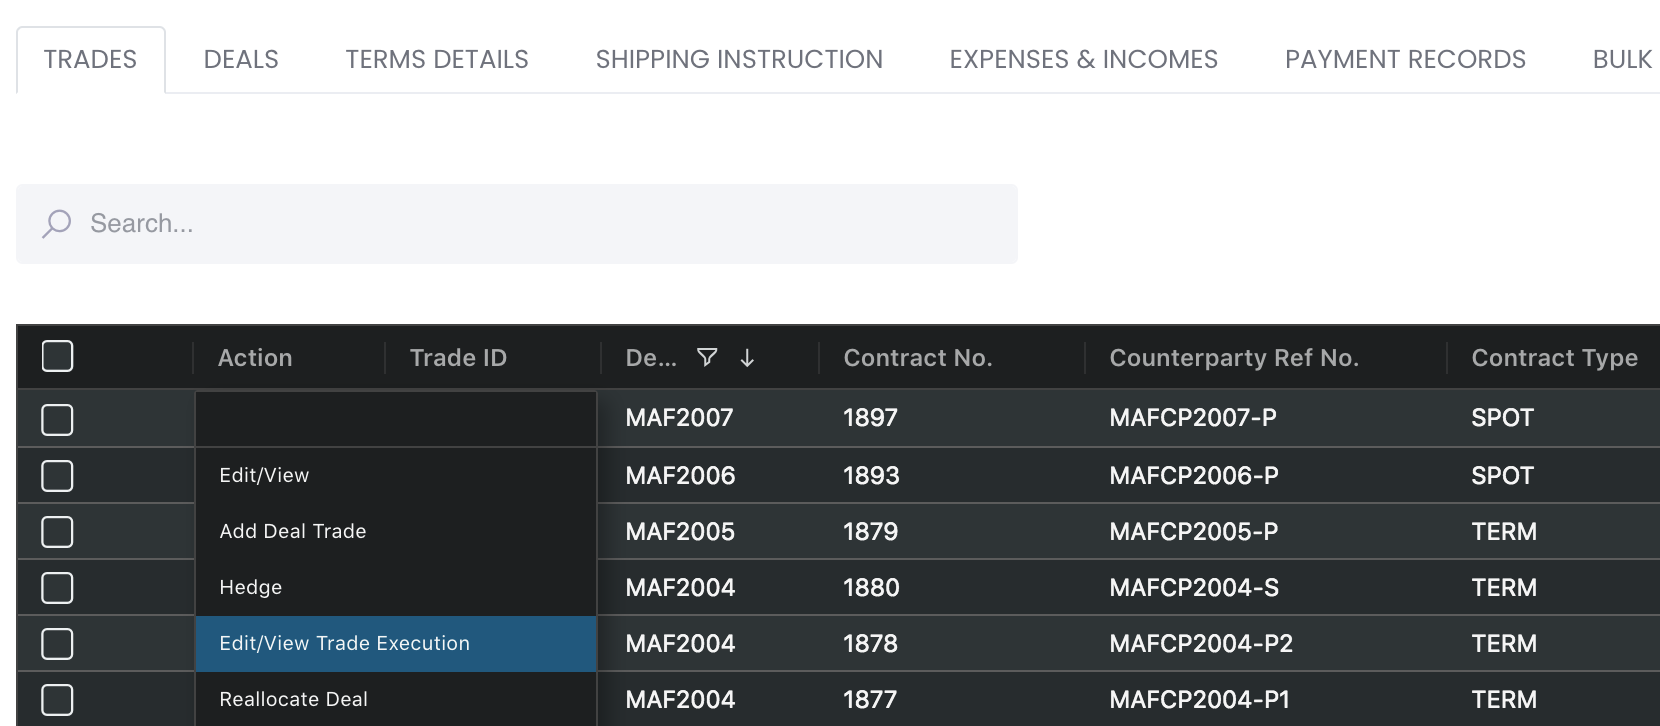
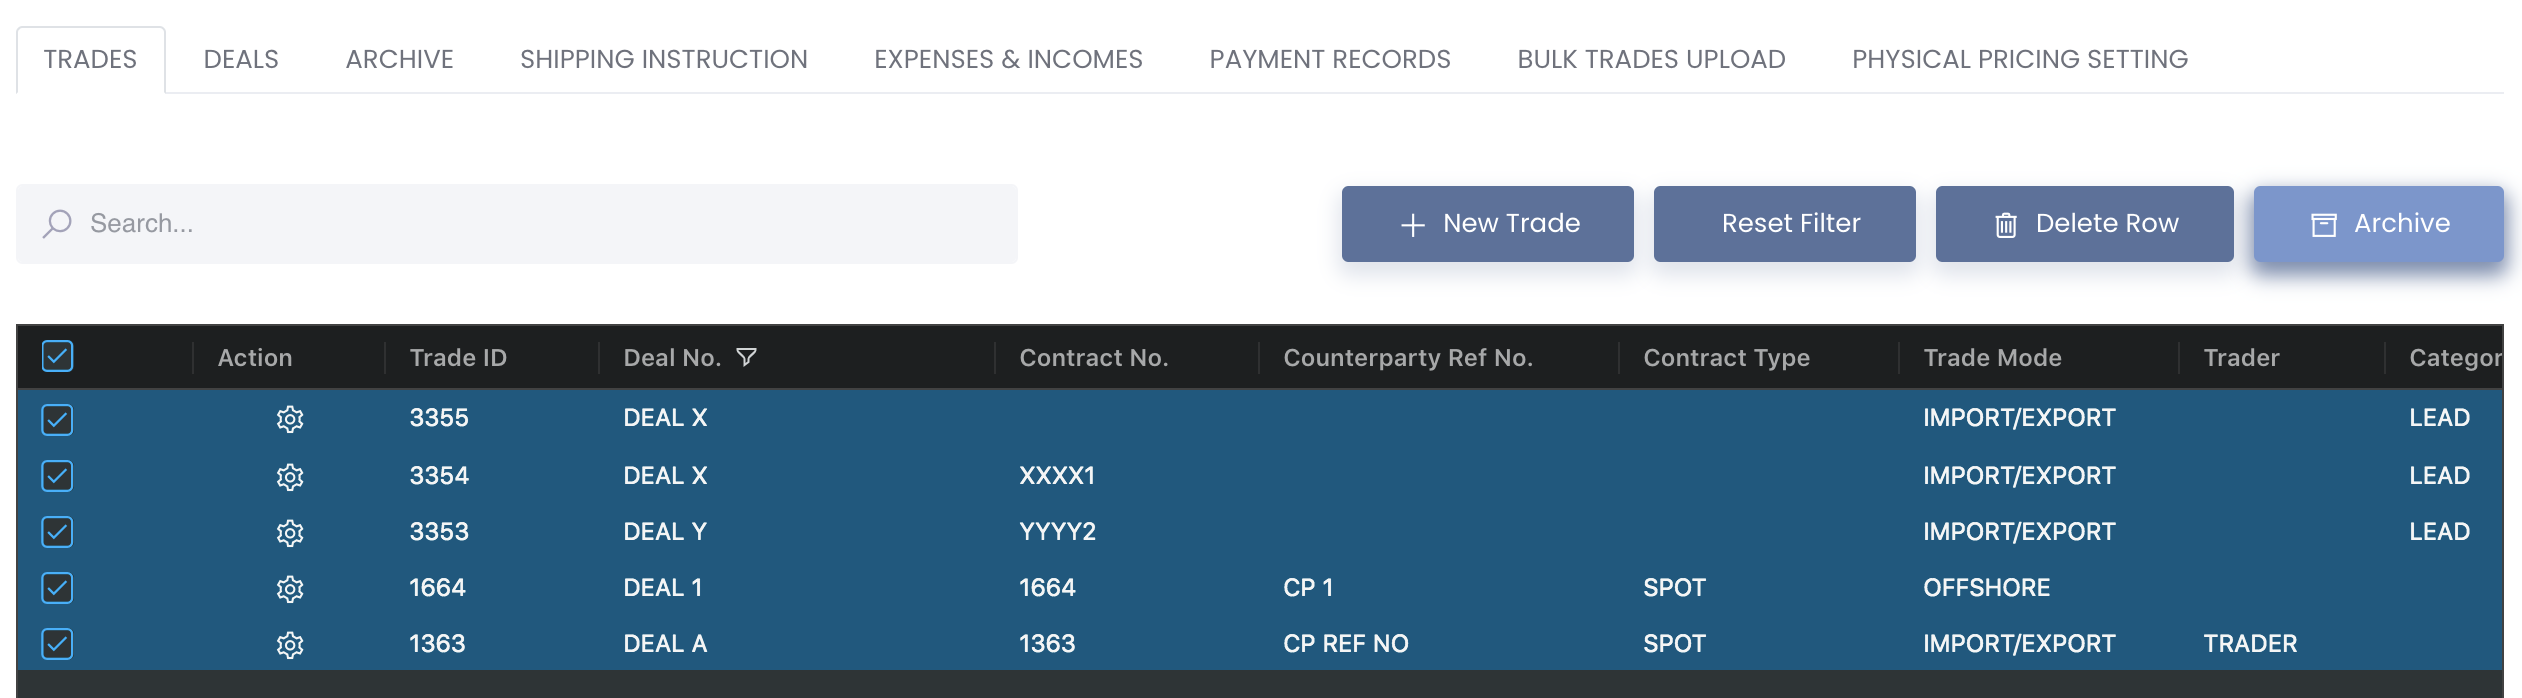
1. TRADES TAB
Viewing Physical Trades Table
To access this section, click on 'Trade', following by 'Physical Trades' from the navigation sidebar on the left. Click on the 'TRADES' tab at the top of the page to access this section.
Various information on each of your trades is provided in the table. You may refer to the List of Definitions: Trades page for a list of definitions for the column headings.
Note: Only Remarks and Doc Date are editable directly in the table.
Note: 'Outstanding Qty' with any value above "0" infers that the trade is un-settled (no title transfer date - title of goods has not been transferred or received). So if the trade has been settled/completed, you will need to input the 'Title Transfer Date' in trade execution page for the 'Outstanding Qty' to be displayed as "0". Please note that 'Outstanding Qty' cannot be negative.
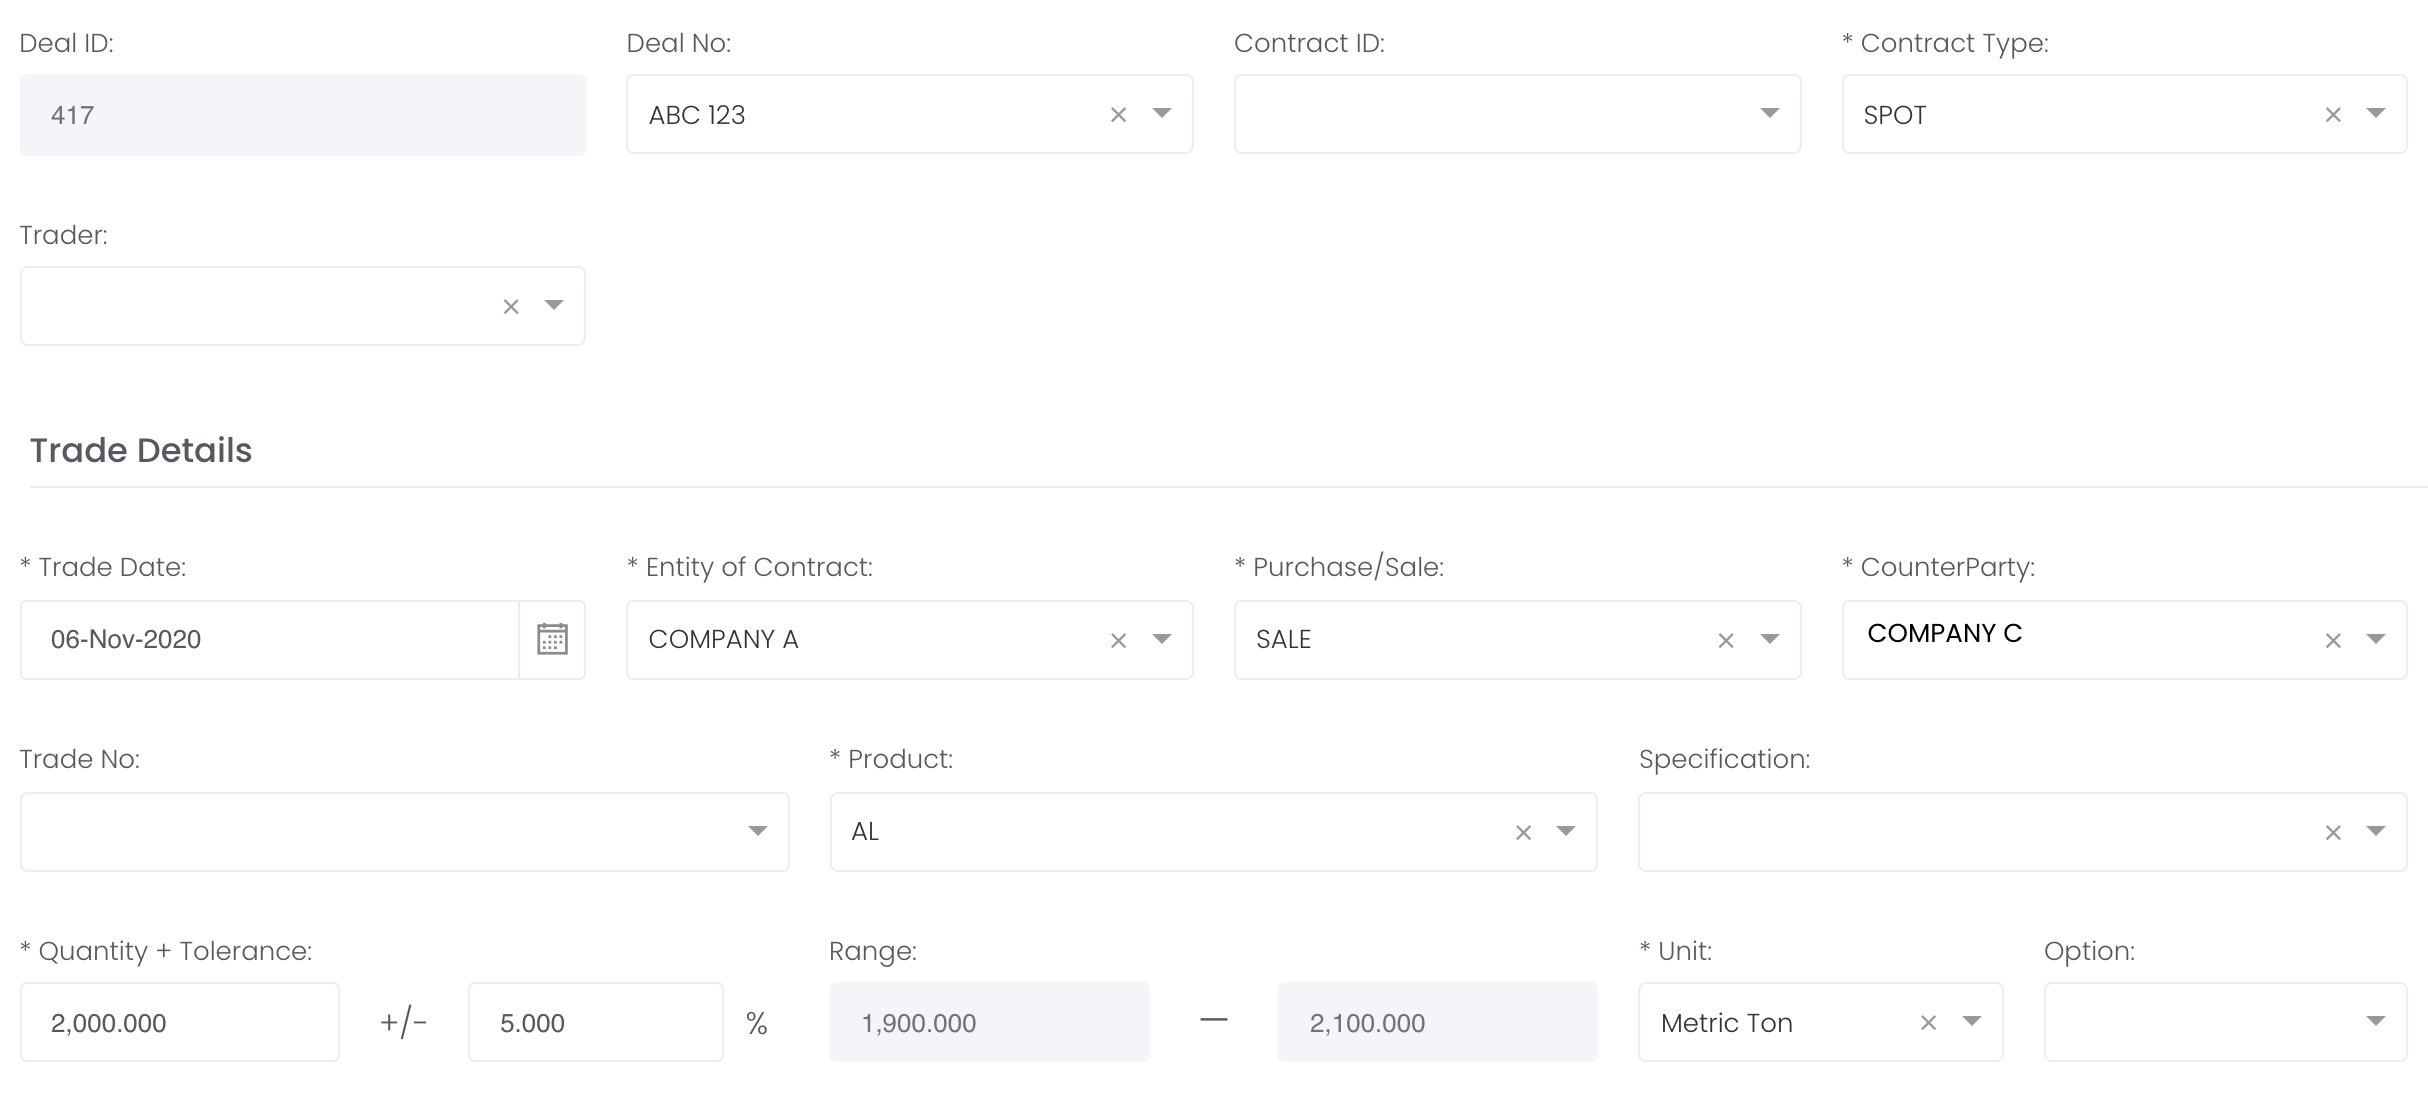
To add a new physical trade, click '+ New Trade' and you will be directed to Creating New Physical Trade(s).
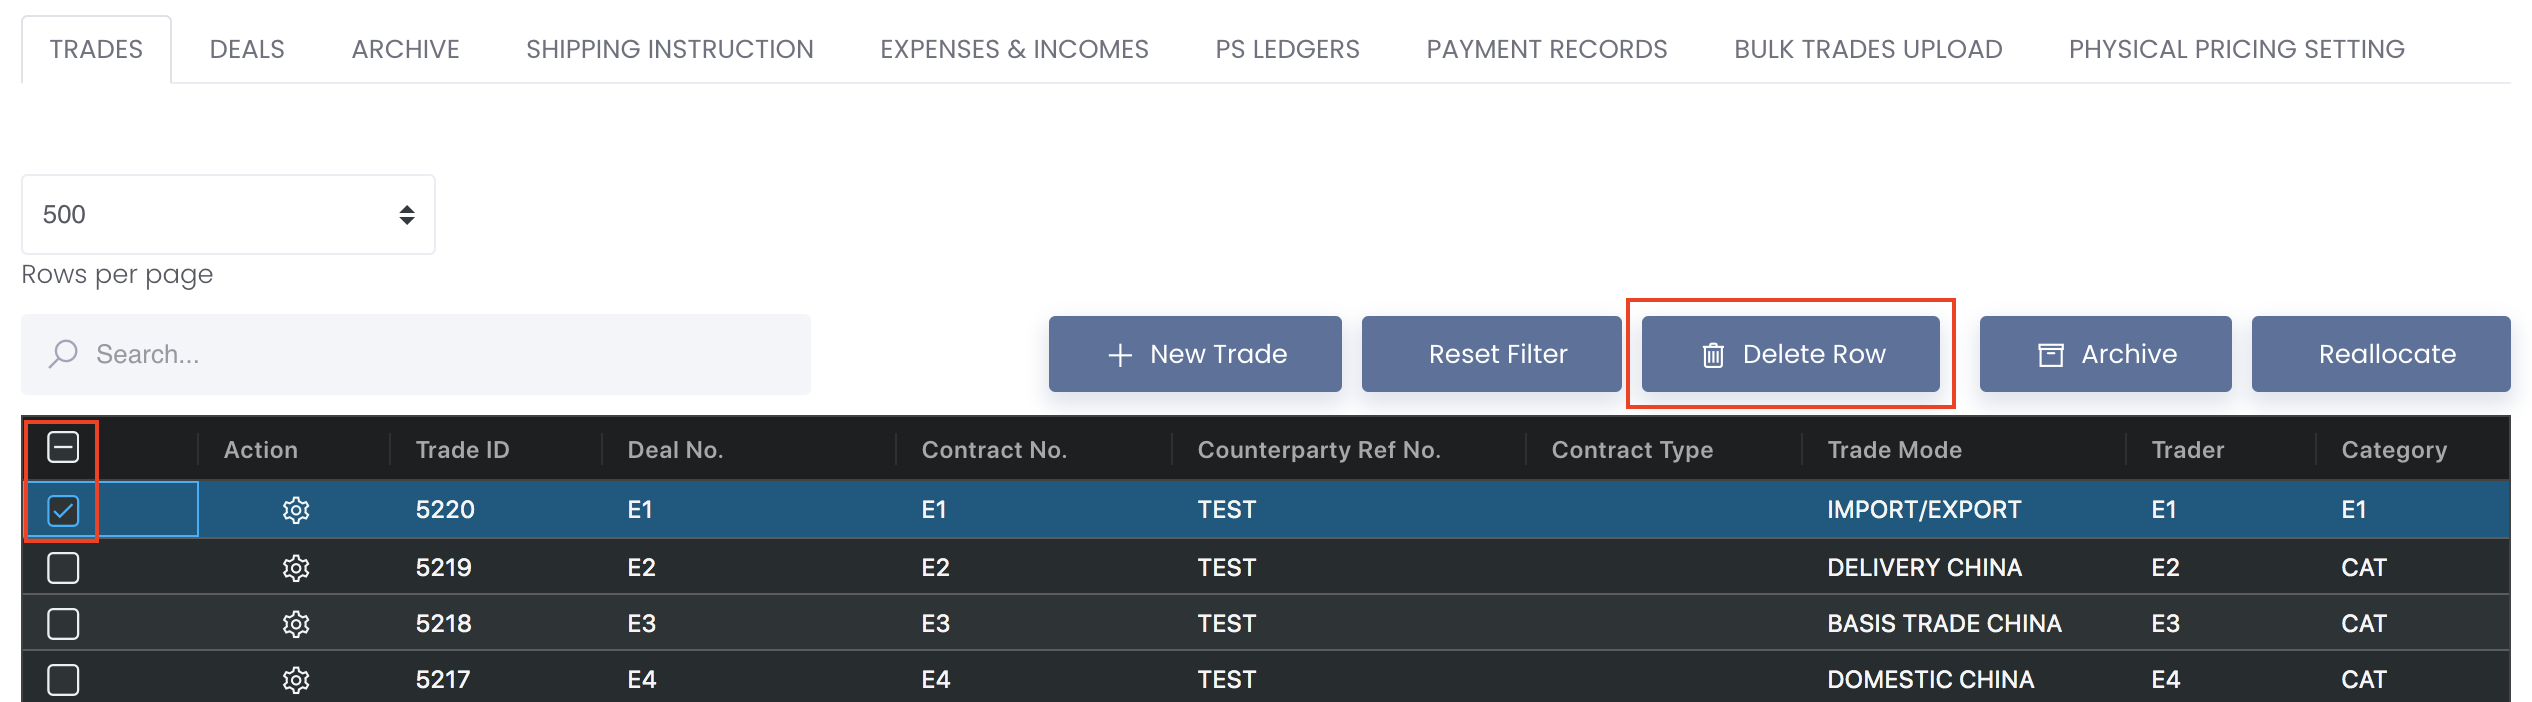
To delete your trade, tick the checkbox of the trade and click 'Delete Row'.
Please note that certain columns can be edited directly in the physical trade table; namely:
- Spec 质量标准
- Incoterm 交货方式
- Port/WH Name 交货地 (Please note that if you have set up warehouse data in Settings>Company Data>Warehouse, you will not be able to free key in this column, unless you remove all data in the Warehouse table. You will only be able to select Port/WH Name from the data you have included in the Warehouse table)
- Delivery Rule 交货期限
- Doc Date 原件归档
Bulk-Rellocate Deals
You can now bulk-reallocate a deal into a new or existing deal by ticking the trade and clicking on “Reallocate” and input the deal number. Please note that you can only bulk reallocate trades (tick trades) with the same deal number at any one time.
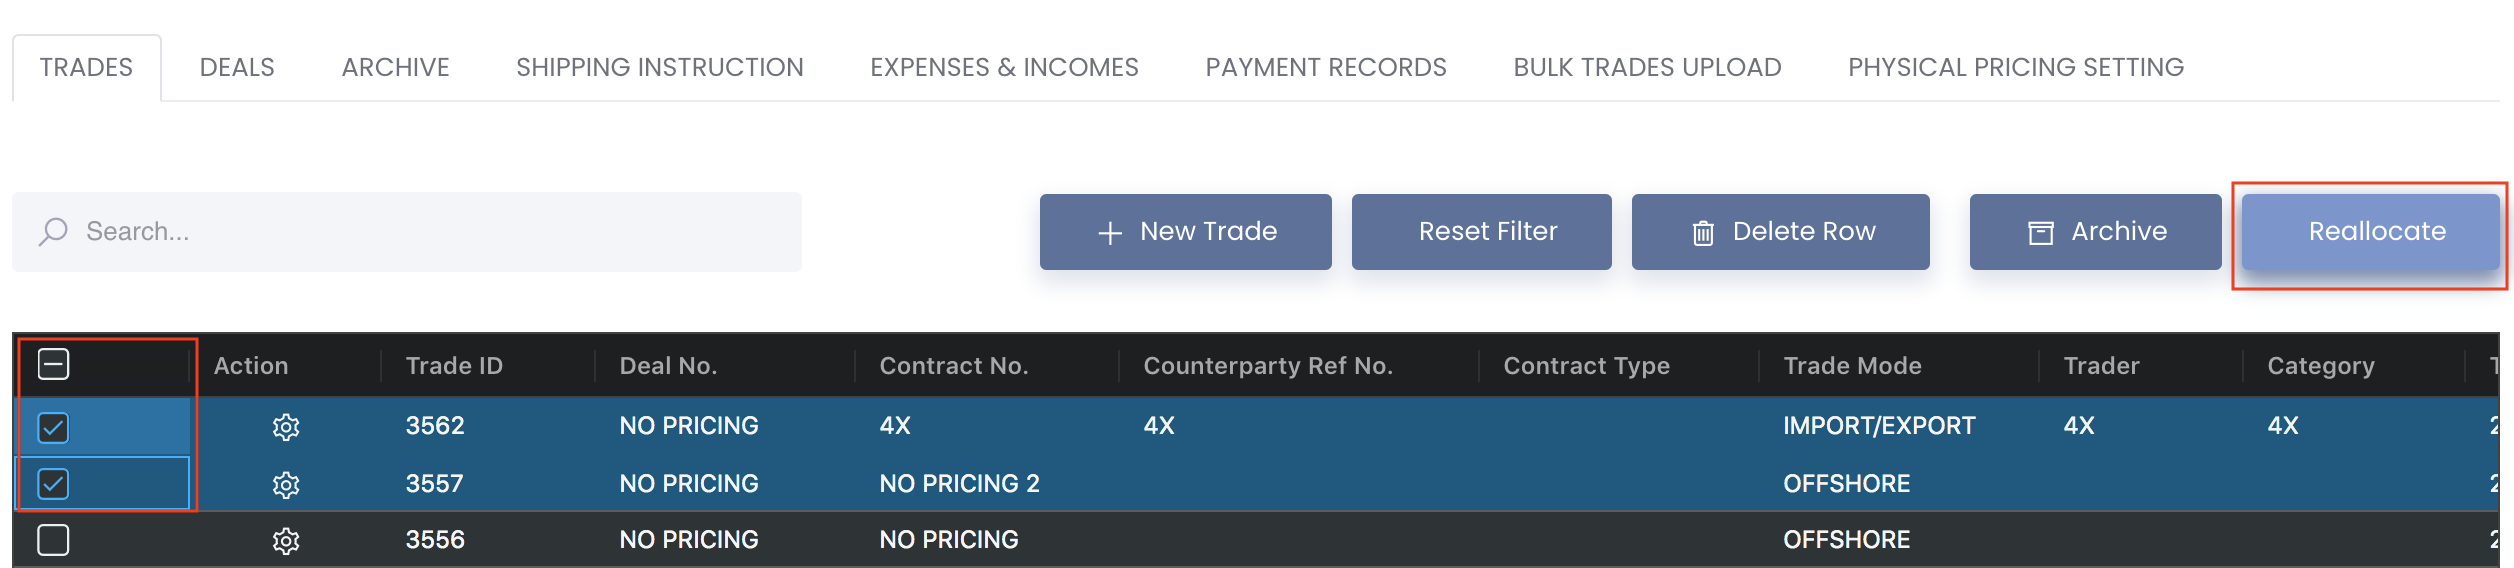
- If you reallocate the deal into an existing deal, the deal's MTM pricing details will follow that of the new deal, but the Benchmark pricing details remain the same.
If you reallocate into a deal which has one trade but without pricing, the MTM will use the selected trades' MTM
After reallocating into a deal, the existing deal if empty, will be auto deleted
After reallocating, any related expense & income item will be allocated with the trades into the new deal.
If the existing deal has no pricing and you reallocate into another deal with no pricing, the MTM will be empty as well
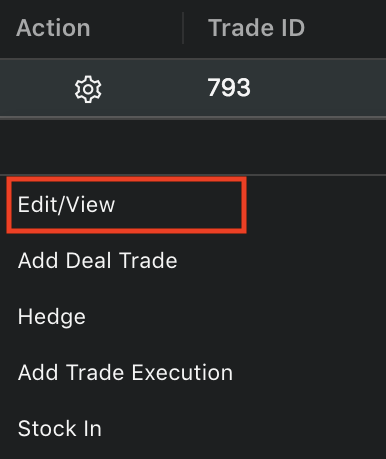
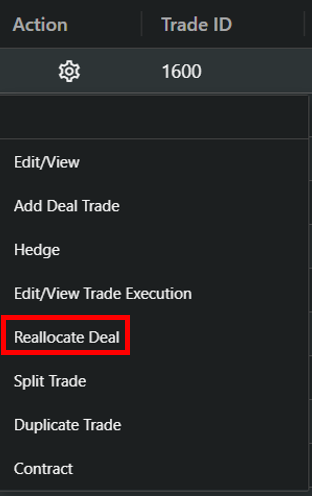
Under 'Actions' in the table, click the 'Settings' button (represented by a 'gear' icon) in each row to display all types of functions.
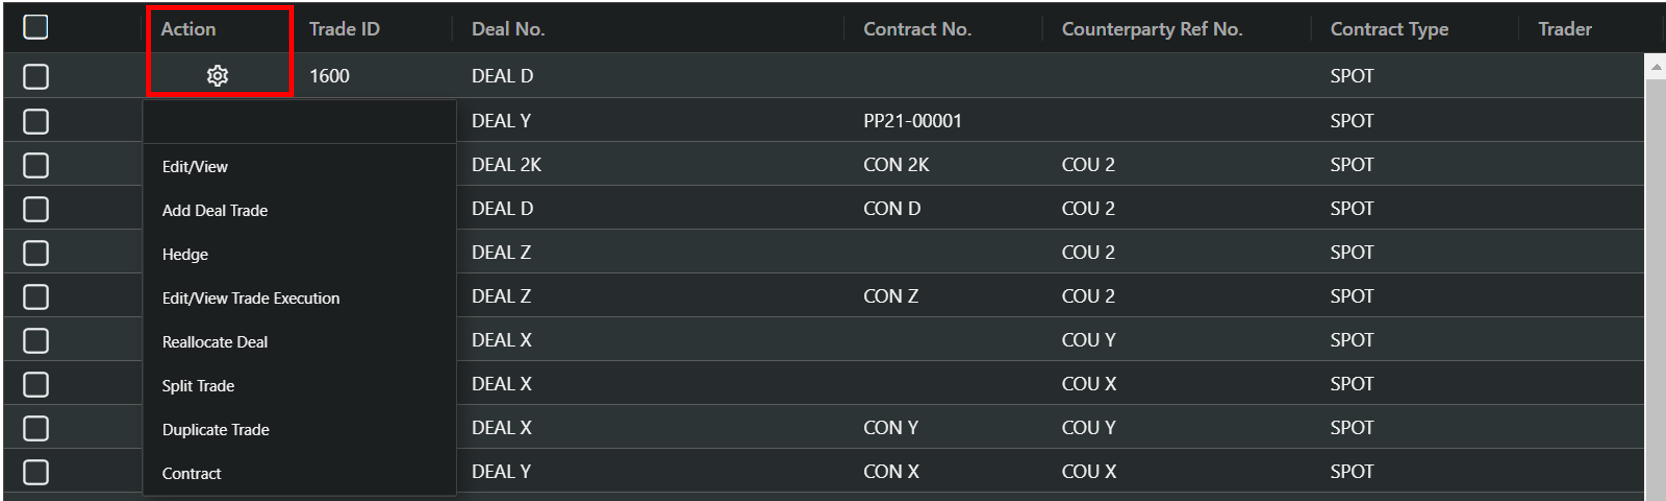
A. Edit/View
Clicking this button will direct you to edit or view your physical trade. Follow through the steps to modify your data and click 'Submit' to save the changes.
Please note that the system will auto keep edited data (if page is not saved) when click on Next button or Edit Specifications button, so when return back to the page, data will not be reset to original
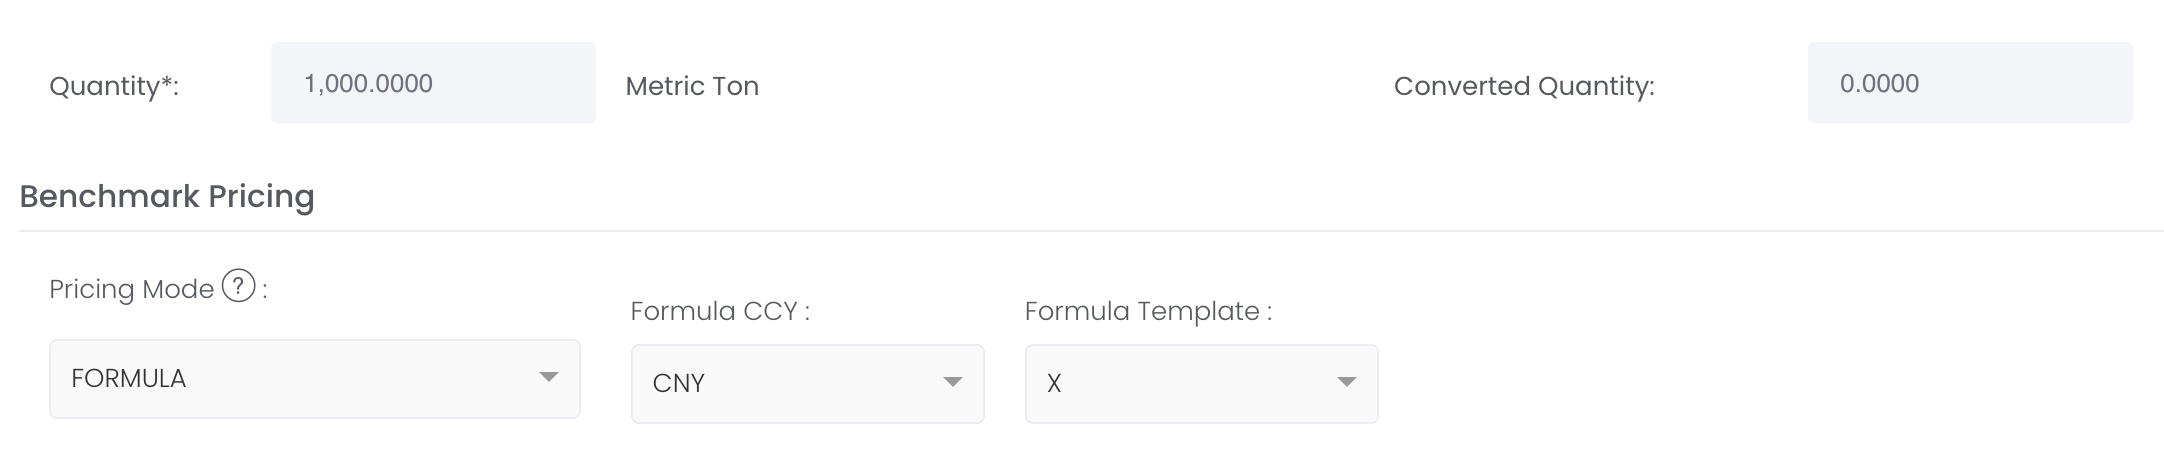
Please note that if Actual Quantity in trade execution has been input, you will not be able to modify any of the data in the Benchmark pricing page, except if the selected pricing mode is FORMULA where you will be able to modify the formula related functions only, and cannot change these data.
B. Add Deal Trade
Clicking this button will direct you to add a deal trade to your physical trade.
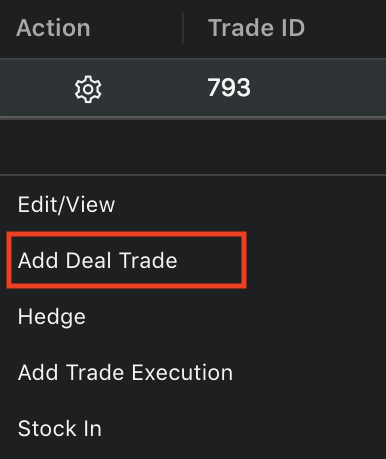
This allows you to add additional trades within the same deal, to add to or close off your existing physical trades, for example if original physical trade is listed as 'Purchase', then adding a deal trade will automatically switch to 'Sell'. Creating new trades will automatically generate a deal in the 'DEALS' tab and adding a deal trade will join the existing deal. You may refer to DEALS for more details on how you can monitor your outstanding deals and the associated profit and loss.
Add Deal Trade will duplicate the following fields:
- Contract No. (No)
- Contract Type
- Trader
- Counterparty Ref No.
Trade Mode
- Broker (No)
- Broker Ref No. (No)
- Trade Date
- Purchase/Sale
- Counterparty (No)
- Product
- Category
- Specification
- Unit
- Option
- Pricing Description (No)
- Conversion Factor (No)
- To Unit (No)
- Credit Term
- Payment Term
- Days
- Specifications Calculations (WMT, DMT, FE%, MOIS%)
- Incoterm
- Port/WH Name
- Shipping Month/Year
- Remarks
Deal ID, Deal No. and Deal Currency will follow the selected deal's details and will be uneditable.
Please note that Specifications (WMT, DMT, FE% MOIS%) can only be duplicated by selecting the Contract No. in the specifications page. Please refer to Iron Ore Product Group - Specifications to learn more.
The steps are the same as Creating New Physical Trade(s) and you can click 'Submit' when done.
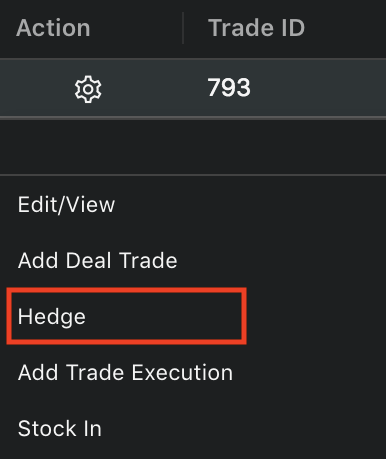
C. Hedge
Clicking this button will direct you to create a new paper trade to hedge your physical trade exposure. The steps are the same as Creating New Paper Trade(s). When you click Add Row, the Portfolio, Category and Trader (if filled in physical trades) will be auto-filled. You can click 'Submit' when done.
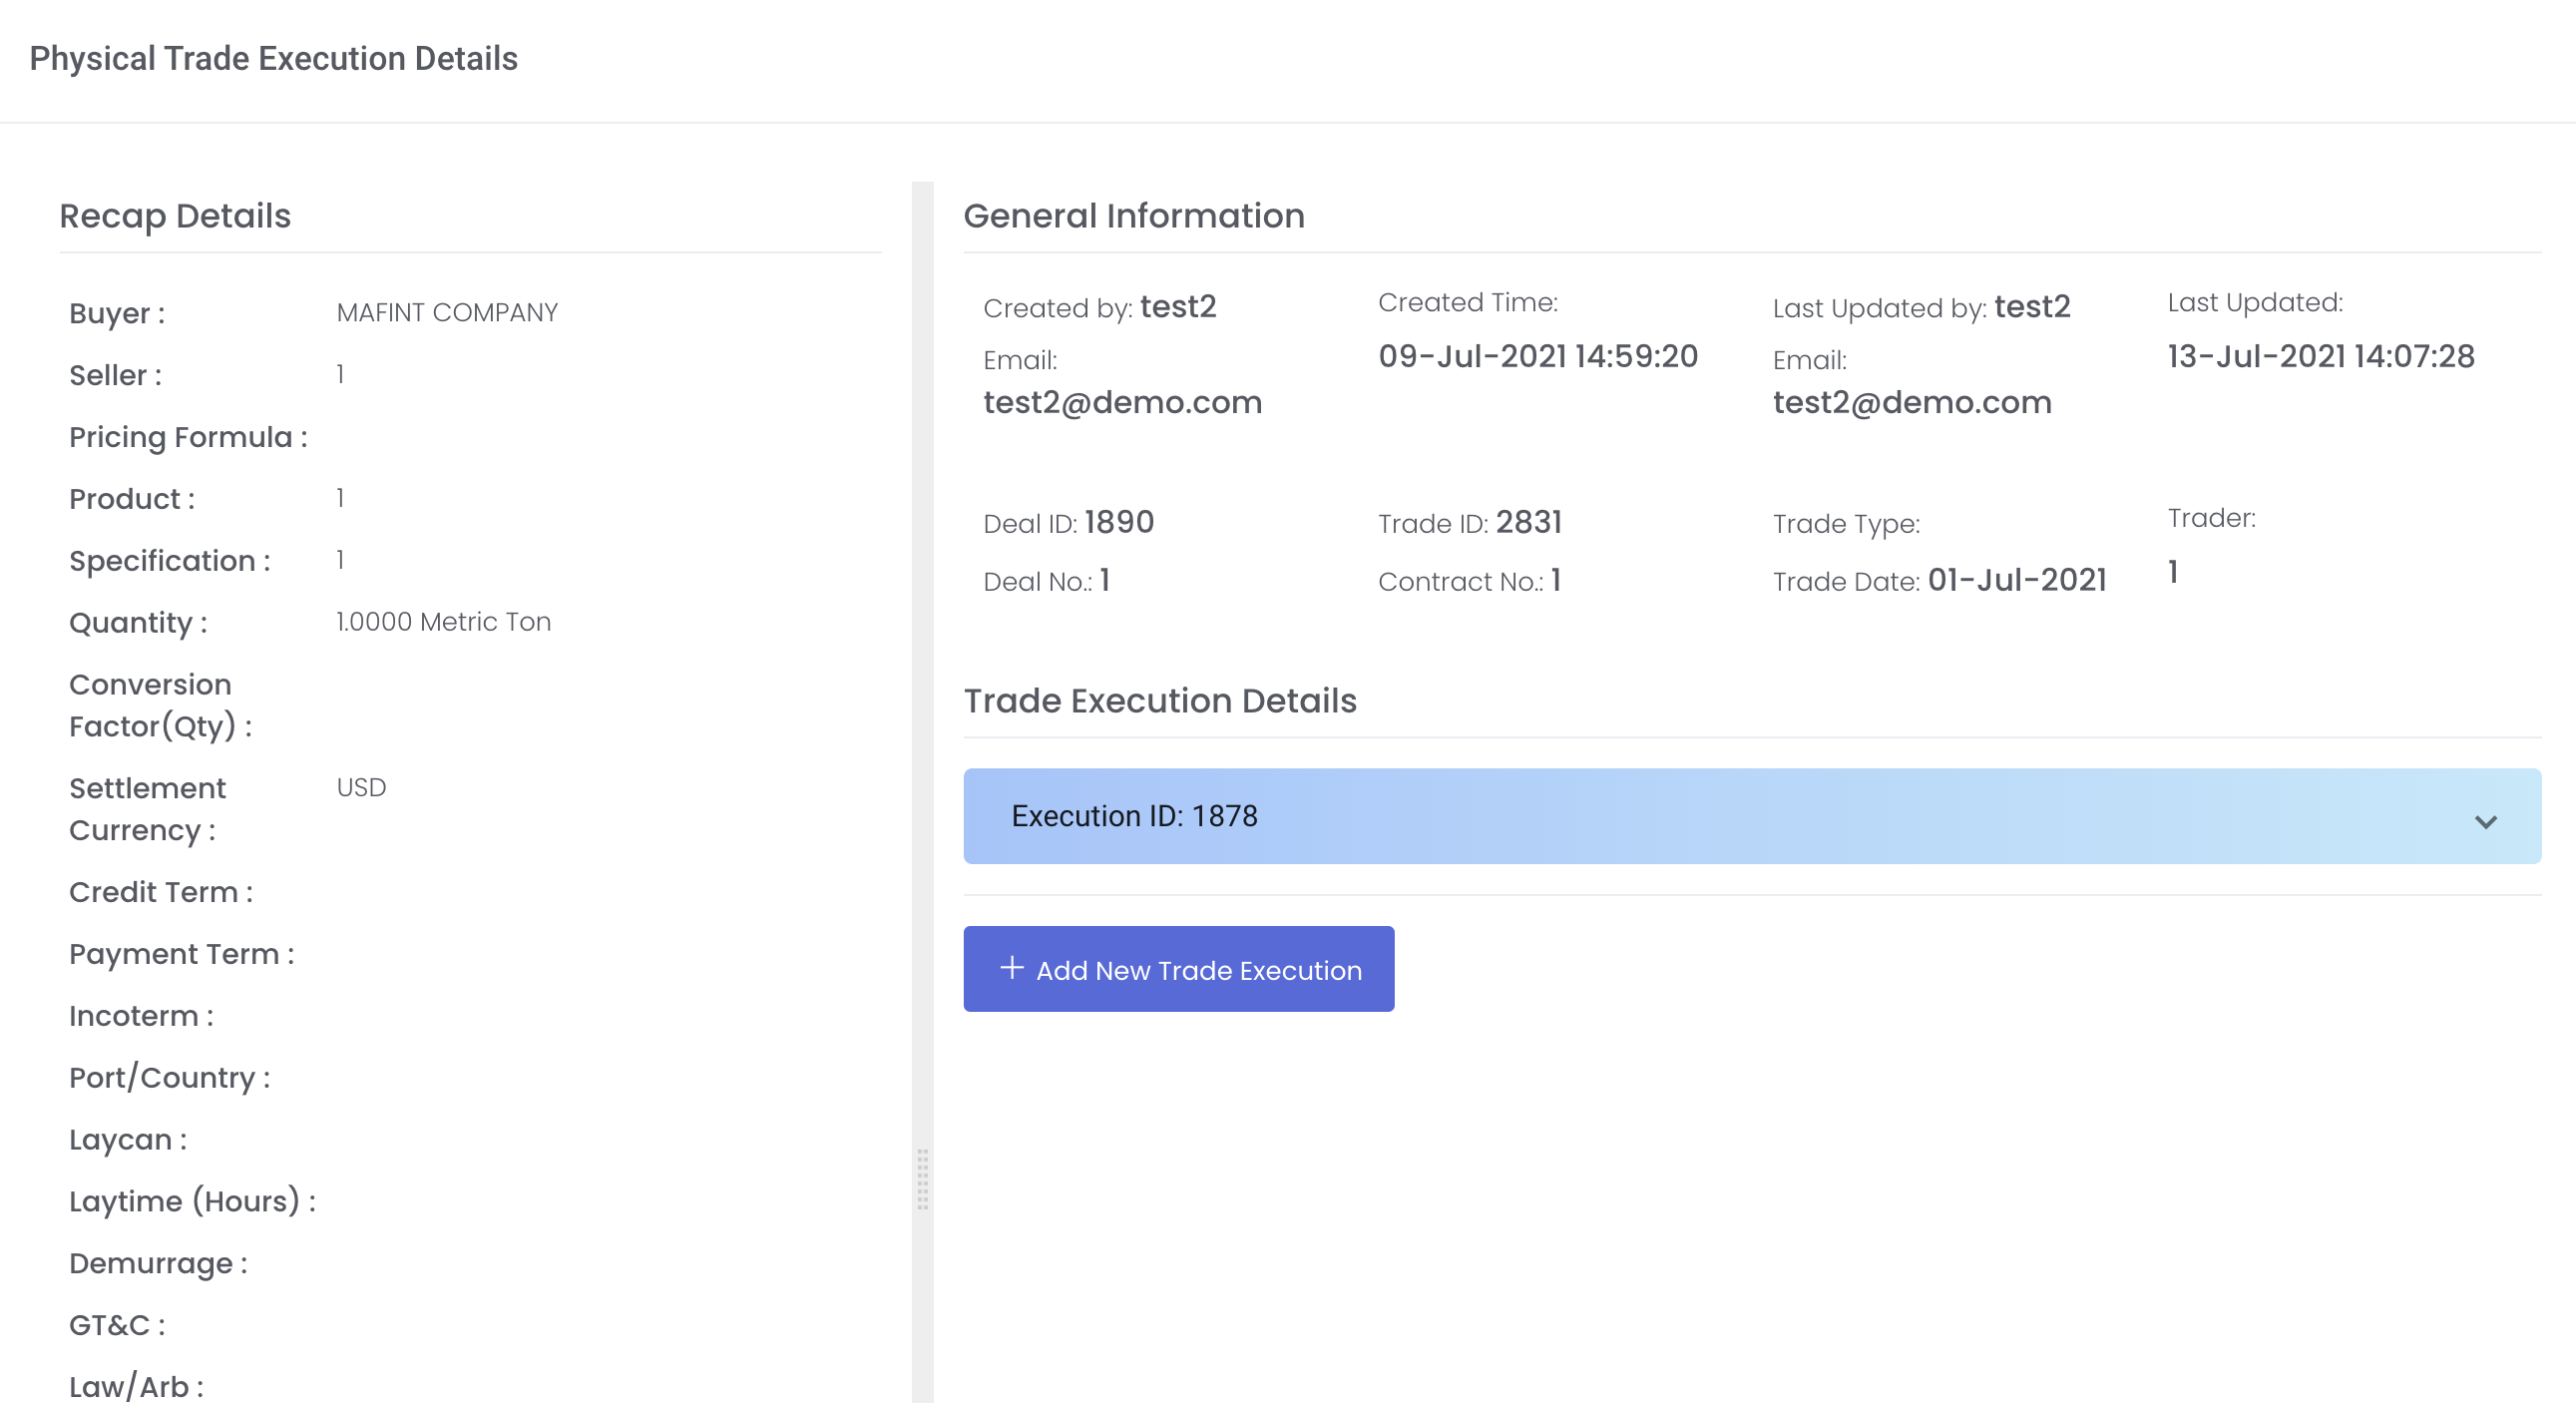
D. Edit/View Trade Execution
Click on the Edit/View Trade Execution button will direct you to the 'Physical Trade Execution' page. This allows you to add/edit/view associated physical trade execution to record and monitor the execution of your trades.
To add new trade execution, click on 'Edit/View Trade Execution' and you will be directed to the trade execution page. Click on 'Add New Trade Execution' to open a new trade execution section.
New columns update:
LC Issuing Date 开征日期
Presentation Period 交单期
sample data: within 14 days after LC issuing date/BL date
Change DP/LC Sub Date: to LC Issuing Date
The Product Group (shown after Trade Type in General Information section) you chose earlier in the physical trade page will affect the fields here as well, where the fields in the physical trade execution page will be adjusted accordingly to the product group you select:
- Default (all fields will be displayed as per normal)
- Iron Ore (includes all fields in default layout except Laycan Period, all items from Show LoadPort and Show Disport, and Claims Details)

Once you select, the Product Group will remain as your selection until you change. You may return to the physical trade's page by clicking on the Edit/View button in Physical Trade table and change the product group, and the fields to be filled in physical trade page and physical trade execution page will be adjusted accordingly.
If you only have 1 trade, the pricing block will auto-select that trade. If you have multiple trades, you will need to select each trade in the pricing block in each trade execution panel (click 'Add New Operation Execution at the bottom of the page).
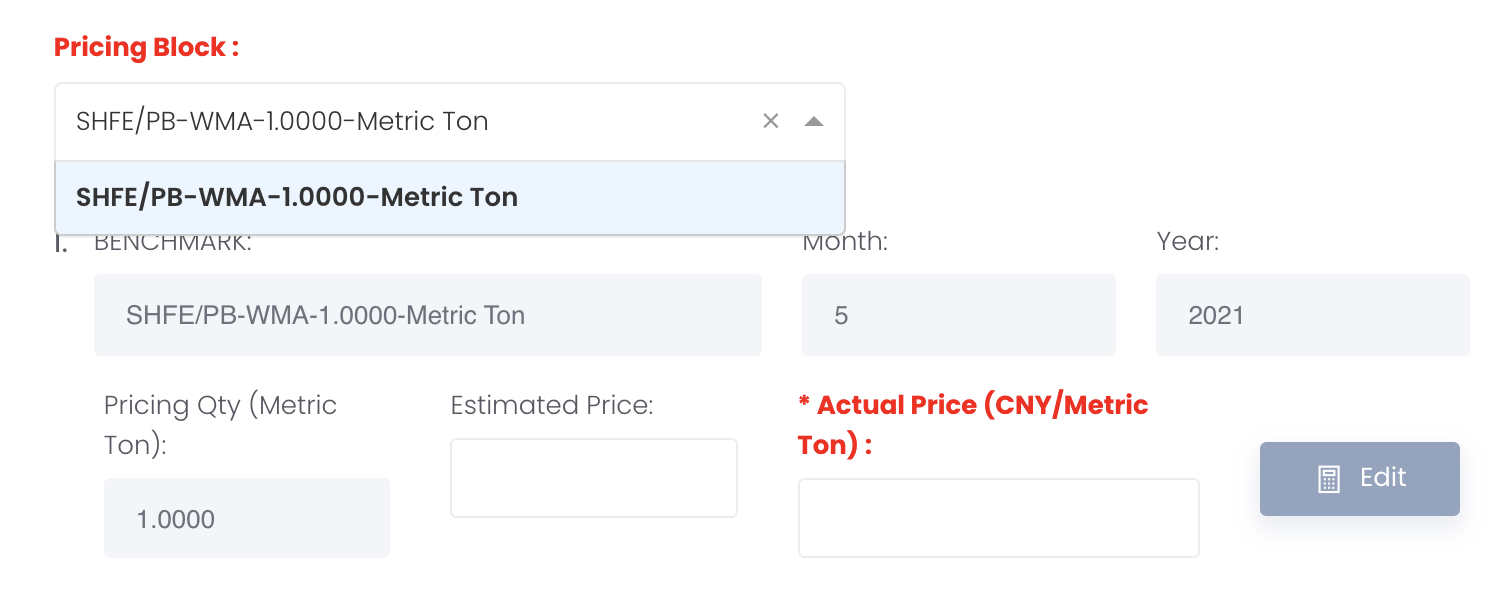
Select the pricing block and fill in the details required for the execution of your trade accordingly. All fields are optional. To delete the trade execution, click on the 'Delete' button at the bottom of each trade execution.
Once done, click 'Save' at the bottom of the page to save the trade execution details and the trade execution will be appear in the Trade Execution List table in the Physical Trades page.
Auto-fill Title Transfer Date
To auto-fill your trades' Title Transfer Date with their Trade Date, click on AUTO TTD above the Trade Execution table and all the trades with no Title Transfer Date will be auto-filled with their Trade Date. Click on Save Changes to bulk-update successfully.

EDIT TRADE EXECUTION DETAILS
You may edit certain columns directly in the table; namely:
- Trader
- Category
- Product
- Contract No.
- Contract Quantity (If have actual quantity, cannot edit contract quantity in edit physical trade page, but can edit contract quantity directly in trade execution table)
- Title Transfer Date
- Estimated Price
- Provisional Price
- Actual Price
- Actual Quantity (If have actual quantity, cannot edit contract quantity in edit physical trade page, but can edit contract quantity directly in trade execution table)
- Premium
- Exchange Rate
- Custom Tax Rate
- Pricing Date
- Pricing Contract
Execution No.
Counterparty Ref No.
Spec
Payment Date
Remarks
PortInco TermDelivery RuleDoc Date
Otherwise, you may bulk upload the details by clicking on 'Bulk Exe Update' and either input the new details manually or click on 'Download Template' to download the template, fill in the details and upload the file. The trade execution details will be auto-replaced by the new details you have submitted.
- Please be reminded to upload the correct language version of the file into the system. For instance, if you are using the English version in the system, you will be required to upload the file with the English headers.
Note: If you leave the details empty in any column in the bulk exe update page, the system will take it as the field is empty and will replace your current fields. So please ensure the fields are filled and not keep them empty as necessary.
Trade with Fixed Price do not need to fill in Estimated Price.
The AUTO TTD checkbox is ticked by default. If ticked, the Title Transfer Date column will not appear in the Bulk Exe Update table so Title Transfer Date will not be updated (any existing Title Transfer Date of the trade will remain unchanged). If unticked, Title Transfer Date column will appear in the table for you to fill in.
Editing of Contract Quantity in trade execution table and Bulk Execution Update table:
Can change Contract Qty in trade execution table and bulk execution update table even when Actual Qty is filled
Cannot change Contract Qty in trade execution table and bulk execution update table if the trade has multiple pricing blocks (eg 1000 MT split into 400 MT and 600 MT)

In the trade execution page,
Split Quantity: To split the quantity in the trade to allow each quantity to have its own trade execution, click on the 'Edit' button and key in the quantity to split out from the total quantity. A new pricing block with the split quantity will be generated. You will need to click on the 'Add New Operation Execution' button at the bottom to select the new pricing block to create its trade execution.
The following fields will generate values automatically:
- 'Pricing Block' will automatically be selected if you only have 1 pricing on your physical trade pricing page. Otherwise, you will need to manually select the pricing block to create its trade execution.
- Provisional Value = 'Provisional Qty' * 'Provisional Price'
- Final Price = Actual Price + Premium
- Final Value = ('Actual Qty' or 'Converted Actual Qty') * 'Final Price' (quantity used will depend on the unit matched). Once you key in 'Actual Quantity', you will not be able to click 'Edit' to adjust the pricing quantity.
- 'Demurrage Rate' can be obtained directly from Demurrage.
Note: If your pricing mode is FIX, you do not need to update the actual price in the trade execution page as it will be displayed automatically. If your premium/discount pricing mode is FIX, you can only edit your premium/discount details in the pricing page, and not in the trade execution page. If you have already keyed in "premium/discount" amount in the pricing page, the "actual price" you key in the trade execution page should exclude the "premium/discount" to prevent double counting.
Inputting 'Title Transfer Date' will replace 'Trade Date' in PORTFOLIO page (under TRADES table). If 'Title Transfer Date' is removed, the original 'Trade Date' will be displayed. 'Title Transfer Date' cannot be after Today's Date.
Note: Title transfer date cannot be earlier than the physical trade date and cannot be after today's date.
Note: If ACTUAL QUANTITY, ACTUAL PRICE and TITLE TRANSFER DATE are not filled yet, the cells will be in red to remind you to fill in to settle the trade fully.
QTY DSP (Quantity Discrepancy) column: Sometimes, in one deal, buy and sell actual qty could not be 100% matched, e.g, bought 1001 MT, and sold 1001.2 MT (sometimes, weight could be changed due to some reasons like package changes, transportation issue etc). But for the system, it does not know if it is real difference or key wrongly, so it shows DEAL QTY DSP (dsp = discrepancy) for user to double check.
Shows Deal Qty Dsp column in red will indicate either:
Actual qty of purchase and sale contract is not equal, so prompts user to check, or
Actual qty of either purchase or sale contract is filled in, but not closed yet as either corresponding sale or purchase is not available yet. Will show in red as long as one trade has actual qty
if 1 trade does not have actual qty, system will not check so will not be in red
This issue only comes when user fills up all the key information and we do final check for them to make sure the trade is done
CURRENT LOGIC:
- If the contract is not sold yet, P/L will remain as unrealised P/L, even when TITLE TRANSFER DATE is input. So once contract is sold, it will be closed and P/L will be realised P/L
- To close a contract, ACTUAL PRICE and TITLE TRANSFER DATE must be input
- Only contracts with the same CATEGORY can close each other
- For contracts under the same CATEGORY, sales contract must have TITLE TRANSFER DATE and ACTUAL PRICE to close purchase contract; purchase contract will be closed on a FIFO basis; CLOSE DATE of the closed contract will be the same as the sales contract's TITLE TRANSFER DATE
- HEDGE RATIO, POSITION MATRIX and PHYSICAL TRADE INVENTORY app will only show outstanding positions. If ESTIMATED PRICE or ACTUAL PRICE is input, the contract will not show in the app
- WMT, DMT, FE% and MOIS% will automatically be displayed in the table once Specifications are filled
- Formula Name and Formula will automatically be displayed in the table once Formula pricing is filled
In VIEW PORTFOLIO page,
- If ACTUAL PRICE has been input but 'Title Transfer Date' is still empty, it will be considered as an OPEN POSITION (trade will appear in OPEN POSITION table) and PRICED IN will be TRUE.
- If ACTUAL PRICE has not been input but 'Title Transfer Date' is filled/not filled, it will be considered as an OPEN POSITION (trade will appear in OPEN POSITION table) and PRICED IN will be FALSE.
- If ACTUAL PRICE has been input and 'Title Transfer Date' is filled, it will be considered closed and the trade will appear in the CLOSED POSITION table and PRICED IN will be TRUE.
- If ESTIMATED PRICE has been input but ACTUAL PRICE is not input, and 'Title Transfer Date' is filled/not filled, it will be considered as an OPEN POSITION (trade will appear in OPEN POSITION table) and PRICED IN will be TRUE.
- In short, the trade will only be considered CLOSED if the ACTUAL PRICE and TITLE TRANSFER DATE are filled. Otherwise, the trade will remain in the OPEN POSITION table as unrealized P/L.
- Once MTM positions are closed, they will not be shown in the CLOSED POSITIONS table and will only show in TRADES table
Note: ESTIMATED PRICE can only be filled if the pricing mode is not FIX; namely, FLOAT, WMA and SPOT.
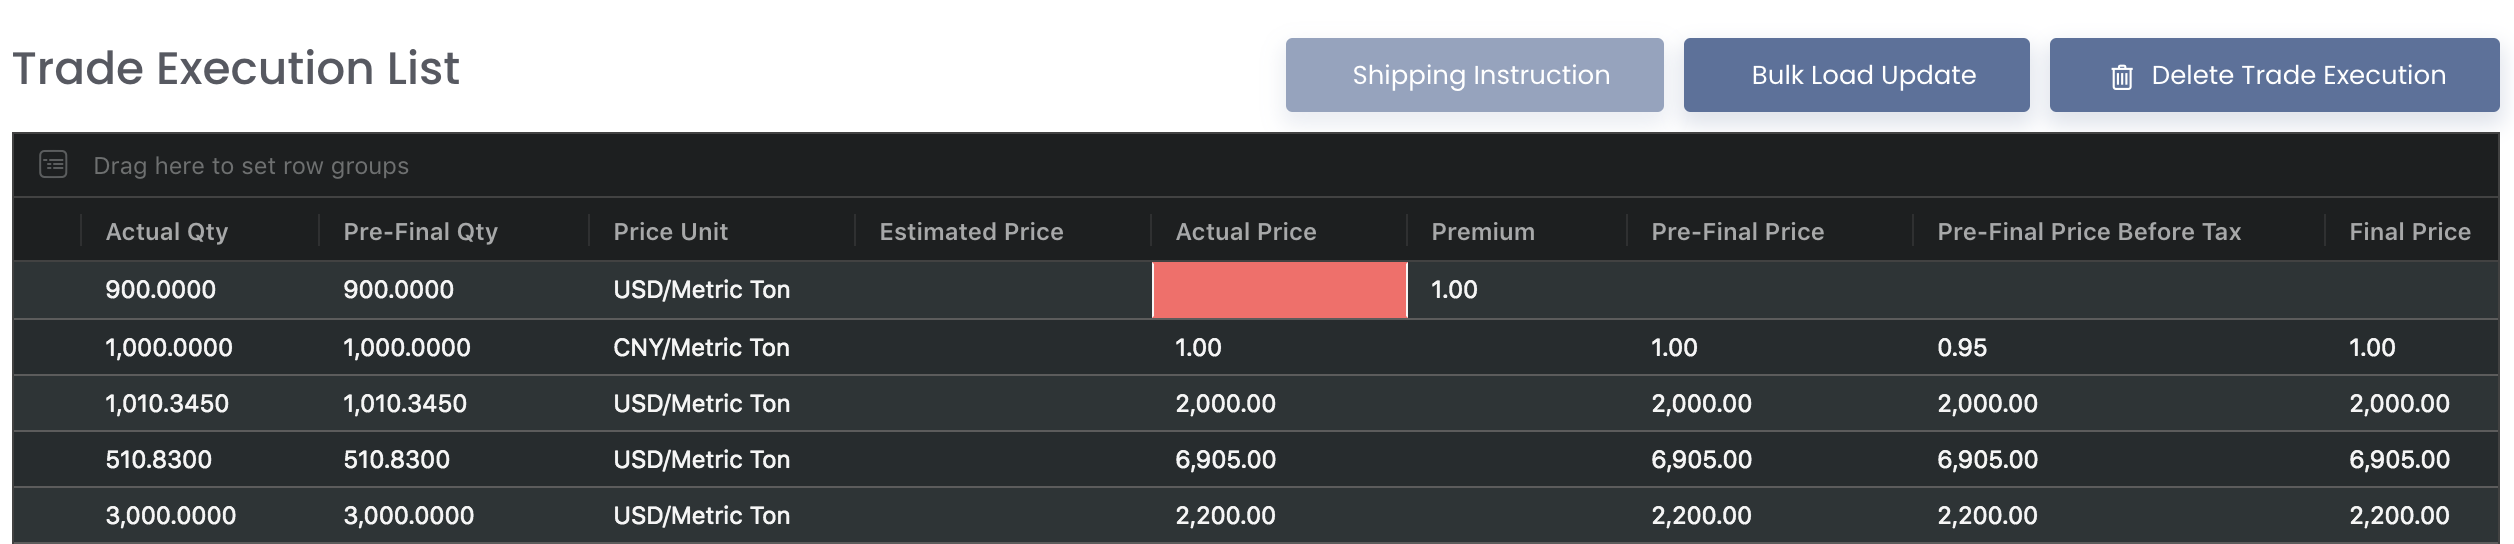
VIEW TRADE EXECUTION LIST TABLE (CALCULATIONS)
The columns will be auto-reflected once inputs are available:
- PRE-FINAL QTY = ACTUAL QUANTITY or CONTRACT QTY: If ACTUAL QTY has been input, ACTUAL QTY will be displayed. Otherwise, CONTRACT QTY will be displayed instead.
- PRE-FINAL PRICE = (ACTUAL PRICE or ESTIMATED PRICE) + premium: If ACTUAL PRICE is input, ACTUAL PRICE will be displayed. Otherwise, if ESTIMATED PRICE is input, ESTIMATED PRICE will be displayed instead. It will then be added with PREMIUM to form PRE-FINAL PRICE. If both ACTUAL PRICE and ESTIMATED PRICE are not input yet, this field will remain empty
- PRE-FINAL PRICE BEFORE TAX: PRE-FINAL PRICE/(1+tax rate) or CARGO VALUE BEFORE TAX / PRE-FINAL QTY
- FINAL PRICE: ACTUAL PRICE + PREMIUM (if actual price has value)
- CARGO VALUE = PRE-FINAL PRICE * PRE-FINAL QTY (this is offshore amount, sort of like purchase amount)
- CARGO VALUE BEFORE TAX = CARGO VALUE * EXCHANGE RATE + CUSTOM TAX AMOUNT / (1+tax rate) eg cargo value before tax = cargo value (2k) * ex rate (5) + custom tax (10) [10010] / 1.05 (tax rate = 5%) = 9533.33
- PRICED IN = TRUE (if actual price or estimated price has value), otherwise will be FALSE
Note:
If pricing mode of a trade is FIXED, its Estimated Price cannot be input
If pricing mode of a trade is FIXED, its Actual Price cannot be empty
If a trade has Premium, it can be 0.0 (can be edited) but cannot be deleted in the trade execution table
If Estimated Price and Actual Price are not input but Premium is input, Pre-Final Price will remain empty until Estimated Price and Actual Price are input
CARGO VALUE AMOUNT
To convert other currency into portfolio currency or deal currency, it will be divided by the exchange rate. If the product currency is eg CNY, then CARGO VALUE BEFORE TAX will divide by the exchange rate (will use input exchange rate, otherwise will use system exchange rate)
eg exchange rate is 10; custom tax is 5
cargo value = actual qty * actual price = 5,000,000
cargo value before tax = 5,000,000 * 10 (ex rate) + 5 (custom tax) = 500,005
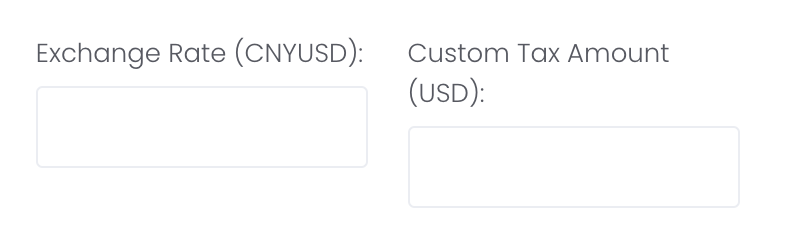
When trading company imports or exports cargo, there will be custom tax charge or refund by government, and they will be involved in currency exchange as well. So this information has to be input for accurate profit and loss calculation.
EXCHANGE RATE
For example USD/CNY:
1st currency is the currency of the product in the physical trade pricing page, which is also the currency for FINAL VALUE
2nd currency is the settlement currency of the create physical trade page (under PAYMENT DETAILS), which is USD by default.
If you input your own Exchange Rate on the trade execution page, it will replace the system’s exchange rate and provide calculations accordingly in Portfolio P/L Details model. Please note that the P/L calculations in View Portfolio page will continue to use system’s exchange rate and not use your own exchange rate.
CUSTOM TAX AMOUNT
- Any amount input here will be added automatically into the EXPENSES & INCOME table to indicate an expense and in the OTHERS column in the Portfolio P/L Details model. When you input or edit CUSTOM TAX AMOUNT, the date in expense/income table will reflect yesterday's date by default.
The default currency is the settlement currency of the create physical trade page (under PAYMENT DETAILS)
3 WAYS TO SPLIT QUANTITY IN TABLE
- Split quantity using pricing blocks in physical trade pricing page: Split quantity in trade to allow each quantity to have its own trade execution but physical trade details (eg counterparty) remain the same. This works the same as point 2. Click here to learn more.
- In physical trade pricing page, click on the '+ Add Block' button and key in the quantity. You will need to ensure that the total quantity in the pricing blocks in this page match the 'Quantity' in the previous page (click the 'Back' button at the bottom to go back to the previous page).
- Split quantity using pricing blocks on trade execution page: Split quantity in trade to allow each quantity to have its own trade execution but physical trade details (eg counterparty) remain the same. This works the same as point 1.
- In trade execution page, click on the 'Edit' button and key in the quantity to split out from the total quantity. A new pricing block with the split quantity will be generated. Click here to learn more.
- Split quantity using button in physical trade table: Split quantity in trade to allow allocation to different counterparties. Click here to learn more.
- In physical trade table, click on the 'Settings' button followed by 'Split Trade' and key the quantity to be split to the new counterparty.
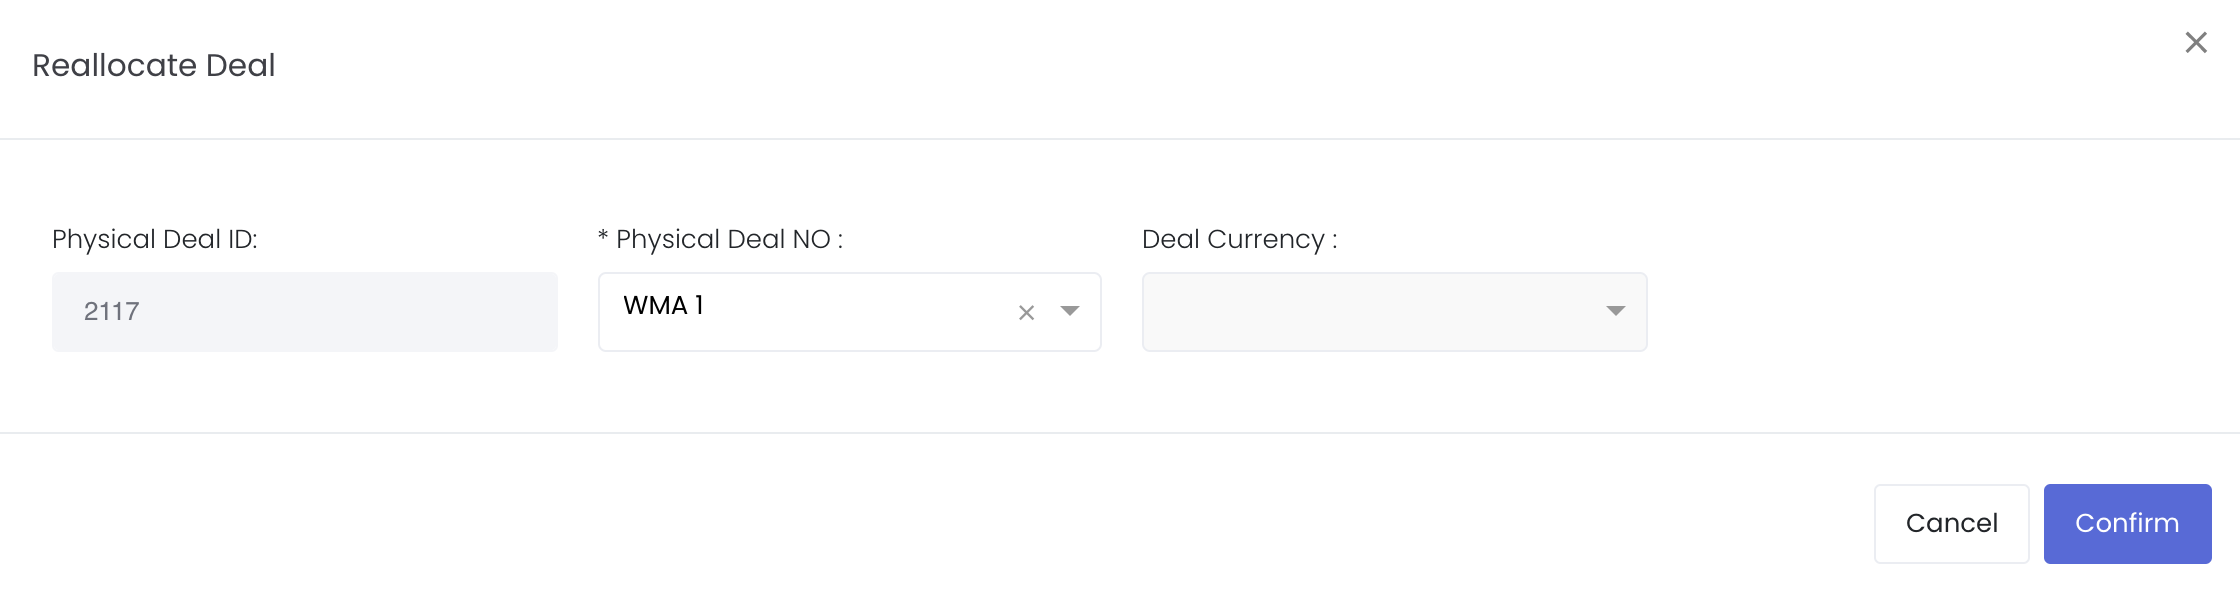
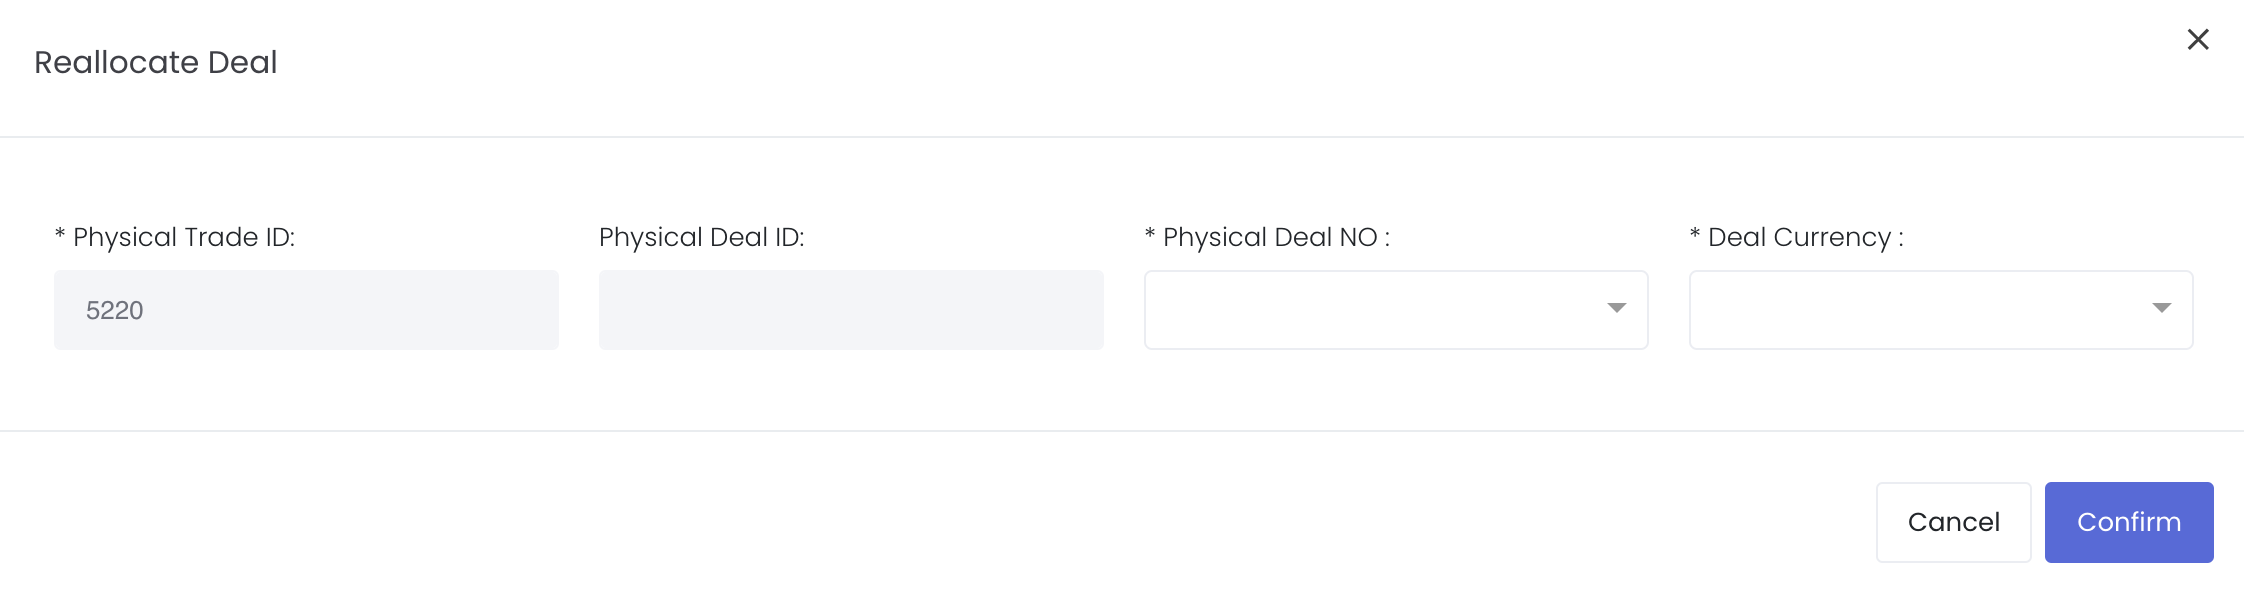
E. Reallocate Deal
To reallocate a trade into another deal, under 'Actions' in the table, click the 'Settings' button (represented by a 'gear' icon) of the row and click 'Reallocate Deal'.
You can choose to fill in:
a. Existing 'Physical Deal No': Trade will be reallocated directly into the existing deal. Note: If the to-be-reallocated trade's pricing details (BENCHMARK & MTM) have been filled or empty and the trade is reallocated into an existing deal with an existing pricing details, the quantity and the pricing method (BENCHMARK) of the trade will remain but the pricing method (MTM) will follow the deal that it is reallocated to.
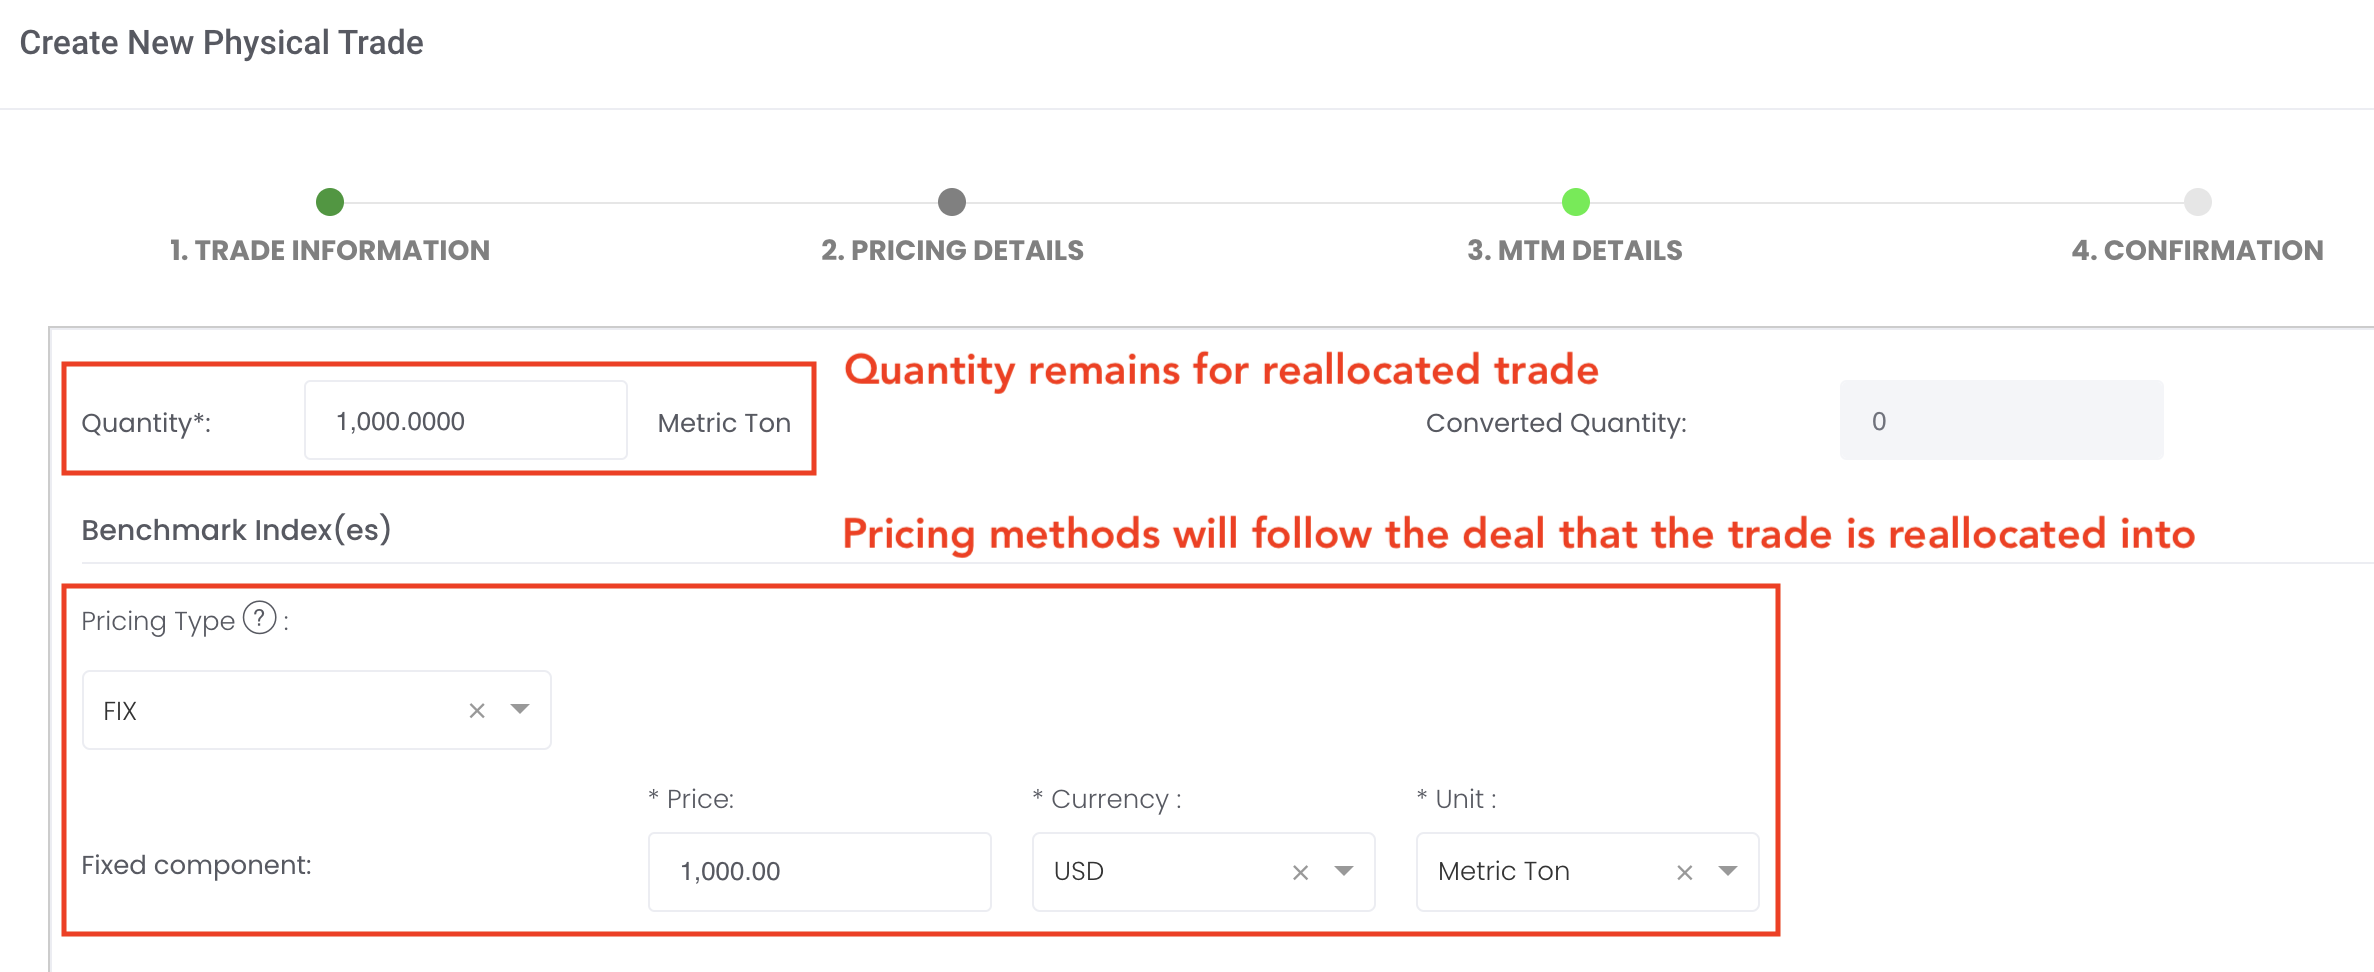
b. New 'Physical Deal No': Trade will be reallocated directly into the newly created deal (new deal number that you input).
'Physical Deal ID' will be automatically generated once you input the deal number. Click 'Confirm' when done and the trade will be allocated successfully into the deal.
F. Split Trade
To split the quantity of a single trade and allocate it to another 'COUNTERPARTY', under 'Actions' in the table, click the 'Settings' button (represented by a 'gear' icon) of the row and click 'Split Trade'.
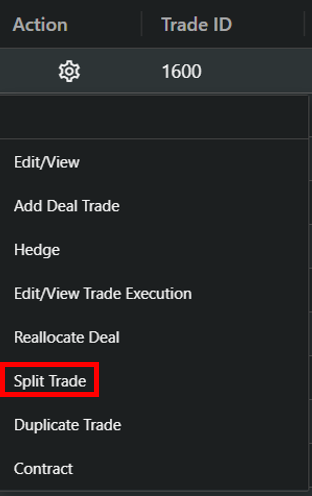
Fill in the 'NEW SPLIT QTY' (quantity to be allocated to new counterparty) and the 'NEW SPLIT COUNTERPARTY' (new counterparty name) and click 'Confirm' when done. This will give rise to two trades with the same details but of the adjusted quantity.

There are 3 ways to split quantity of a trade:
- Split quantity using pricing blocks in physical trade pricing page: Split quantity in trade to allow each quantity to have its own trade execution but physical trade details (eg counterparty) remain the same. This works the same as point 2. Click here to learn more.
- In physical trade pricing page, click on the '+ Add Block' button and key in the quantity. You will need to ensure that the total quantity in the pricing blocks in this page match the 'Quantity' in the previous page (click 'Back' button at the bottom to go back to previous page).
- Split quantity using pricing blocks in trade execution page: Split quantity in trade to allow each quantity to have its own trade execution but physical trade details (eg counterparty) remain the same. This works the same as point 1.
- In trade execution page, click on the 'Edit' button and key in the quantity to split out from the total quantity. A new pricing block with the split quantity will be generated. Click here to learn more.
- Split quantity using button in physical trade table: Split quantity in trade to allow allocation to different counterparties. Click here to learn more.
- In physical trade table, click on the 'Settings' button followed by 'Split Trade' and key the quantity to be split to the new counterparty.
G. Duplicate Trade
To duplicate a single trade, under 'Actions' in the table, click the 'Settings' button (represented by a 'gear' icon) of the row and click 'Duplicate Trade'.
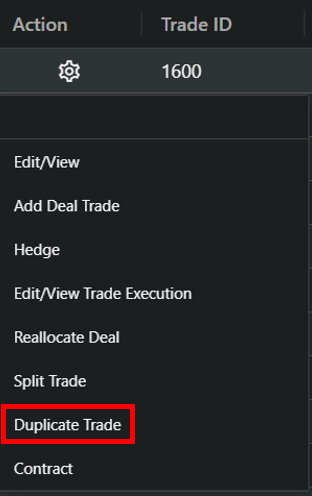
Only the 'DEAL NO.' is a compulsory item and you can choose to fill in:
a. Existing 'DEAL NO'': Duplicated trade will be allocated directly into the existing deal. Note: If the duplicated trade's pricing details (BENCHMARK & MTM) have been filled or empty and the duplicated trade is allocated into an existing deal with an existing pricing details, the quantity and the pricing method (BENCHMARK) of the trade will remain but the pricing method (MTM) will follow the deal that it is allocated to.
b. New 'DEAL NO': Duplicated trade will be allocated directly into the newly created deal (new deal number that you input).
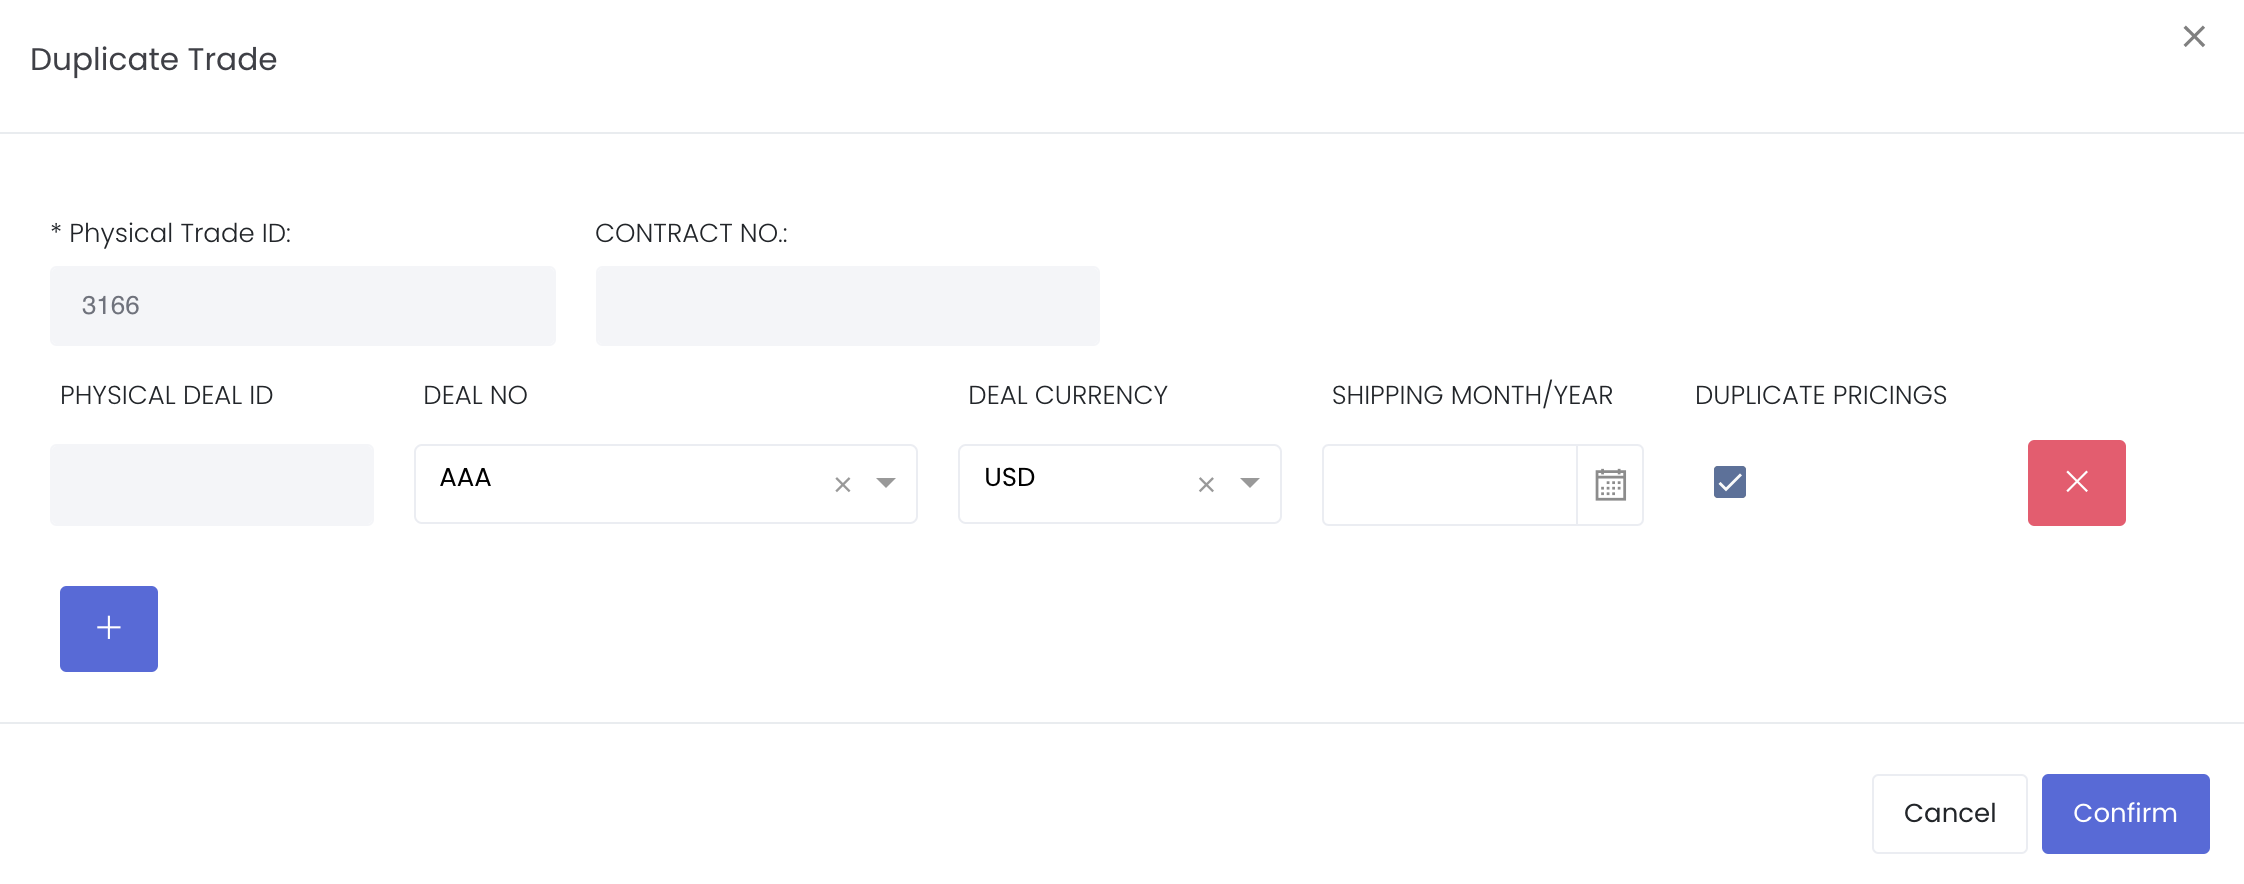
SHIPPING MONTH/YEAR: Input the shipping month/year for your duplicated trade if necessary.
DEAL CURRENCY: Input the deal currency
DUPLICATE PRICING: Tick the checkbox to duplicate the pricing details of the selected trade into your duplicated trade. If untick, the pricing details in your duplicated trade will remain empty for your manual input.
You can click the blue '+' button to add new row(s) to duplicate the selected trade multiple times, such as for different months (add multiple rows and key in the months) To delete the row, click the red 'X' button.
Note: If your selected trade has trade execution, duplicating the trade will also duplicate its trade execution for the duplicated trade.
If the original trade’s deal currency is USD, you cannot duplicate the trade and change to other currency eg CNY.
Original trade has exchange rate - Due to deal currency being USD, but pricing currency is CNY, so there may have exchange rate
When duplicate to a new deal with different currency eg CNY, but pricing currency is CNY, so there should not have exchange rate
Duplicate Trade: Will duplicate the following fields:
Contract Type
- Trader
- Counterparty Ref No.
Trade Mode
- Broker
- Broker Ref No.
- Trade Date
- Purchase/Sale
- Counterparty
- Product
- Category
- Specification
- Unit
- Option
- Pricing Description
- Conversion Factor
- To Unit
- Credit Term
- Payment Term
- Days
- Specifications Calculations (WMT, DMT, FE%, MOIS%)
- Incoterm
- Port/WH Name
- Shipping Month/Year
- Remarks
Deal ID, Deal No. and Deal Currency will follow the selected deal's details and will be uneditable.
Please note that Specifications (WMT, DMT, FE% MOIS%) can only be duplicated by selecting the Contract No. in the specifications page. Please refer to Iron Ore Product Group - Specifications to learn more.
Click 'Confirm' once done and your trade will be duplicated successfully. This will give rise to duplicated trade(s) and if applicable, its duplicated trade execution(s).
Note: If the trade you duplicated uses Auto Running Number function to generate its contract number, the newly duplicated trade's contract number will be auto-generated in the next running number based on the Auto Running Number function. You may edit the contract number as necessary.
Note: If you duplicate a trade with multiple trade executions, the duplicated trade will have multiple trade executions too. But you will be required to enter the trade execution page to select the pricing block in order to view the P/L details accordingly.
You may refer to List of Definitions: Trades for the definitions.
H. Generate Contract
Please refer to this Creating a Contract Document for more details.
Viewing Physical Trade Execution Table
All physical trade executions created will be displayed in the 'Physical Trade Execution' table.
To edit your trade, click on the 'Edit' button (represented by a 'pen and paper' icon) under the 'Actions' column of your trade. Modify your data accordingly and click 'Save' to save the changes.
To delete your trade, tick the checkbox of the trade and click 'Delete Trade Execution'.
Please refer to List of Definitions: Trades for the definitions of the fields.
2. DEALS TAB
This section displays the details of your deals and associated trades to allow you to monitor your outstanding and completed deals efficiently.
Once a trade has been created, it will automatically generate a deal in the 'DEALS' tab.
To access this section, click on 'Trade', following by 'Physical Trades' from the navigation sidebar on the left. Click on the 'DEALS' tab at the top of the page to access this section.
You will be able to view the outstanding quantity ('Outstanding Qty') of your cargo and the associated profit and loss ('Realised P/L', 'Unrealised P/L' and 'Total P/L') to allow you to make informed decisions accordingly. You may refer to the 'Physical Trades Table' at the bottom of the page as reference.
Several functions are available to assist in the selection of data:
- Search bar: Search for keywords in the search bar for relevant data to be displayed
- Table Headers: 'Sort' and 'Filter' data using the functions in the table headers (Please refer to Table Settings for table functionalities).
Open/Closed Deals: Contract Quantity will be used to determine if the trades have been closed (purchase and sale transactions close each other off), and if closed, the 'Outstanding Qty' in "DEALS" tab will be displayed as "0".
Calculations: Actual Quantity (input in trade execution page) will be used for the calculations in the table, but if Actual Quantity is not input yet, the Contract Quantity will be used instead.
OPEN column: TRUE/FALSE
TRUE: Deal is not closed yet, still have open positions.
FALSE: Deal is closed with no open positions.
To determine if the position is still open, you can go to portfolio page to see if there are any trades in the OPEN POSITIONS table.
If Outstanding Qty is 0.0 but OPEN column is TRUE, it means that the buy and sell trades are already closed, but still have open positions as title transfer date, actual price and actual quantity of the trade are not filled yet. Negative value = Sales quantity, positive value = Purchase quantity
If Outstanding Qty is 0, it should not be highlighted in red. Only <0 or >0 will be highlighted in red.
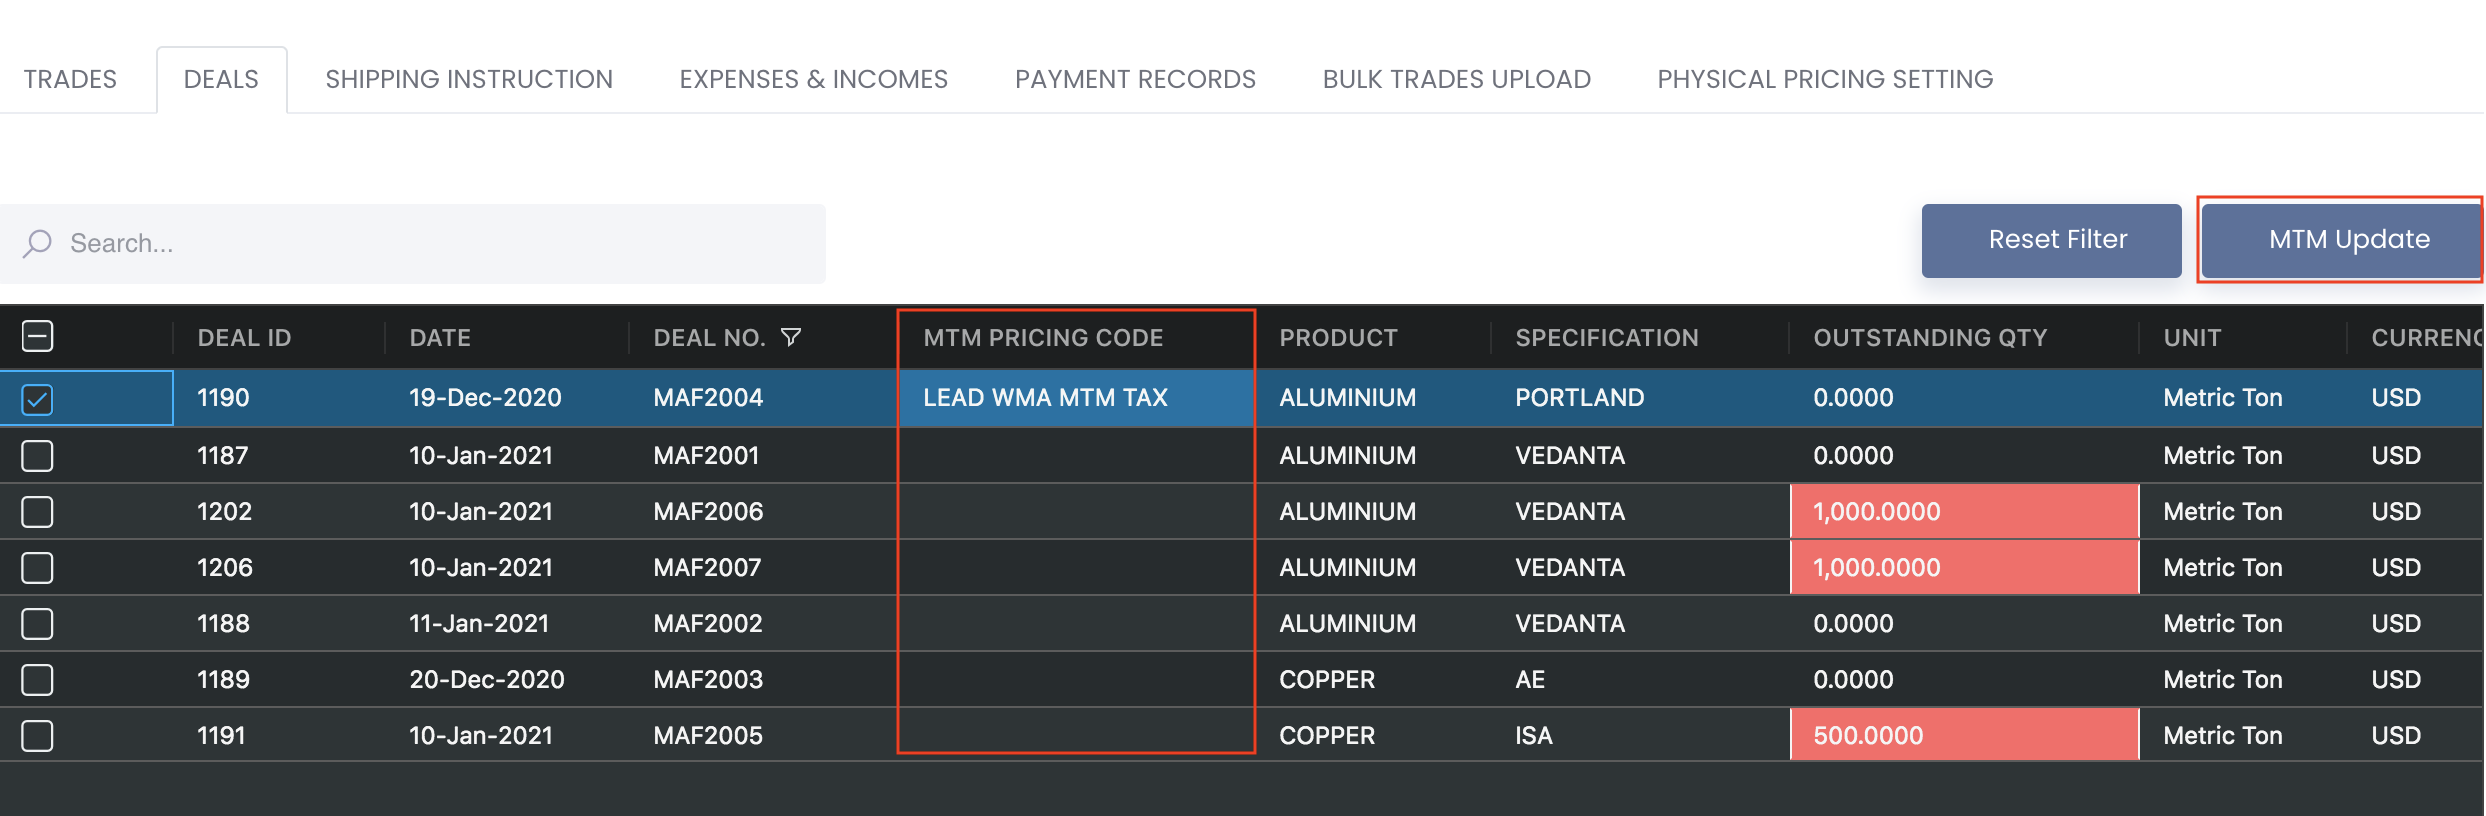
Update MTM Pricing Directly
You will be able to update your MTM pricing here or edit directly in the physical trade page. You will be required to pre-fill your pricing code in the Physical Pricing Setting tab (select POTENTIAL under TRADE TYPE). Once done, you can select the pricing code under "MTM Pricing Code" for each deal number. Tick the row and click on "MTM Update" at the top right corner of the table.
The MTM pricing index for your deal will be updated accordingly.
Note:
MTM Update of premium for existing trade’s premium will only work if pricing mode of existing premium is FIXED. Otherwise, error message will appear.
Tax rate in pricing code in Physical Premium Setting fixed - tax rate will auto appear in the corresponding physical trade.
If the existing trade’s trade mode is “Offshore”, using a pricing code with tax rate for MTM update will not be allowed.
If unit of pricing code in Physical Pricing Setting is different from the physical trade’s unit, error message will appear.
If pricing code in Physical Pricing Setting table is deleted, the existing pricing index details will remain in the physical trade page.
Can use MTM Update for original trade with different pricing currency (eg original is USD; MTM Update product can be CNY)
Cannot use MTM update for original trade with different units (eg original is Metric Ton, MTM Update product cannot be Barrels)
For Paper/Physical Trade - If product is used in paper/physical trade, cannot delete the product in Product Data table. Will have to remove the product from the paper/physical trade before deleting
Check Outstanding Quantity
1. Click on the 'DEALS' tab at the top left corner of the page to view the details of your deal trades.
For example, in this case, 4,500 units ('OUTSTANDING QTY') have been purchased ("PURCHASE") and are outstanding as they have yet to be sold.

2. To close the trade, follow Step 9 & 10. In this case, the 'Purchase/Sale' field will be "SALE" and 'Quantity' will be "2,000" to reflect the sale position of the trade. Follow through the steps and click 'Submit' to save your trade.
3. Click on the 'DEALS' tab at the top left corner of the page to view the details of your deal trades.
Following the same example in Step 1 & 2, 2,000 units have been closed/sold and the 'OUTSTANDING QTY' will reflect the remaining outstanding quantity (4,500 purchased quantity - 2,000 sold quantity).

4. Follow through the same steps until all quantity are purchased/sold to close the term contract and 'OUTSTANDING QTY' will become "0".
Please refer to List of Definitions: Trades for the definitions of the fields.
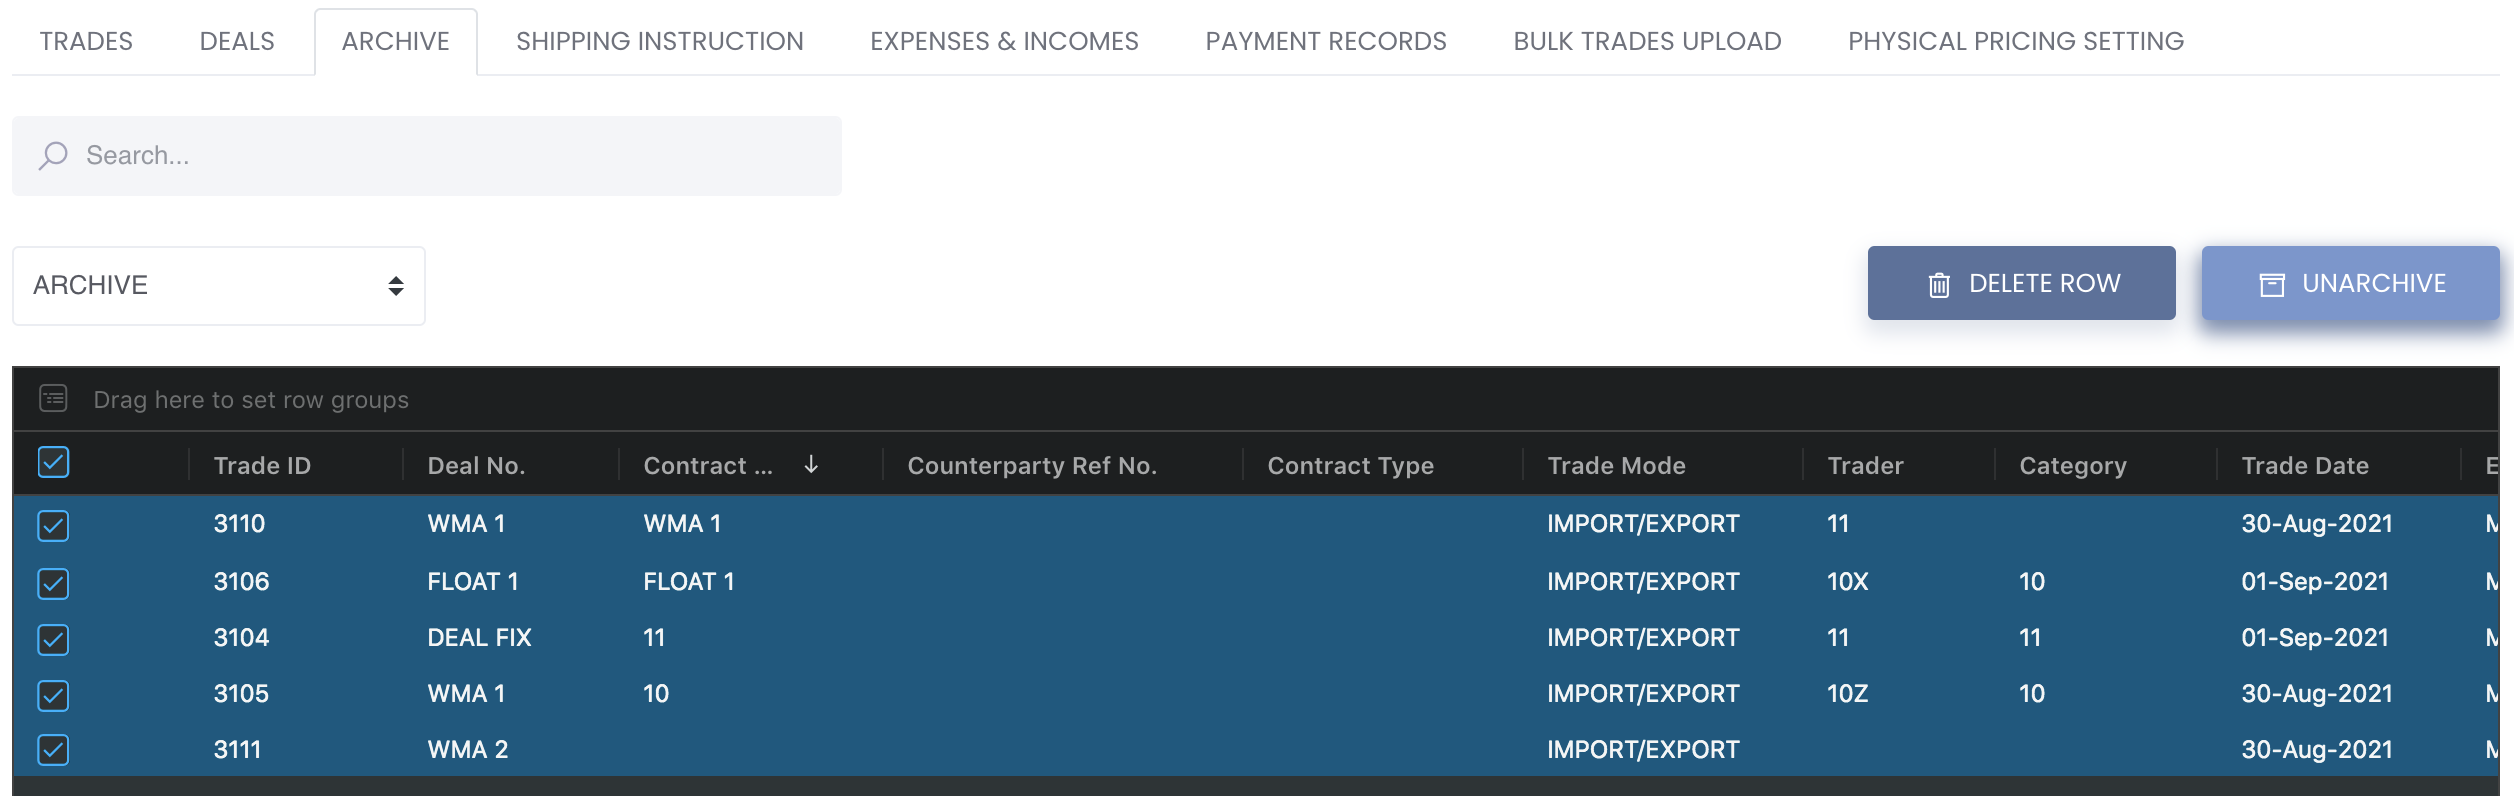
3. ARCHIVE TAB
You will be able to archive any completed/closed physical trades and their associate trade executions that you do not need direct access to and store them in the Archive table, and unarchive them anytime. Tick the checkbox of the trades you want to archive and click on 'Archive' at the top right corner of the table. Archived trades and their trade executions will be stored in the ARCHIVE tab, next to DEALS tab.
In the ARCHIVE tab, tick the checkbox of the trades to delete directly or to unarchive, and the trades and their associated trade executions will return back to the Physical Trades table.
4. SHIPPING INSTRUCTION TAB
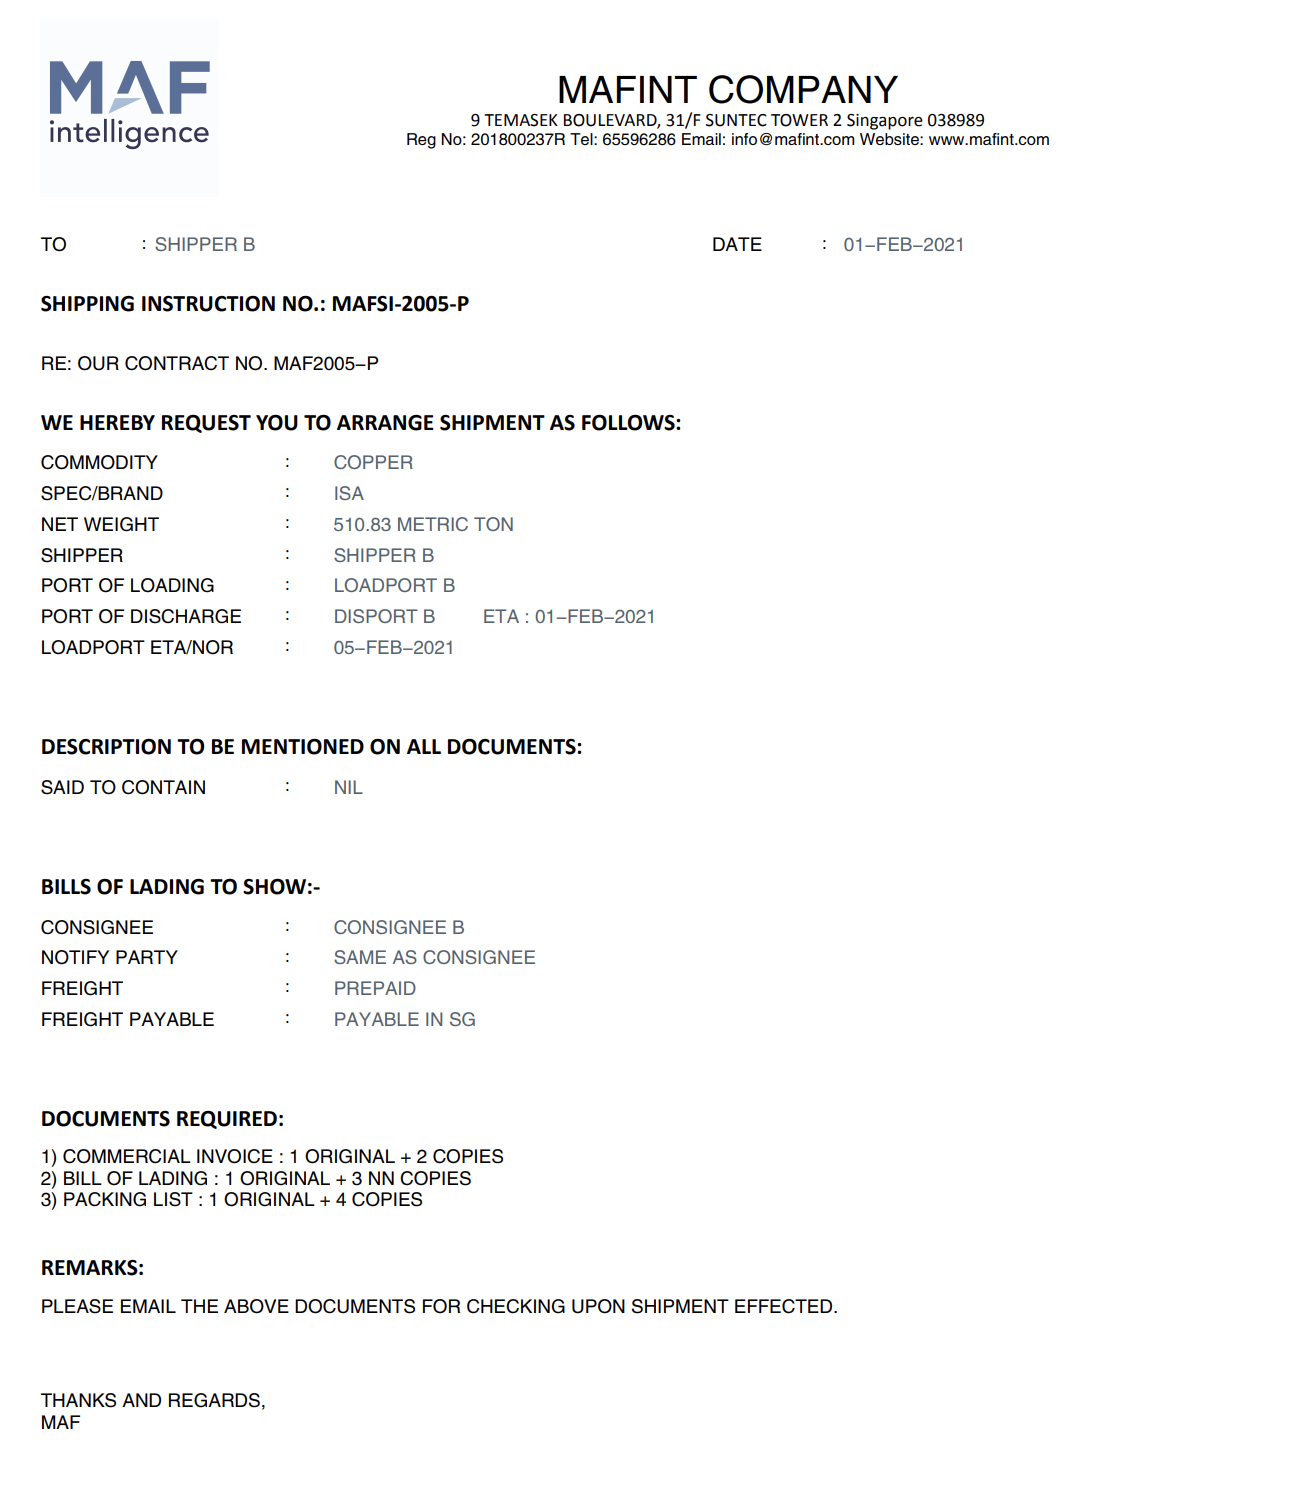
Once your physical trade transactions and executions have been completed/settled/closed, you can use MAF Cloud system to generate a shipping instruction document from your trade execution and issue to your counterparties. The shipping instruction document will contain all the details needed to process your shipment and contain information that feeds directly into your Bills of Lading. All data input previously in the physical trades and trade executions sections will be directly linked here, saving you the hassle of manually creating your shipping instruction document from scratch!
To access this section, click on 'Trade', following by 'Physical Trades' from the navigation sidebar on the left. Click on the 'SHIPPING INSTRUCTIONS' tab at the top of the page to access this section.
This section allows you to view all the shipping instructions documents created in Creating a Shipping Instructions Document.
Several functions are available to assist in the selection of data:
- Search bar: Search for keywords in the search bar for relevant data to be displayed
- Table Headers: 'Sort' and 'Filter' data using the functions in the table headers (Please refer to Table Settings for table functionalities).
To edit the shipping instructions document, click on the 'Edit' button (represented by a 'pen and paper' ![]() icon) located on the left of each row. To delete the shipping instructions document, tick the checkbox of the row and click on the 'Delete Row' button located above the table. You may also select multiple rows to delete.
icon) located on the left of each row. To delete the shipping instructions document, tick the checkbox of the row and click on the 'Delete Row' button located above the table. You may also select multiple rows to delete.

This is a sample of the Shipping Instructions document generated:
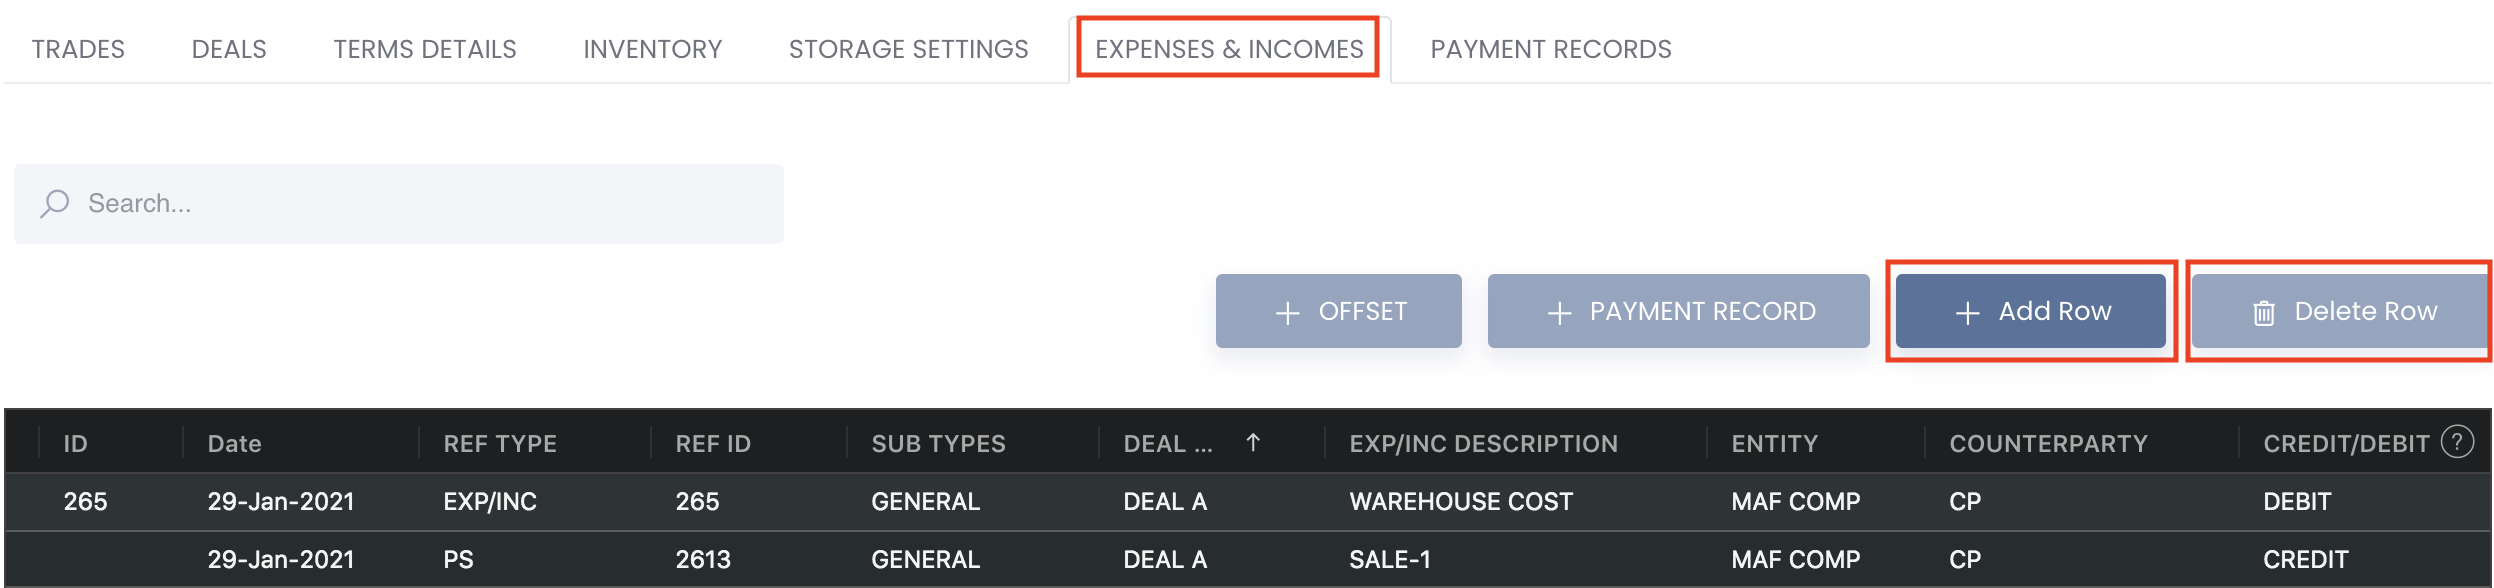
5. EXPENSES & INCOMES TAB
This section displays the details of your expenses and incomes for all physical trades, categorised based on the Deal/Trade level. This means that you can allocate expense and income items directly into your deal or trade by selecting the respective 'DEAL NUMBER' or 'CONTRACT NUMBER' to link the costs. To link the items to the portfolio directly, click here to learn more. You will be able to create your invoice (payment record) here, which will be illustrated below.
To access this section, click on 'Trade', following by 'Physical Trades' from the navigation sidebar on the left. Click on the 'EXPENSES & INCOMES TAB' tab at the top of the page to access this section.
All trades created in the TRADES TAB will be automatically be displayed in this table as a Purchase/Sale (REF TYPE: PS) transaction. Please note that benchmark pricing and premium pricing have been combined together for easier reference.
You can add additional Expense/Income items eg warehouse costs here (which will be reflected as REF TYPE: EXP/INC), by clicking '+ Add Row' button located above the table. Input the details (cells highlighted in red are compulsory fields) in the row and click 'Save' once done. The costs will then be tagged to your deal/trade accordingly to account for P/L calculations.
If the amount value is an expense, please key in negative ![]() amount. If the amount value is an income, please key in positive amount
amount. If the amount value is an income, please key in positive amount ![]() . This is the same as inputting values in General Ledger. The amounts will be reflected accordingly in the Portfolio P/L Details model and Group P/L model.
. This is the same as inputting values in General Ledger. The amounts will be reflected accordingly in the Portfolio P/L Details model and Group P/L model.
To delete a row, tick the checkbox of the row and click on the 'Delete Row' button located above the table. You may also select multiple rows to delete. You can scroll down to view the 'SUMMARY' table which acts like a pivot table and can be categorised and organised by groups according to your needs. You can click here to learn how to customise the table by arranging and filtering the columns based on your preference.
Several functions are available to assist in the selection of data:
- Search bar: Search for keywords in the search bar for relevant data to be displayed
- Table Headers: 'Sort' and 'Filter' data using the functions in the table headers (Please refer to Table Settings for table functionalities).
Note: Debit will be an expense and credit will be an income.
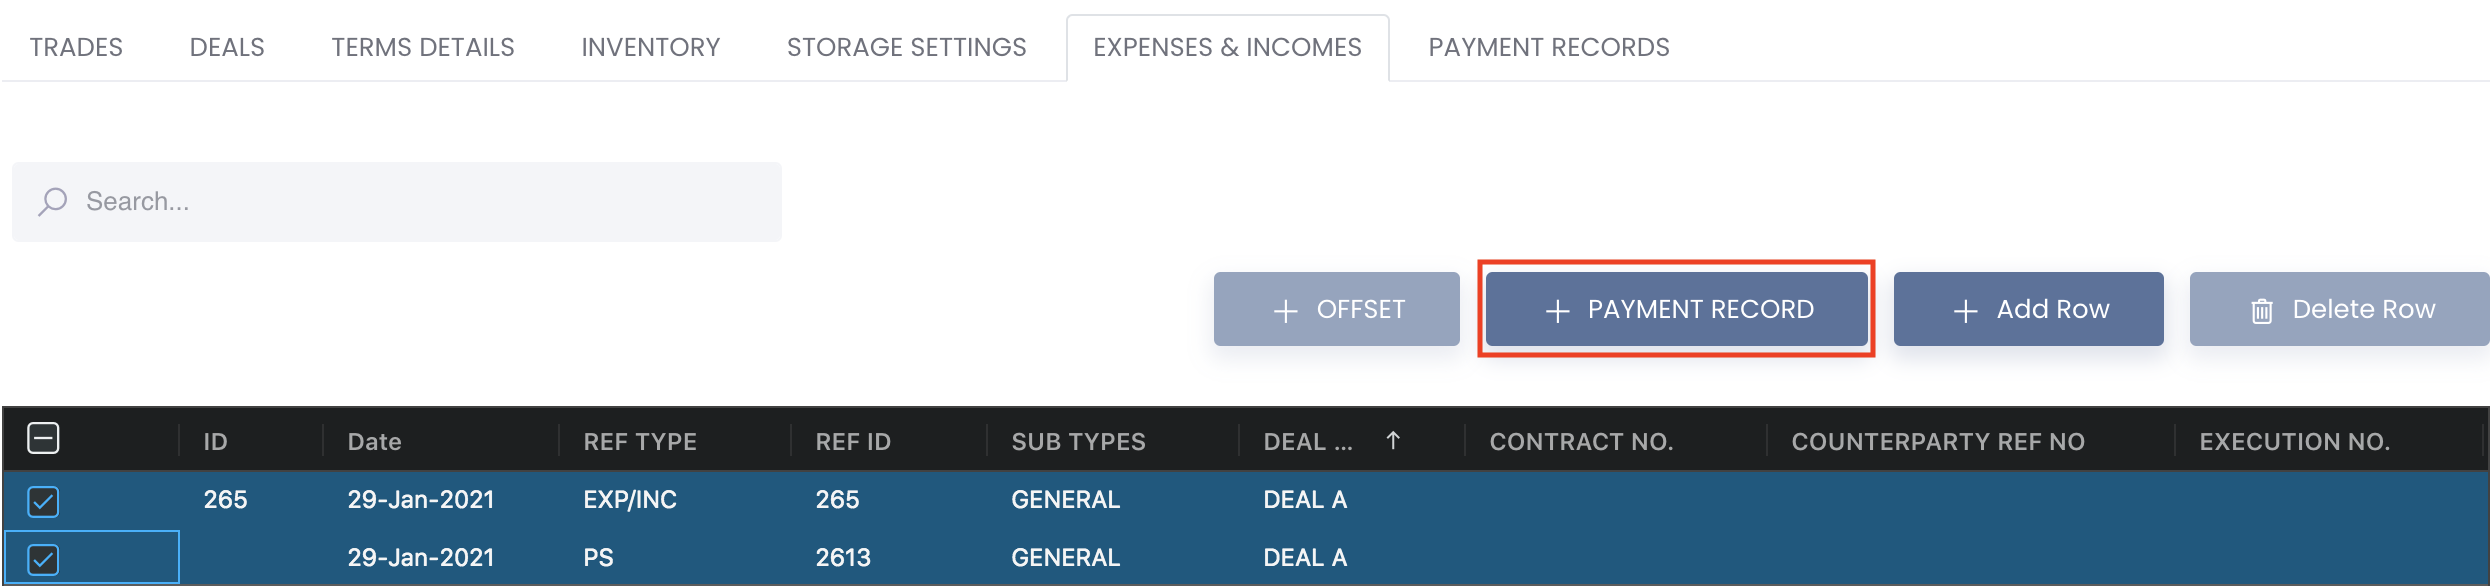
GENERATE INVOICE
To generate an invoice, select the relevant transactions by ticking their respective checkbox (you can select multiple transactions to include them into the same invoice) and clicking on the '+ Payment Record' button. You will be redirected to generate the invoice which will be saved and stored in the 'Payment Record' tab.
You may also opt to create an invoice manually without inputting physical trades data. Please click on the Payment Record tab and click on + Payment Record button to create an invoice.
User Guide:
Creating a Payment Record (Invoice) Manually
Creating a Payment Record (Invoice) After Physical Trades Input
OFFSET TRANSACTIONS
To combine or offset transactions and include them into the same invoice, select the relevant transactions by ticking their respective checkbox and click on the '+ Offset' button.
Please note that you can only combine/offset 'PURCHASE/SALE (PS)' transactions (does not apply to transactions with REF TYPE: EXP/INC) that have the same 'DEAL NUMBER' and 'QUANTITY'.
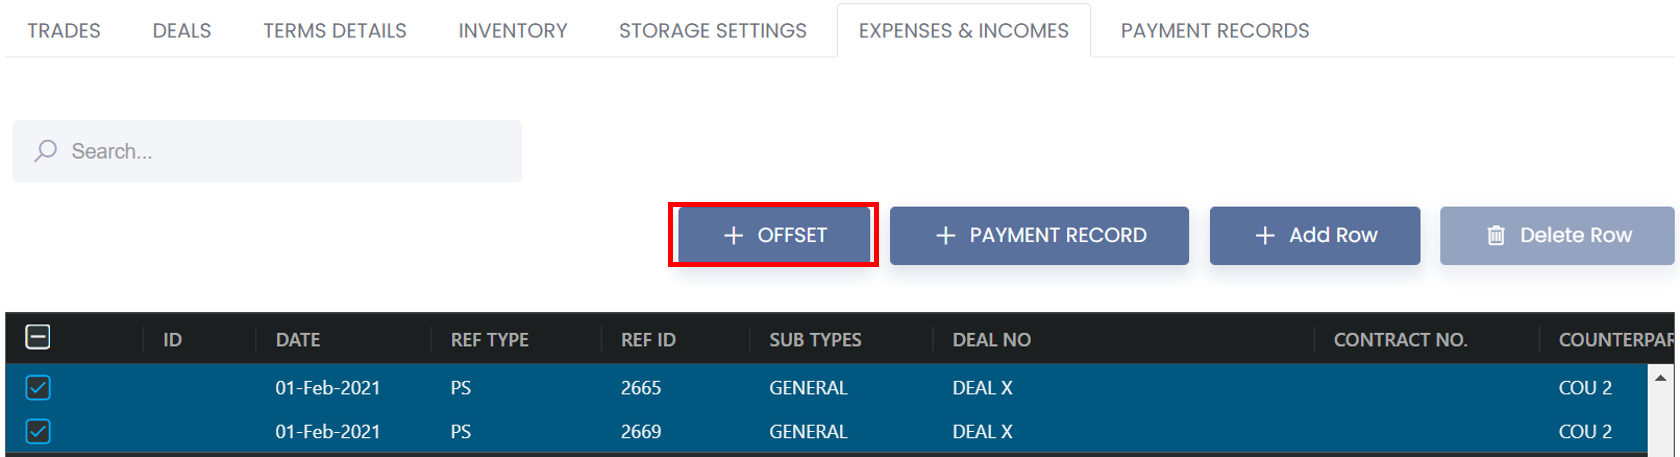
Only 'EXP/INC DESCRIPTION' and 'COUNTERPARTY' are compulsory items and you can only click 'Confirm' after these fields are filled. 'COUNTERPARTY REF NO.' is an optional field that can be keyed in when necessary.
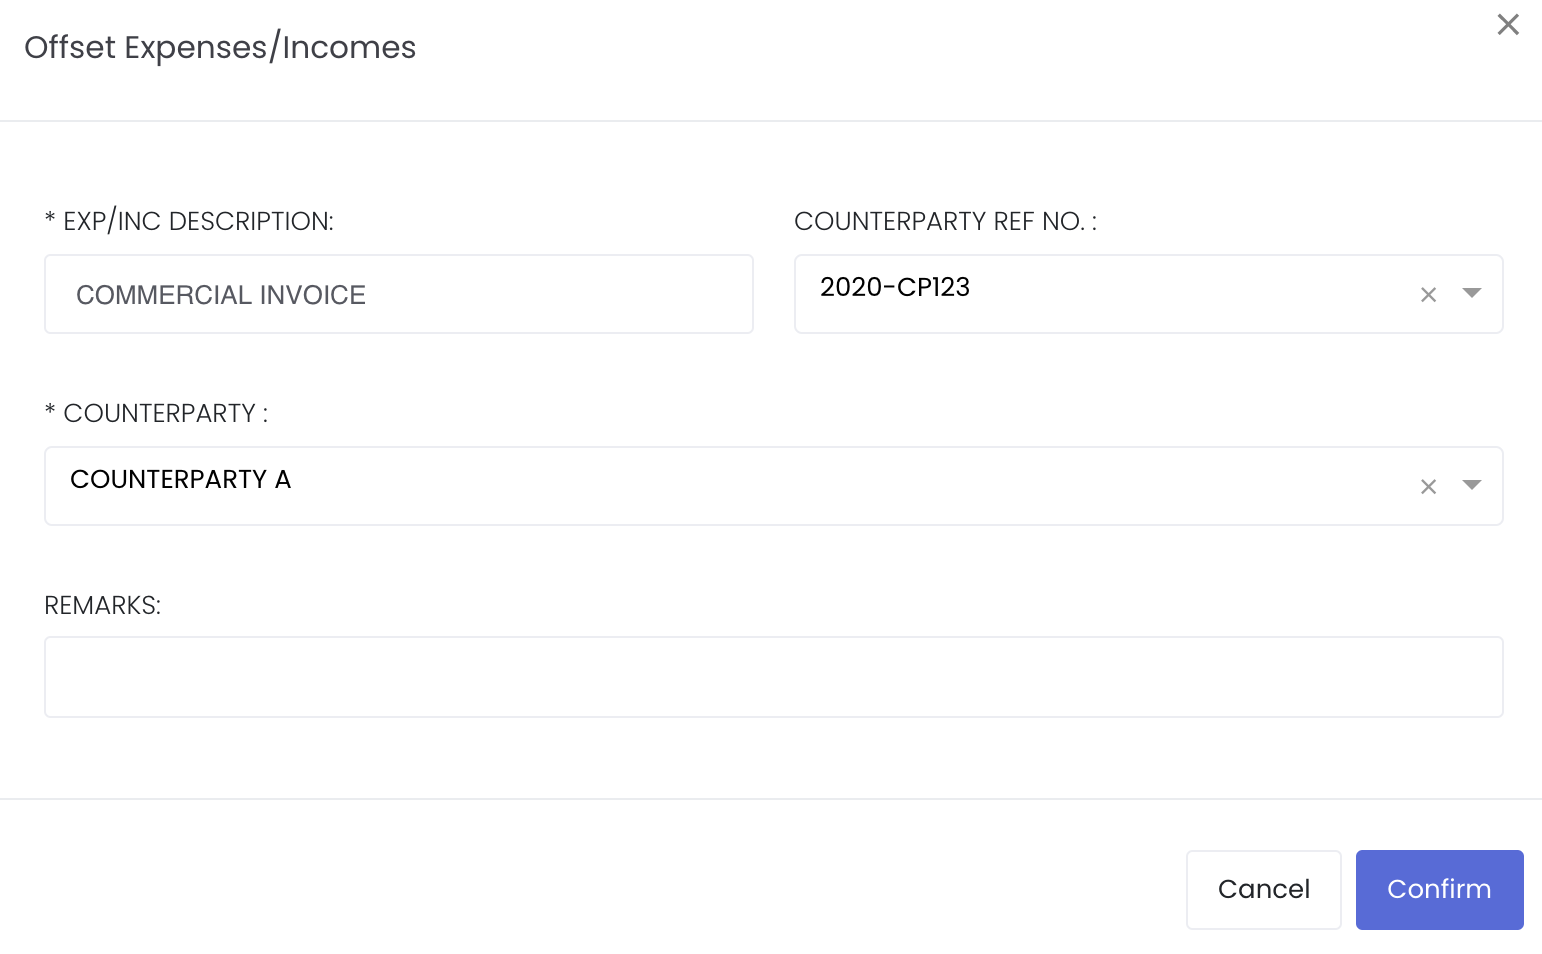
Once you offset/combine the transactions successfully, the quantity and unit price of the transactions will be offset/combined together. You can then tick the checkbox of the offset transactions and click 'Payment Record' to generate an invoice including the offset/combined transactions. Please note the following:
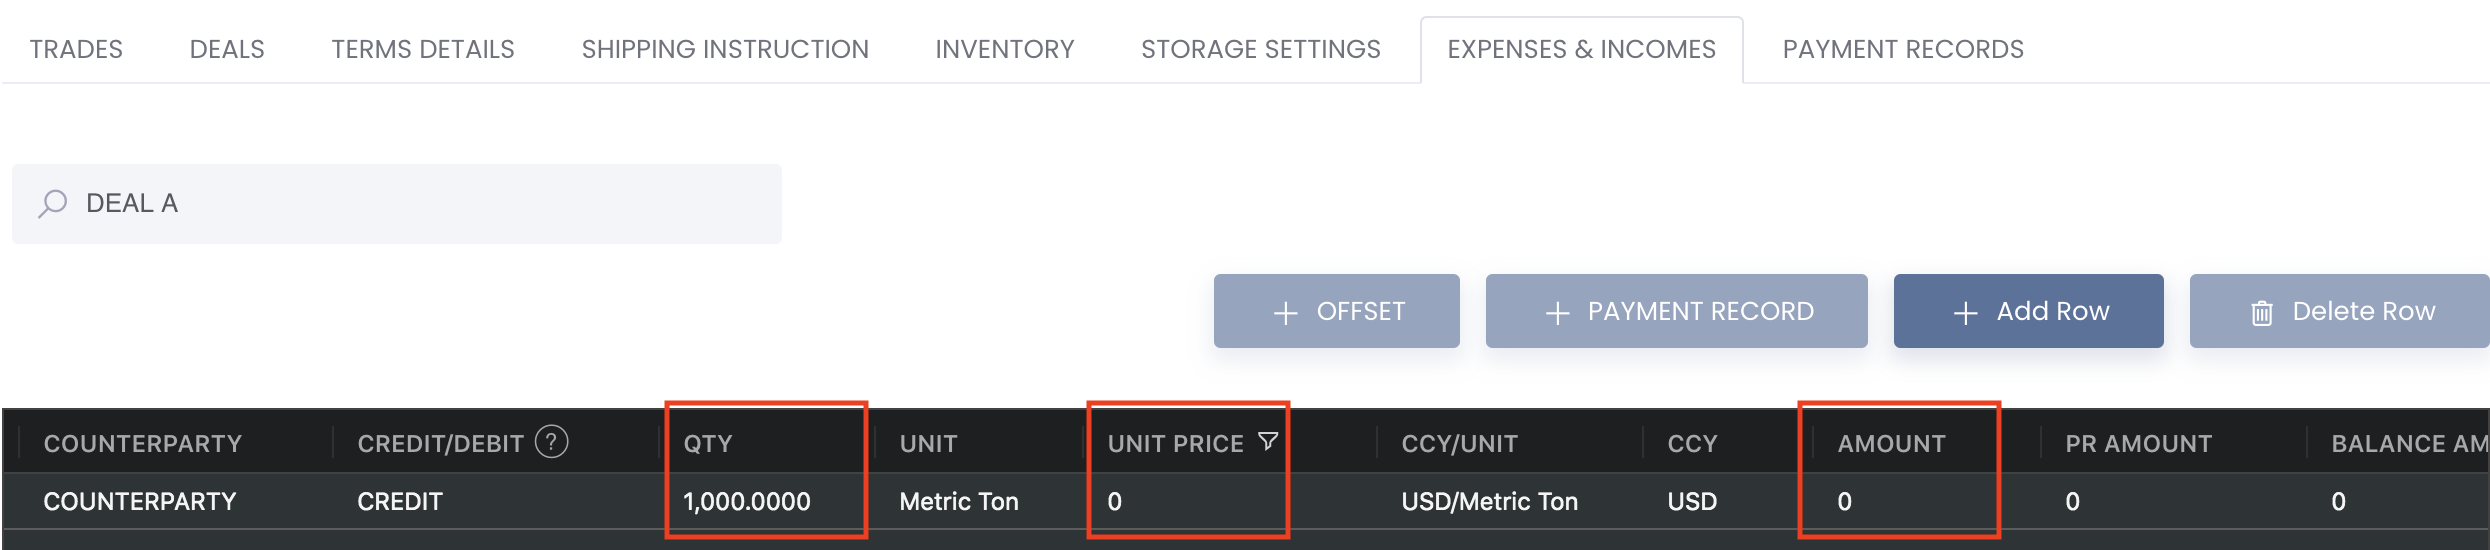
1. Offset: CREDIT and DEBIT items will offset each other, and with QUANTITY remaining the same, UNIT PRICE and AMOUNT will become "0".
Offset the 2 highlighted trades:

After offset:
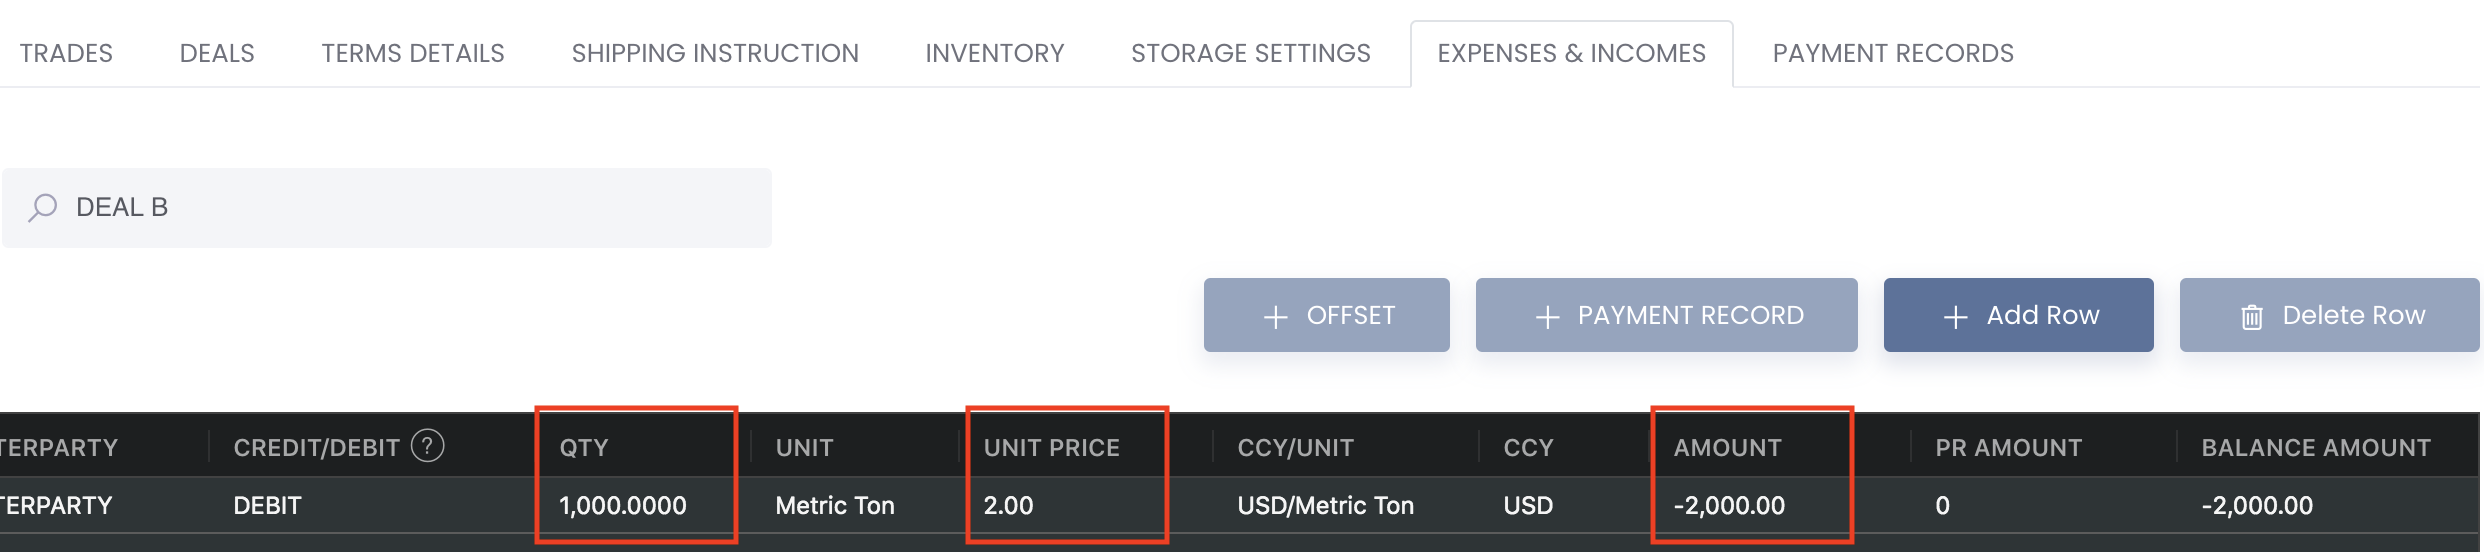
2. Combine: CREDIT (DEBIT) AND CREDIT (DEBIT) items will combine together, and with QUANTITY remaining the same, UNIT PRICE will be added together.
Combine the 2 highlighted trades:

After offset:
To undo the offset, tick the checkbox of the row and click 'Delete Row'. The transactions you have offset previously will be displayed as per normal.
Please refer to List of Definitions: Trades for the definitions of the fields.
6. PS LEDGERS
This section displays the details of your purchase and sale ledgers for all physical trades.
To access this section, click on 'Trade', following by 'Physical Trades' from the navigation sidebar on the left. Click on the 'PS LEDGERS TAB' tab at the top of the page to access this section.
The Start Date is 1 month before today's date by default. Please feel free to change the Start Date and End Date (can be any date beyond today's date) accordingly. The dates will remain according to your settings until you log out.

You can add ledger items by clicking '+ Add Row' button located above the table. Input the details (cells highlighted in red are compulsory fields) in the row and click 'Save' once done. You may select from “Contract No..” to auto fill details in the row according to the trade execution’s details (Company, Counterparty, Quantity [settlement qty>contract actual qty>qty] , Unit, Price [Price will be autofilled according to this, in order of priority settlement price>estimated price>contract actual price>provisional price] and Amount if data is available). CONTRACT NO 合同编号: Key column linked to “PHYSICAL TRADE STATUS” 现货合同状态 app to monitor payment and invoice record.
If Contract No. has not been selected yet aka these fields are empty, they will be auto-filled: Company, Counterparty, Quantity, Unit, Price and Amount if “Contract No.” is selectedIf Contract No. has been selected previously aka these fields are already filled, only Counterparty will change according to the Contract No. So you will need to adjust the rest of the fields manuallyMain Contract No. column has been added, you may input as necessary
PSL TYPE: 账类别
a. PAYMENT 款项: Payment transaction, the amount will be used for “SETTLED AMT” 已收货款 and “SETTLED QTY” 已交重量 calculation in “PHYSICAL TRADE STATUS” 现货合同状态 app.
b. INVOICE 发票: Invoice for the payment, the amount is used for “INV AMT” 票额 and “INV QTY” 票量 calculation in “PHYSICAL TRADE STATUS” 现货合同状态 app.
LEDGER TYPE:
RECEIVED 收款: It means the payment is received from your counterparty, it is also applied to “INVOICE” 发票 type row.PAID 付款: It means the payment is paid to your counterparties, it is also applied to “INVOICE” 发票 type row.AMOUNT 总额: Always positive number which is used for amount calculations in “PHYSICAL TRADE STATUS” 现货合同状态 app.
There are 2 methods:
1. Method 1:
Select RECEIVED if amount is received from counterparty
Select PAID if amount is paid to counterparty
Amount will always be positive value (+)
选择收款如果收到的金额来自于客户
选择付款如果金额是支付给客户
金额必须是正值 (+)
2. Method 2:
If “PSL Type” is “Payment”:
Purchase, + Amount = PAIDPurchase, - Amount = RECEIVEDSale, + Amount = RECEIVEDSale, - Amount = PAID
If “PSL Type” is “Invoice”: If the invoice is paid, “Ledger Type” will be PAID
如果“账类别”是“款项”:
采购, 正数量 = 付款采购, 负数量 = 收款销售, 正数量= 收款销售, 负数量 = 付款
如果“账类别”是“发票”:如果发票已付款了,”分类账种类”是 PAID
The system will perform auto calculations for AMOUNT if QTY, PRICE and RATIO are filled:
Formula = AMOUNT = QTY * PRICE * RATIO for most of the cases, but there is a special case where the unit is US CENT etc but CCY is USD, so AMOUNT = QTY * PRICE / 100
Ratio is in the form of % eg 100%, 5% and the system will do calculation accordingly.
To delete a row, tick the checkbox of the row and click on the 'Delete Row' button located above the table. You may also select multiple rows to delete.
Several functions are available to assist in the selection of data:
Search bar: Search for keywords in the search bar for relevant data to be displayedTable Headers: 'Sort' and 'Filter' data using the functions in the table headers (Please refer to Table Settings for table functionalities).
Note:
Validation - If any row in PS Ledger is linked to deleted trade execution, an error will be raised as trade Execution cannot be deleted until its corresponding PS Ledger item is deletedValidation date column cannot be bigger than today
Updates:
After selecting Contract No., certain fields will be auto filled accordingly. If Actual Qty has been input, Quantity will be auto filled with Actual Qty, otherwise Contract Qty will be filled insteadAfter selecting Contract No., certain fields will be auto filled accordingly. If Actual Price has been input, Price will be auto filled with Actual Price otherwise it will be empty insteadIn Contract No. dropdown list, add these 2 items:Qty: map to qtyPrice: map to price
When add new row, Ratio will be 100 by defaultAfter selecting Contract No., Counterparty should not be in red bug fixedPrice decimal point will follow user’s setting bug fixedFilter will remain in cache until user logs out or click on Reset Filter
7. PAYMENT RECORDS
This section allows you to view outstanding and settled payment records in the form of stored invoices, which can be generated in the EXPENSES & INCOMES TAB. Newly created payment records will be displayed in either the Outstanding Payment Records or Settled Payment Records table.
To access this section, click on 'Trade', following by 'Physical Trades' from the navigation sidebar on the left. Click on the 'PAYMENT RECORDS' tab at the top of the page to access this section.
Note: In general, Operations team will handle the Payment Records section and Accounts/Finance team will handle the Accounting section. When the accounts/finance team has received the actual paid/received amount, they can input in the Accounting section and allocate the amount to each invoice. With that, the team will be able to understand whether the invoices have been fully settled (found in Settled Payment Records table), partially settled or not settled (found in Outstanding Payment Records table) and undertake necessary actions accordingly.
Several functions are available to assist in the selection of data:
- Search bar: Search for keywords in the search bar for relevant data to be displayed
- Table Headers: 'Sort' and 'Filter'data using the functions in the table headers (Please refer to Table Settings for table functionalities).
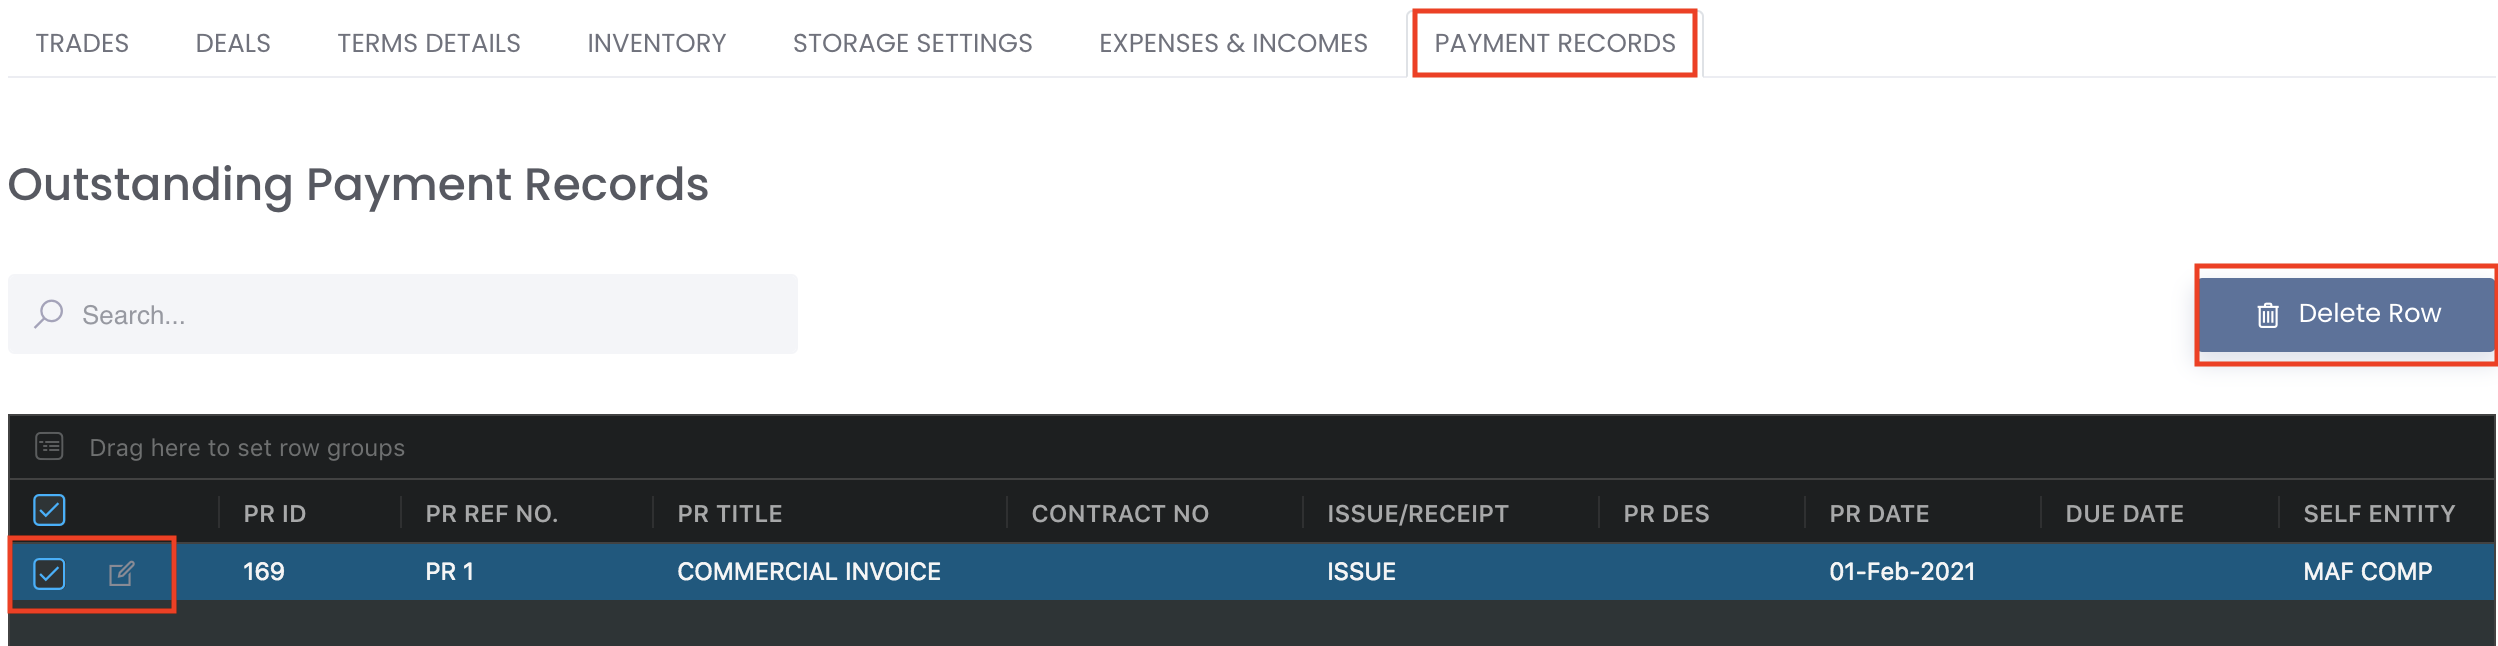
To edit the payment record, click on the 'Edit' button (represented by a 'pen and paper' ![]() icon) located on the left of each row. To delete the payment record, tick the checkbox of the row and click on the 'Delete Row' button located above the table. You may also select multiple rows to delete.
icon) located on the left of each row. To delete the payment record, tick the checkbox of the row and click on the 'Delete Row' button located above the table. You may also select multiple rows to delete.
To duplicate the payment record, click on the 'Copy' button (represented by '1 paper overlapping another paper') located on the left of each row. You will be directed to a duplicated page of the payment invoice for you to edit as necessary. Please be reminded to change the 'PAYMENT RECORD REF NO' (INVOICE NO.) as duplicated invoice number is not allowed, and please note that the 'ISSUE DATE' (INVOICE DATE) and 'CREDIT' items will not be duplicated. Click 'Save' once done to save your payment record.
You may also opt to create an invoice manually without inputting physical trades data. Please click on the Payment Record tab and click on + Payment Record button to create an invoice. Please note that you will not be able to save the invoice into the system, so please ensure that you save the PDF copy into your device before leaving the page.
Outstanding Payment Records Table
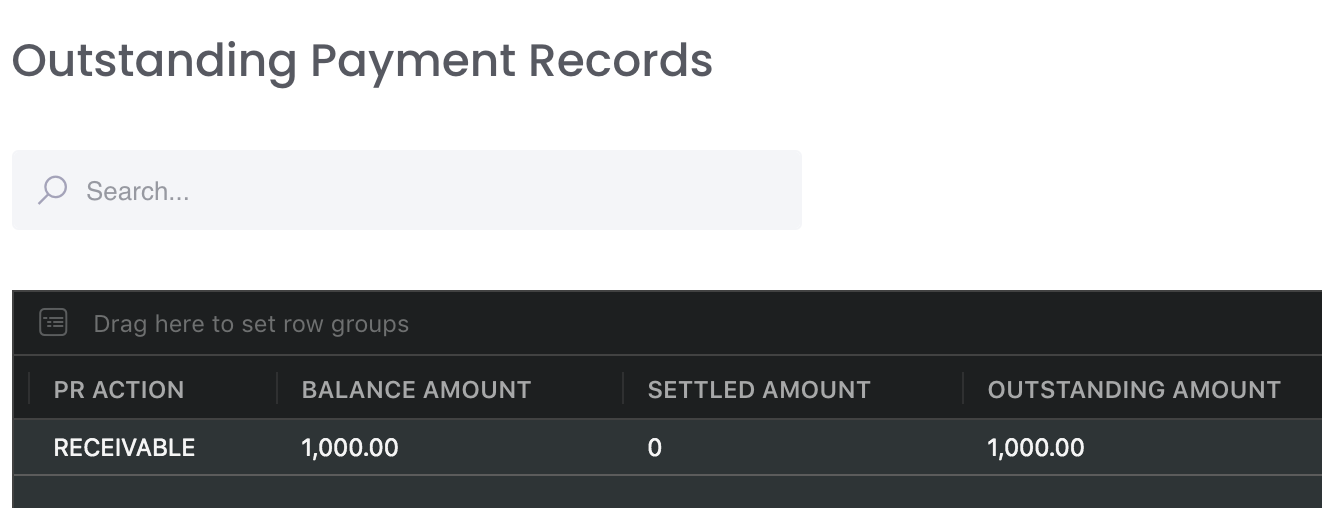
This table displays all the outstanding payment records (invoices) that you have created in EXPENSES & INCOMES TAB. This means that the invoice(s) has not been fully settled (not fully paid or received) or is partially settled by you and/or your counterparties (Outstanding Amount =/= 0; Balance Amount =/= Settled Amount). Scroll to the right in the table to view:
- 'BALANCE AMOUNT': Total invoice amount to be received/paid from/by counterparties
- 'SETTLED AMOUNT': Amount received/paid from/by counterparties
- 'OUTSTANDING AMOUNT': Amount not received/paid from/by counterparties
In this example, it shows that the 'Balance Amount' of USD 1,000 has not been received by the counterparty yet, as 'Settled Amount' is 0 and 'Outstanding Amount' is USD 1,000.
For the 'SETTLED AMOUNT' to be filled, the Accounts/Finance team can input the received/paid amount in 'Bank Transaction' table under the 'Accounting' section and allocate to the invoice. Click here to learn more.
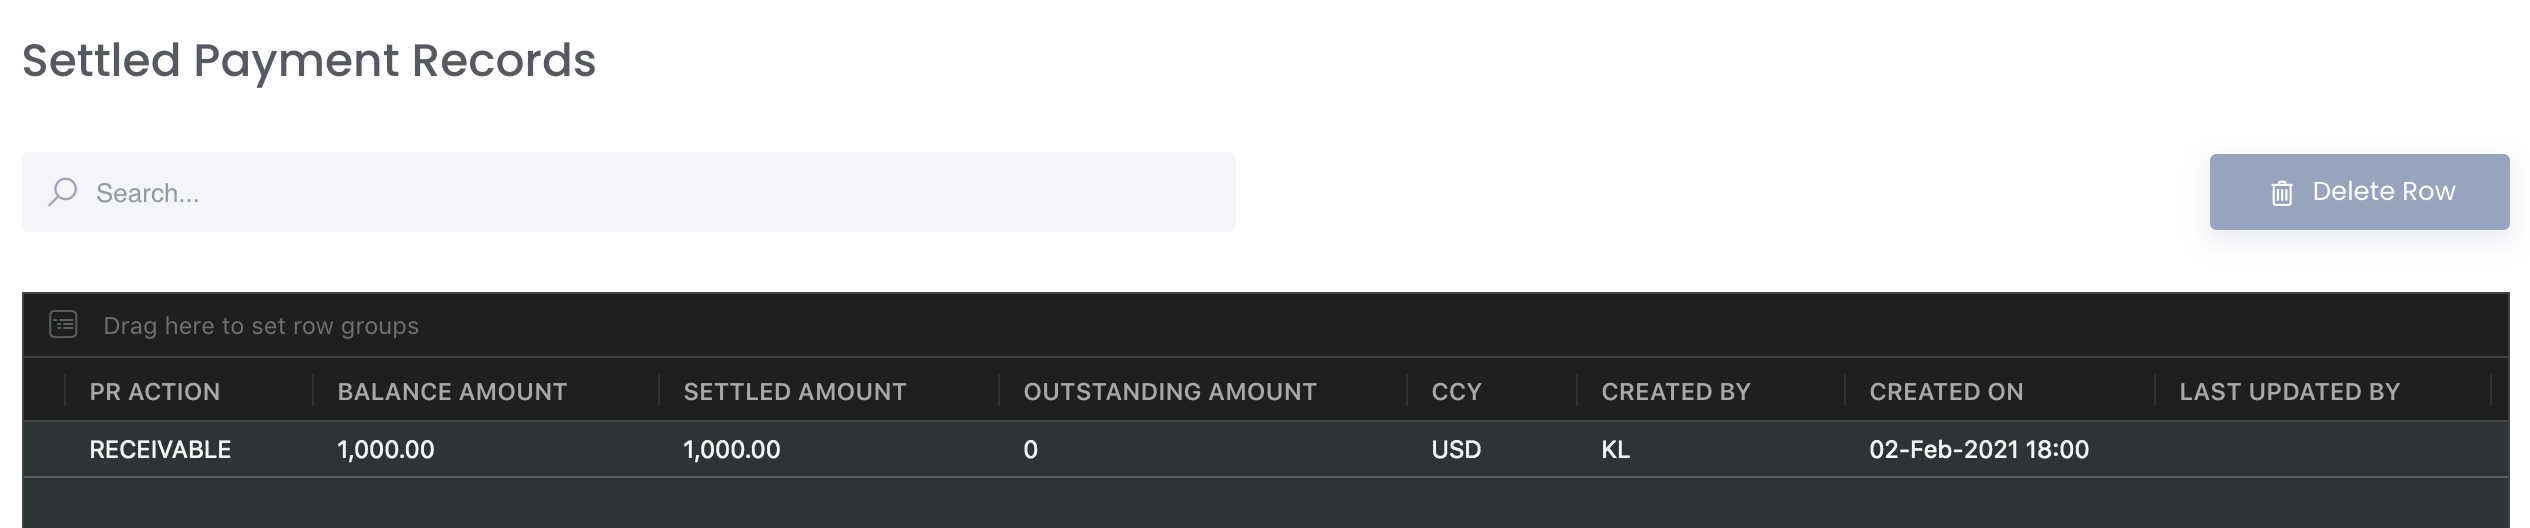
Settled Payment Records Table
This table displays all the settled payment records (invoices) that you have created in EXPENSES & INCOMES TAB. This means that the invoice(s) has been fully settled (fully paid or received) by you and/or your counterparties (Outstanding Amount = 0; Balance Amount = Settled Amount). Scroll to the right in the table to view:
- 'BALANCE AMOUNT': Total invoice amount to be received/paid from/by counterparties
- 'SETTLED AMOUNT': Amount received/paid from/by counterparties
- 'OUTSTANDING AMOUNT': Amount not received/paid from/by counterparties
In this example, it shows that the 'Balance Amount' of USD 1,000 has been received by the counterparty, as 'Settled Amount' is USD 1,000 and 'Outstanding Amount' is 0.
For the 'SETTLED AMOUNT' to be filled, the Accounts/Finance team can input the received/paid amount in 'Bank Transaction' table under the 'Accounting' section and allocate to the invoice. Click here to learn more.
Please refer to List of Definitions: Trades for the definitions of the fields.
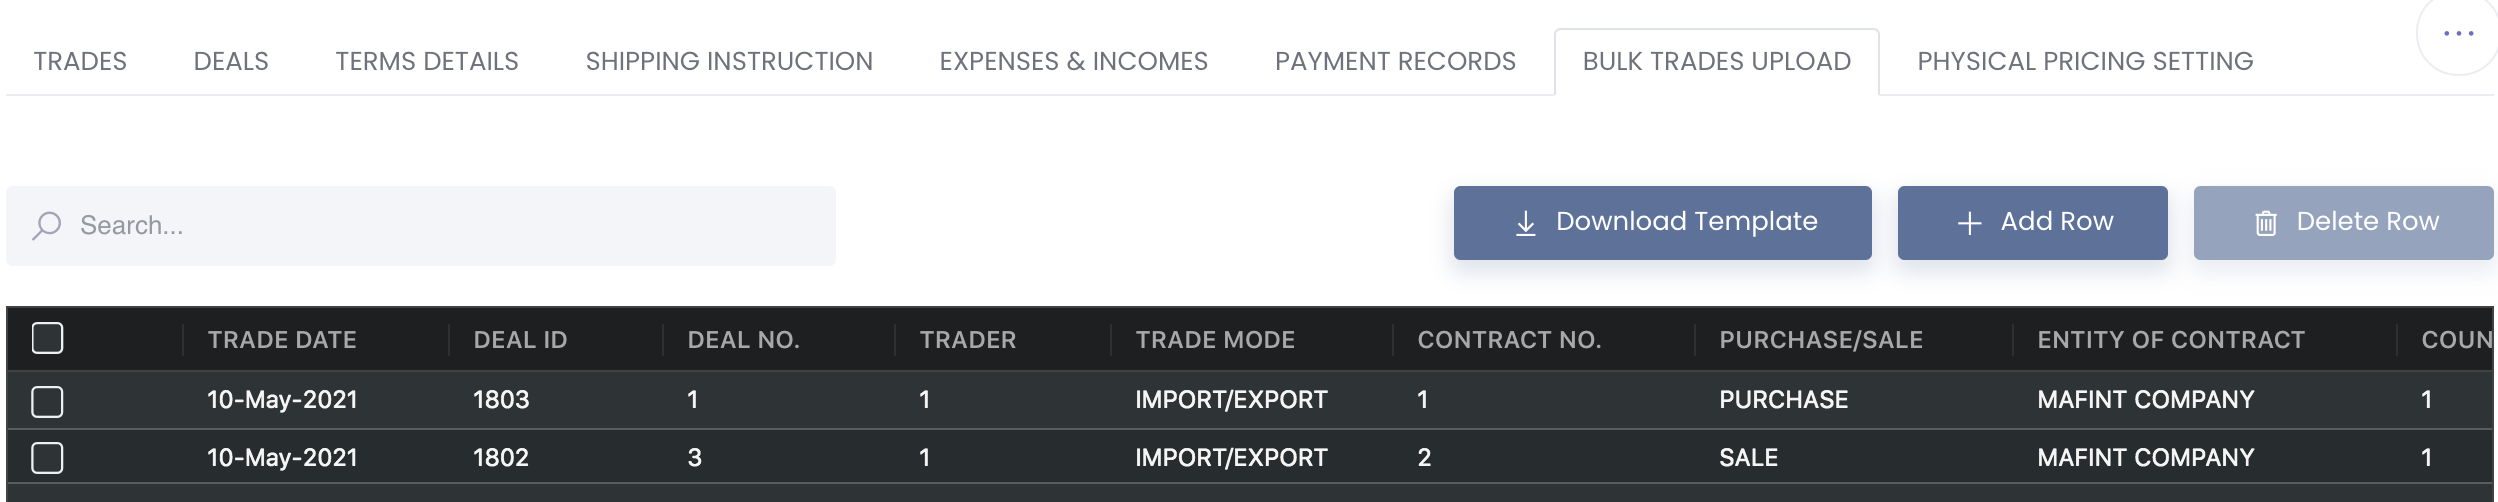
8. BULK TRADES UPLOAD
This section allows you to bulk-upload your physical trades by simply uploading your excel file. Your physical trades will be captured directly into the system and managed according to your business requirements efficiently.
Important: Pricing index for Benchmark and MTM (pricing mode = Float/Ave, WMA or SPOT) should be pre-set first to facilitate bulk-uploading, please click here to set your pricing index first. If you have FIXED price, there is no need to create a pricing index.
Once you have set your physical pricing index in the Pricing Pricing Settings tab, click on 'Trade', following by 'Physical Trades' from the navigation sidebar on the left. Click on the 'BULK TRADES UPLOAD' tab at the top of the page to access this section.
Click on 'Download Template' and fill in the details as necessary. Once done, return to the page and upload the file by hovering your mouse over the "..." from the top right corner and click 'Upload File'.
- Please be reminded to upload the correct language version of the file into the system. For instance, if you are using the English version in the system, you will be required to upload the file with the English headers.
Logic for data input:
File upload will remove those “unnecessary” data (no change to current logic)
Copy paste (ctrl + shift + v or ctrl + v) will show keep those “unnecessary” data indicated in red
- "Unnecessary" data refers to fields that are not required to be filled
Auto-fill Title Transfer Date: The AUTO TTD checkbox is ticked by default. If ticked, Title Transfer Date will be auto filled based on Trade Date; if unticked, you may input the Title Transfer Date as per normal.

Once done, check to make sure there are no red highlighted cells and click 'Save' to submit. You will be directed to the physical trades table in the 'TRADES' tab to edit your physical trades or trade execution as per normal.
Key Info to be Filled in Template
Trade Date: Physical trade date on which trade was created
Deal ID: Unique Deal ID tagged to each portfolio, auto-generated by system.
Deal No.: Deal number of the trade. Please note that if a deal number is an existing deal number, the MTM pricing will follow that of the deal number and so it will not be fillable. If the deal number input is new, you will be able to input the MTM pricing
If select existing Deal No., Deal ID and Deal Currency will automatically appear and are uneditable
If select new Deal No., Deal Currency is compulsory field and will be editable. Deal ID will be empty but will be autofilled once data is saved
Trader: Name of trade
Trade Mode:
1: 'OFFSHORE', 离岸
2. 'DOMESTIC CHINA', 内贸
3: 'DELIVERY CHINA', 交割
4: 'IMPORT/EXPORT', 进出口
5: 'BASIS TRADE CHINA', 基差
Note: When upload file with Chinese Trade Mode, if the system is in English, Trade Mode will be displayed in Chinese as per normal; and vice versa
If you select OFFSHORE, TAX RATE field cannot be filled which means that TAX RATE will be applicable for other trade modes other than OFFSHORE
If you select IMPORT/EXPORT, CUSTOM TAX and EXCHANGE RATE fields will be applicable for inputting.]
Contract No.: Contract number of the trade
Execution No.: Execution number of contract, if not available, you may input the same Contract No.
Purchase/Sale: Indicate whether the trade is a purchase or sale contract
Entity of Contract: Name of your company
Counterparty: Name of counterparty
Counterparty Ref No.: Counterparty reference number
Product: Name of product
Spec: Specification of product
Category: Category of product
Quantity: Quantity traded. Please note that you are required to key in the contract quantity instead of the actual quantity in your contract into the 'Quantity' field. Actual quantity can be input in the Actual Quantity field. Any negative quantity values input/copied & pasted will be automatically converted to positive quantity value
Unit: Unit of product
Deal CCY: Currency of deal
Payment Date: Payment Date
Title Trans Date: Title transfer date cannot be earlier than physical trade date and cannot be after today's date
Inco Term: INCO term
Port/WH Name: Port or warehouse name. Please note that if you have set up warehouse data in Settings>Company Data>Warehouse, you will not be able to free key in this column, unless you remove all data in the Warehouse table. You will only be able to select Port/WH Name from the data you have included in the Warehouse table
Benchmark Pricing: Benchmark PRICING CODE of your product which has been pre-set in the physical pricing setting tab. The pricing index code selected will be used to benchmark the pricing of your trade. Please note that to set the pricing for each trade, you can only choose either benchmark pricing or fixed price. Fixed pricing will be empty if you select benchmark pricing. Tax rate for benchmark pricing has already been pre-set in physical pricing setting tab.
Premium: Premium to your benchmark pricing index
Fixed Price: Fixed price of trade. Please note that to set the pricing for each trade, you can only choose either benchmark pricing or fixed price. Benchmark pricing will be empty if you select fixed pricing.
Fixed Pricing CCY: Currency for fixed price trade.
Tax Rate (%): Tax rate for fixed price trade. Tax rate for benchmark pricing has already been pre-set in physical pricing setting tab so this field will be empty if benchmark pricing has been used instead of fixed pricing. If you select OFFSHORE, TAX RATE field cannot be filled which means that TAX RATE will be applicable for other trade modes other than OFFSHORE
MTM Pricing: MTM PRICING CODE of your product which has been pre-set in the physical pricing setting tab. The pricing index code selected will be used to benchmark the MTM of your trade. Tax rate for MTM pricing has already been pre-set in physical pricing setting tab. You do not need to select this if your deal number is existing deal number with its own MTM pricing.
Actual Qty: Actual quantity of trade
Estimated. price: Estimated price of trade
Provisional Price: Provisional price of trade
Actual Price: Actual price of trade
Exchange Rate: Exchange rate used for the trade. This will only be applicable if your trade mode is IMPORT/EXPORT.
Custom Tax Amount: Custom tax amount applicable of the trade. This will only be applicable if your trade mode is IMPORT/EXPORT.
Delivery Rule: Delivery Rule
Pricing Date: Pricing Date
Pricing Contract: Pricing Contract
Doc Date: Document Date
Logic:
- If Deal No. already exists, when upload or copy and paste data with similar Deal No., Deal ID of the Deal No. will appear. If Deal No. does not exist, Deal ID will remain empty.
- Each row can only have either Benchmark Pricing or Fixed Pricing as the pricing mode; so when upload or copy and paste data with both Benchmark Pricing and Fixed Pricing filled in, the table will highlight Benchmark Pricing column in red to prompt user to correct it by selecting either one
Old bulk insert and update do not support exchange rate date; only new settlement insert and update do; only trade with trade mode == import/export is allowed to have ex rate date.
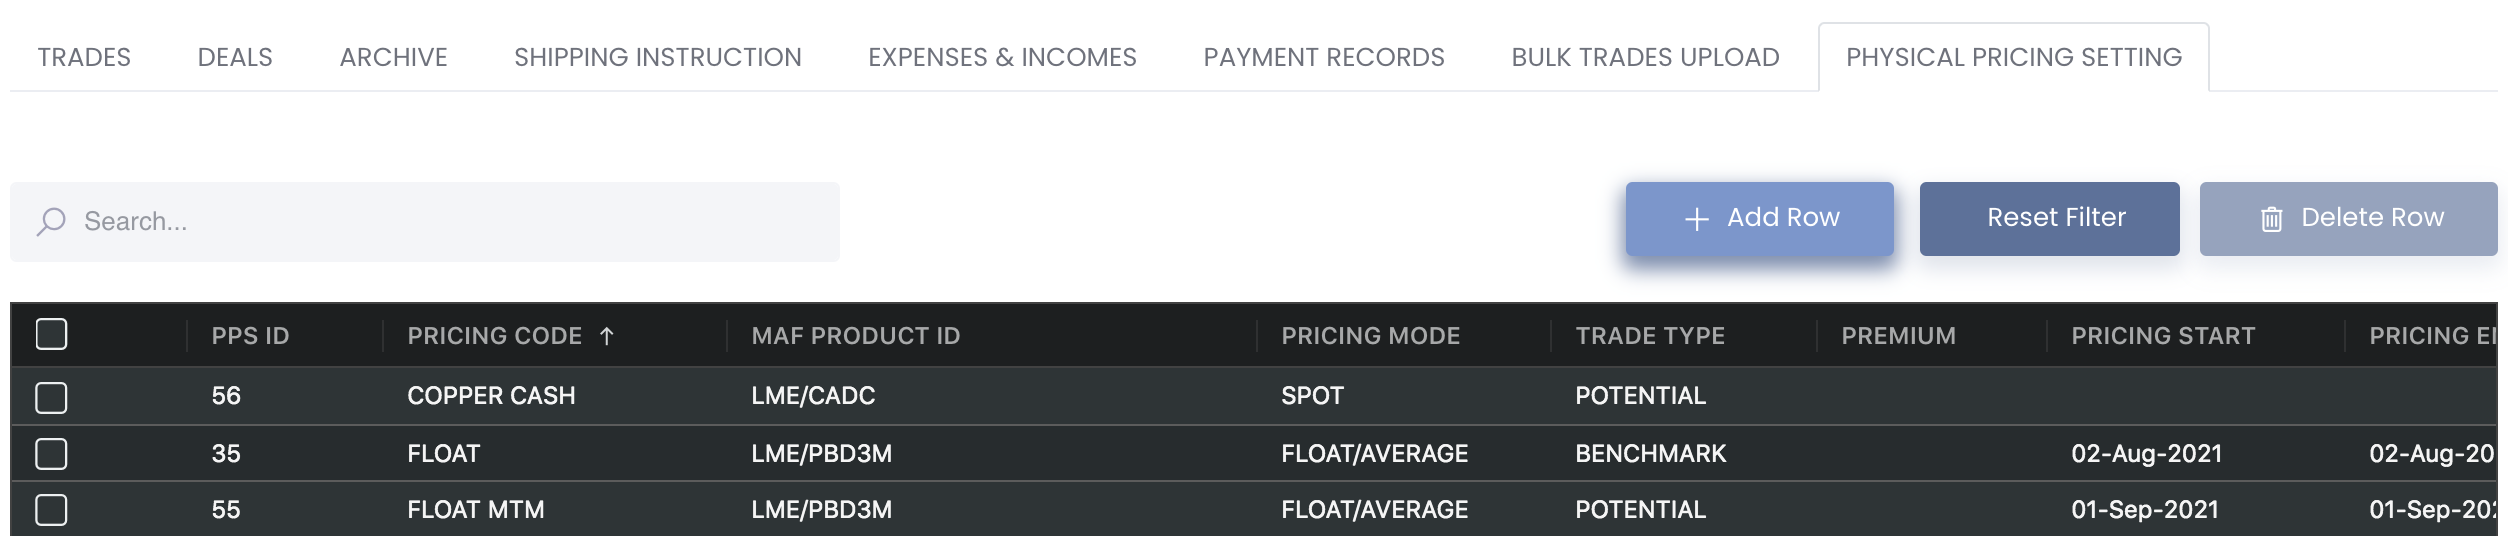
9. PHYSICAL PRICING SETTING
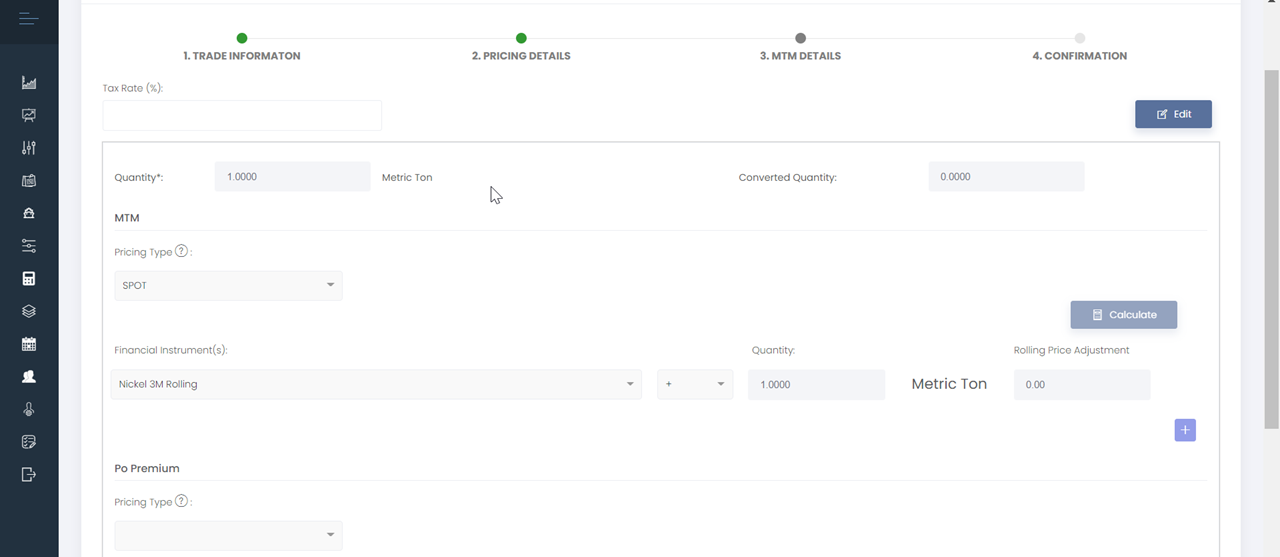
This section allows you to set up your physical trade pricing index (Benchmark & MTM - pricing mode = Float/Ave, WMA & Spot) here, which will be required if you want to do bulk trade upload for your physical trades. The pricing index allows you to use a product and benchmark its price against the purchase or sale pricing of the contract so as to better calculate the positions and P/L before the contract is complete (have actual price and quantity). You will thus be able to decide which contract (without actual price yet) should be matched to which particular product's pricing in order to price the contract and calculate the P/L more accurately. If your contract has fixed or actual price, there is no need to create a pricing index, you may just input the fixed price accordingly.
Every physical trade contract will have its own Benchmark and MTM (Potential) pricing index.
Benchmark pricing: Used to price your purchase or sale contract, if fixed price is not available yet. You may input the actual price once you receive it.
Potential pricing: Used to price/mark-to-market the corresponding contract (sale or purchase), if fixed price is not available yet. This allows you to have an idea of the calculations of the positions and P/L before the contract is complete.
Every trade with the same deal number will have the same Potential Pricing index.
So the system will be able to handle the following cases for the Benchmark and MTM (Potential) pricing index:
a. Floating price is available only (no fixed or actual price yet): If your contract has no fixed or actual price, you can record the floating price by choosing pricing mode “Float/Average”, “Whole Month Average(WMA) or ”Spot“. Once you receive the actual or fixed price, you may input for your trade, more details to be provided below. For instance, for a contract (import/export), if you only have floating price, you can use LME product for Benchmark pricing and SHFE product for MTM, which will result in a difference in P/L. Once you input the actual price and actually quantity, the positions and P/L of the contract will be calculated more accurately.
b. Fixed price is available: If your contract has fixed or actual price, you may input the price into the "Fixed Price" column in the bulk trade upload file, more details to be provided below.
In summary, all paper and physical trades pricing logic is as follows:
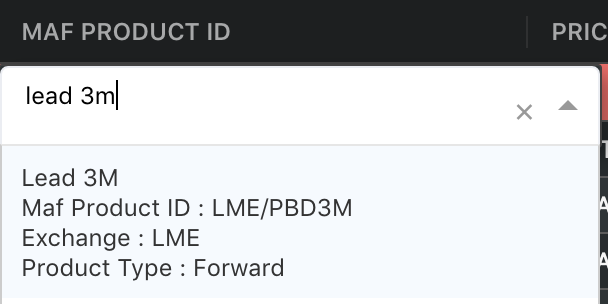
To determine which Pricing Mode to use, you may double click on the MAF Product ID/Product field to determine the "Product Type" (forward/futures/spot/forex):
1. If Product Type is FORWARD, please select FLOAT/AVE and input the Pricing Start and Pricing End Date only. For instance, LME 3M contract is specific to a certain date. Some examples include LEAD 3M, ZINC 3M etc.
2. If Product Type is Futures, please select WMA and input the Month and Year only. Some examples include LEAD, ZINC etc.
3. If Product Type is Forex or Spot, please select Spot and you do not need to input month, year or date. Some examples include LEAD 3M Rolling, ZINC CASH etc.
Please click on Add Row to add a new row and input the details accordingly. Once this setting is configured, you will be able to input the Pricing Code in the Benchmark Pricing and MTM Pricing columns in the Bulk Trade Upload file. Once upload, your contracts' pricing will be matched directly to the product you have matched them with. Cells in red are compulsory fields.
To access this section, click on 'Trade', following by 'Physical Trades' from the navigation sidebar on the left. Click on the 'PHYSICAL PRICING SETTING' tab at the top of the page to access this section.
To add a new pricing index, click on 'Add Row' and fill in all the details as necessary (cells in red are compulsory fields.)
Pricing Code: Unique name to identify the pricing index, you may come up with the names as you wish
MAF Product ID: Product to use as a pricing index, these products are obtained from various Exchanges sources and have been added into the system for your usage
Pricing Mode: Types of pricing mode, namely; Float/Ave, WMA and Spot
To determine which Pricing Mode to use, you may double click on the MAF Product ID cell and look at the "Product Type" (forward/futures/spot/forex):
a. If Product Type is Forward, please select FLOAT/AVE and input the Pricing Start and Pricing End Date
b. If Product Type is Futures, please select WMA and input the Month and Year
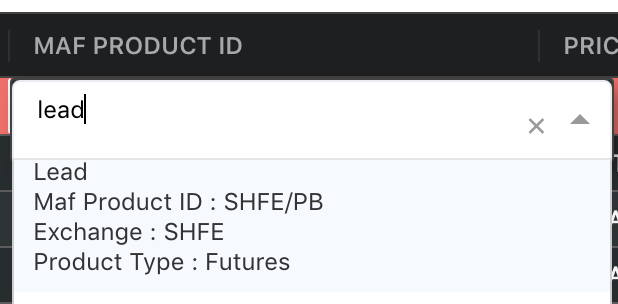
c. If Product Type is Forex or Spot, please select Spot

Trade Type: Financial instrument(s) used as an index to benchmark the pricing of your trades (Benchmark or Potential (MTM)
Premium: Premium to your benchmark index/MTM
Pricing Start: Start date of pricing, applicable for forward products
Pricing End: End date of pricing, applicable for forward products
Month: Contract month of pricing, applicable for futures products
Year: Contract year of pricing, applicable for futures products
Tax Rate: Tax rate applicable to the pricing of the index
Once done, please click 'Save' and the Pricing Code will be available for you to input in the 'Benchmark Pricing' or 'MTM Pricing' fields in the bulk trade upload
Please note that this section is equivalent to the pricing index setting as shown in the screenshot when manually creating your physical trade.
10. DAILY CHANGE
Click on the DAILY CHANGE tab to handle physical trade average pricing daily position change for HEDGE RATIO model here.
Click on Add Row and fill in the compulsory fields and click "Save" at bottom left of the page to save the changes.
ACCUM QTY: Final value will appear in the 1st row of the ACCUM QTY of each pricing ID group (TOTAL QTY - DAILY CHANGE)
REMAIN QTY: TOTAL QTY - ACCUM QTY
Note: if contract number of the trade is empty, it will not be available in the CONTRACT NO. drop down list. Please add contract number for the trade for it to appear here. If physical trade's Benchmark price is priced in (FIXED), it will not be shown here because priced in open position will not be shown in Hedge Ratio.
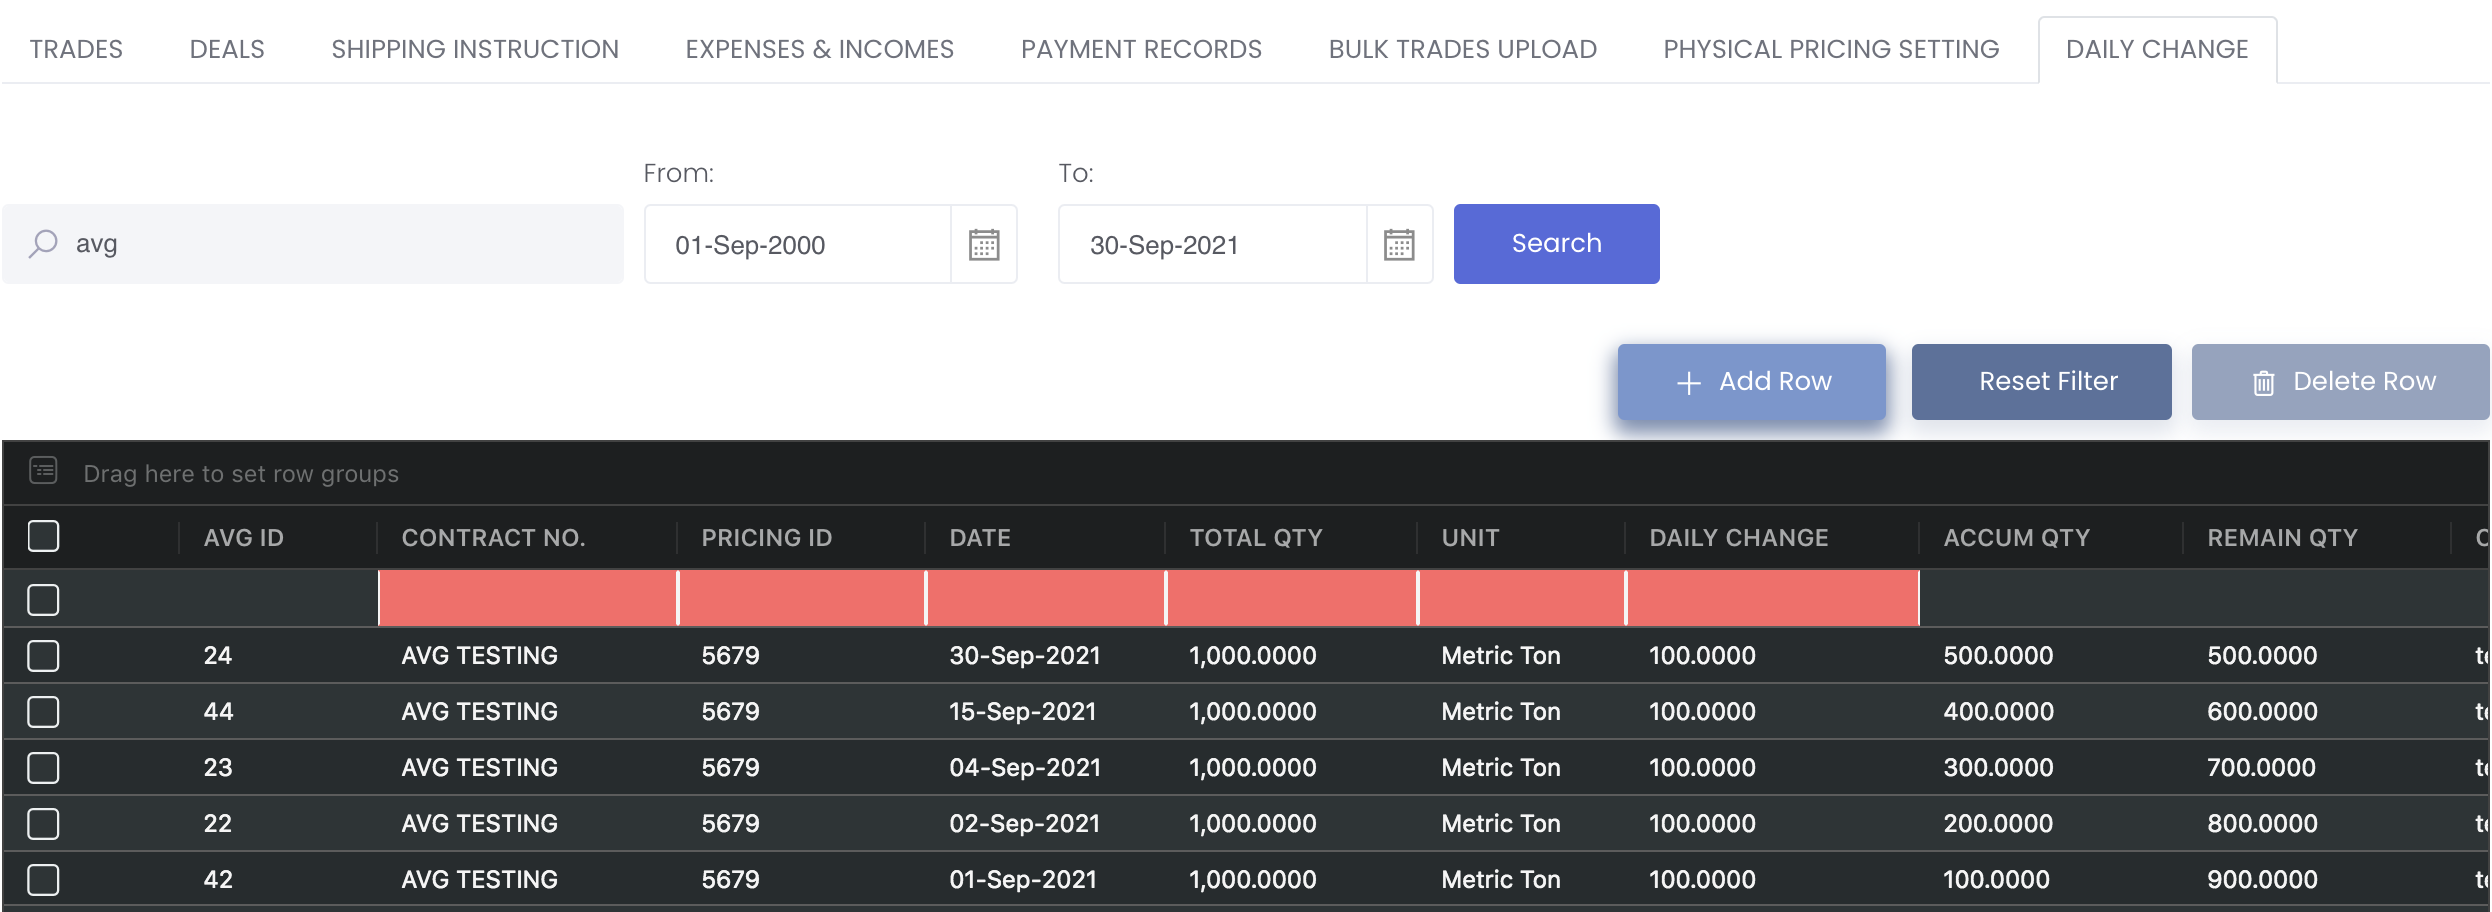
Start Date will be 1st day of current month and End Date will be today’s date by default. You need to delete physical trade daily change data first before related physical trades or physical trades pricing can be deleted
In HEDGE RATIO app: If there are any linked daily changes in Daily Change table
Cut off day will be current date (today), so for any rows with any date beyond today’s date, the position will not appear in the HEDGE RATIO app
Sum of all average daily change amount based on pricing ID will form the ACCUM QTY in Daily Change table
If the trade has estimated price or actual price (PRICED_IN = TRUE), there will be no open position and so will not appear in HEDGE RATIO
New physical position should be = Normal Position Qty - ACCUM QTY if normal position qty > 0; otherwise, will be = ACCUM QTY
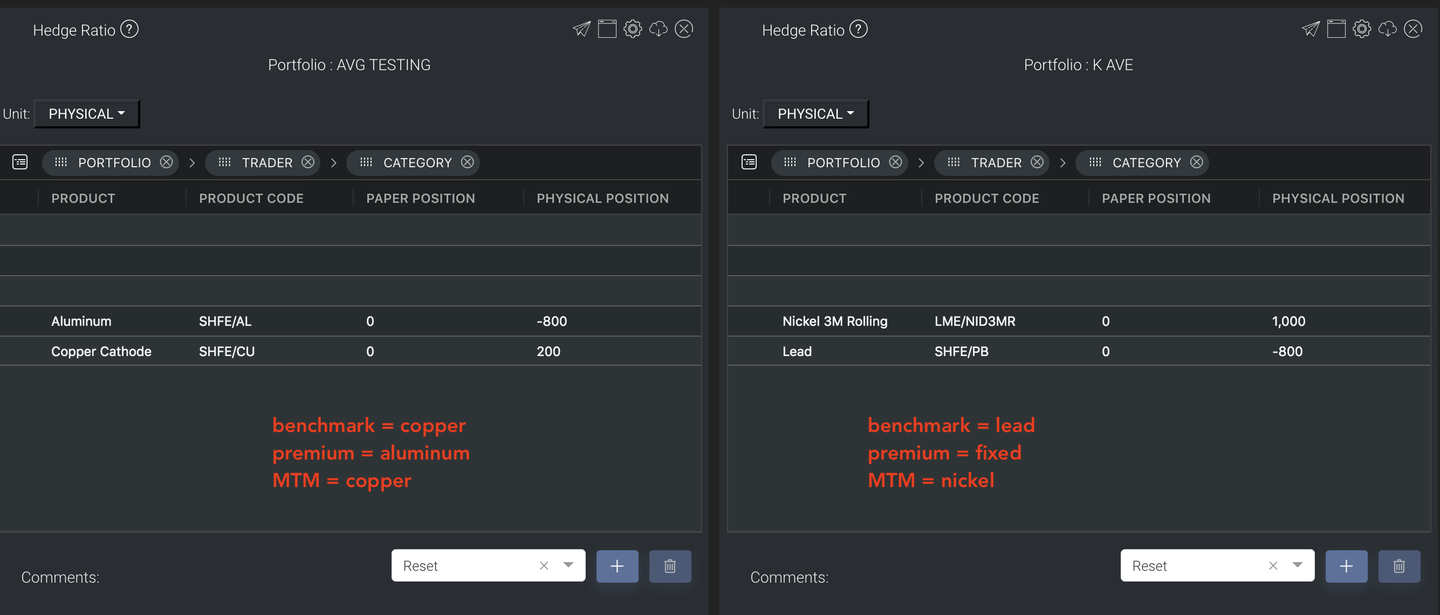
For example,
Case 1:
Benchmark: -1000 MT SHFE/CU
Premium: -1000 MT SHFE/AL
Potential: + 1000 MT SHFE/CU
Daily change for Benchmark and Premium will be 200 MT each
So sum up accordingly and the positions will be shown
Case 2:
Benchmark: -1000 Lead
Potential: +1000 Nickel
Daily change accum qty + 200 lead
- So sum up accordingly and the positions will be shown
Functionality
Please refer to Table Settings and Table Layout Settings for table functionalities.
Definition of Terms
Please refer to List of Definitions: Trades.
Click to access: