MAF Cloud: Quick Start Guide
- IT Support
- MAF Intern (Unlicensed)
-
--
Welcome to MAF Cloud!
Here's a quick guide to help you get started.

TABLE OF CONTENTS:
How do I start my MAF Cloud journey?
Thank you for your interest in MAF Cloud! ![]()
You may refer to Onboarding Guide for more details.
Sign Up
You can sign up for an account by clicking here.
Upon signing up, you will receive 2 emails:
a. Account Verification Email. Please follow the instructions in the email to verify your email address to activate your account.
b. Welcome Email. This provides some guidance on navigating and using MAF Cloud, to help you get started!
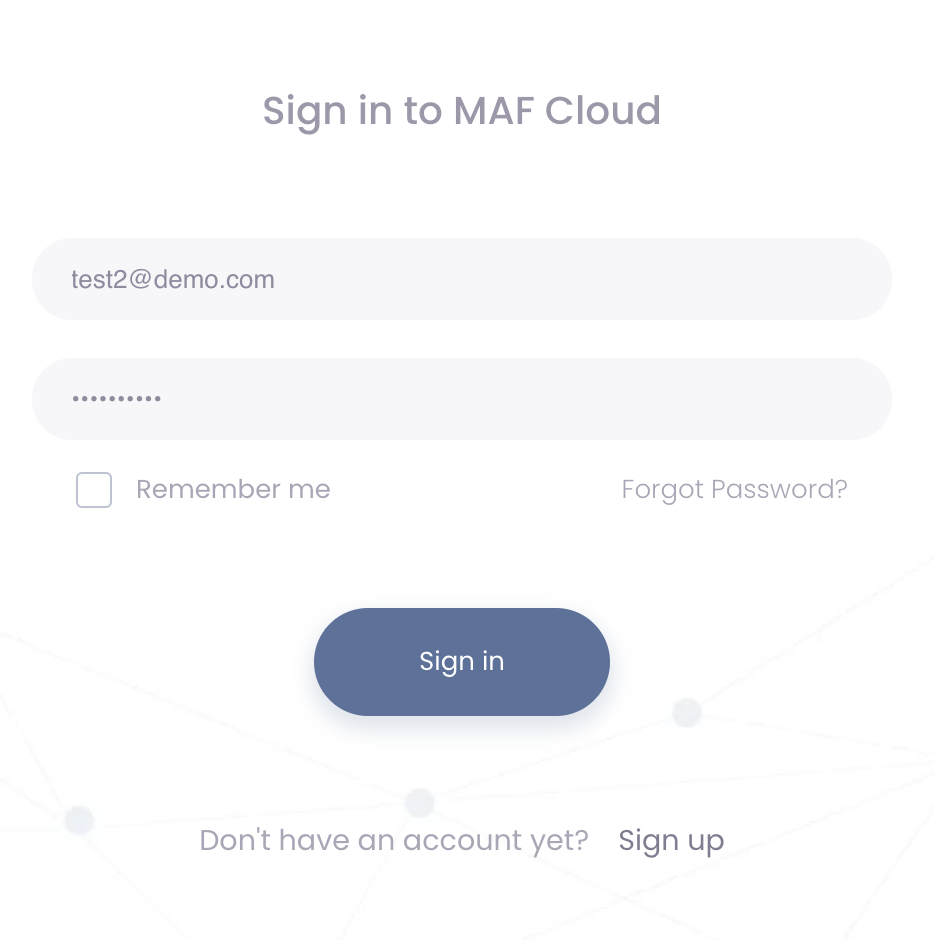
Sign In
Once you have verified your email address in MAF Cloud, you can sign into your account immediately. You may do so by clicking here or 'Get Started' in the Welcome Email.
Simply key in your details and you are good to go!
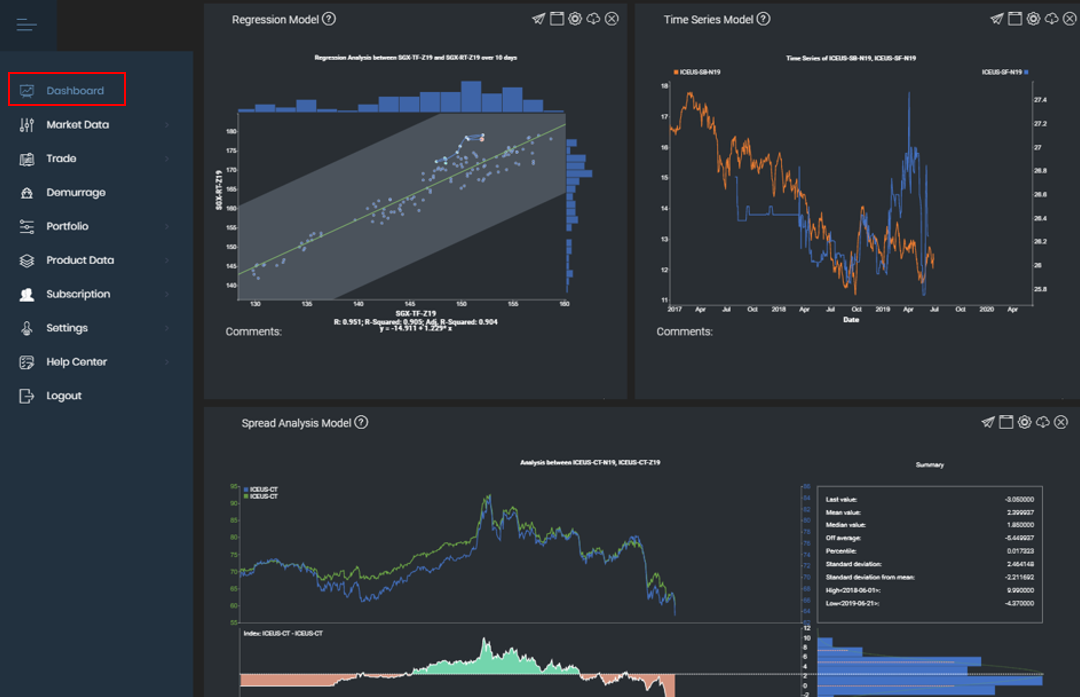
This is the first page you will see when you first enter MAF Cloud ('Featured Charts'). There are many other functions for your selection in the navigation sidebar on the left. Please feel free to explore!

We hope you have a pleasant MAF Cloud journey!
Note: The mobile phone interface is more suitable for viewing/browsing the features in MAF Cloud, so it is recommended that you use your desktop/laptop to access MAF Cloud and create your model(s) and market activities, and then use your mobile to view/browse!
How can I create my first Quantitative Model in my Dashboard?
The 'Dashboard' is where you can utilise many quantitative models available in MAF Cloud to analyse market data and/or your portfolio(s). To access it, click on 'Dashboard' in the navigation sidebar on the left.
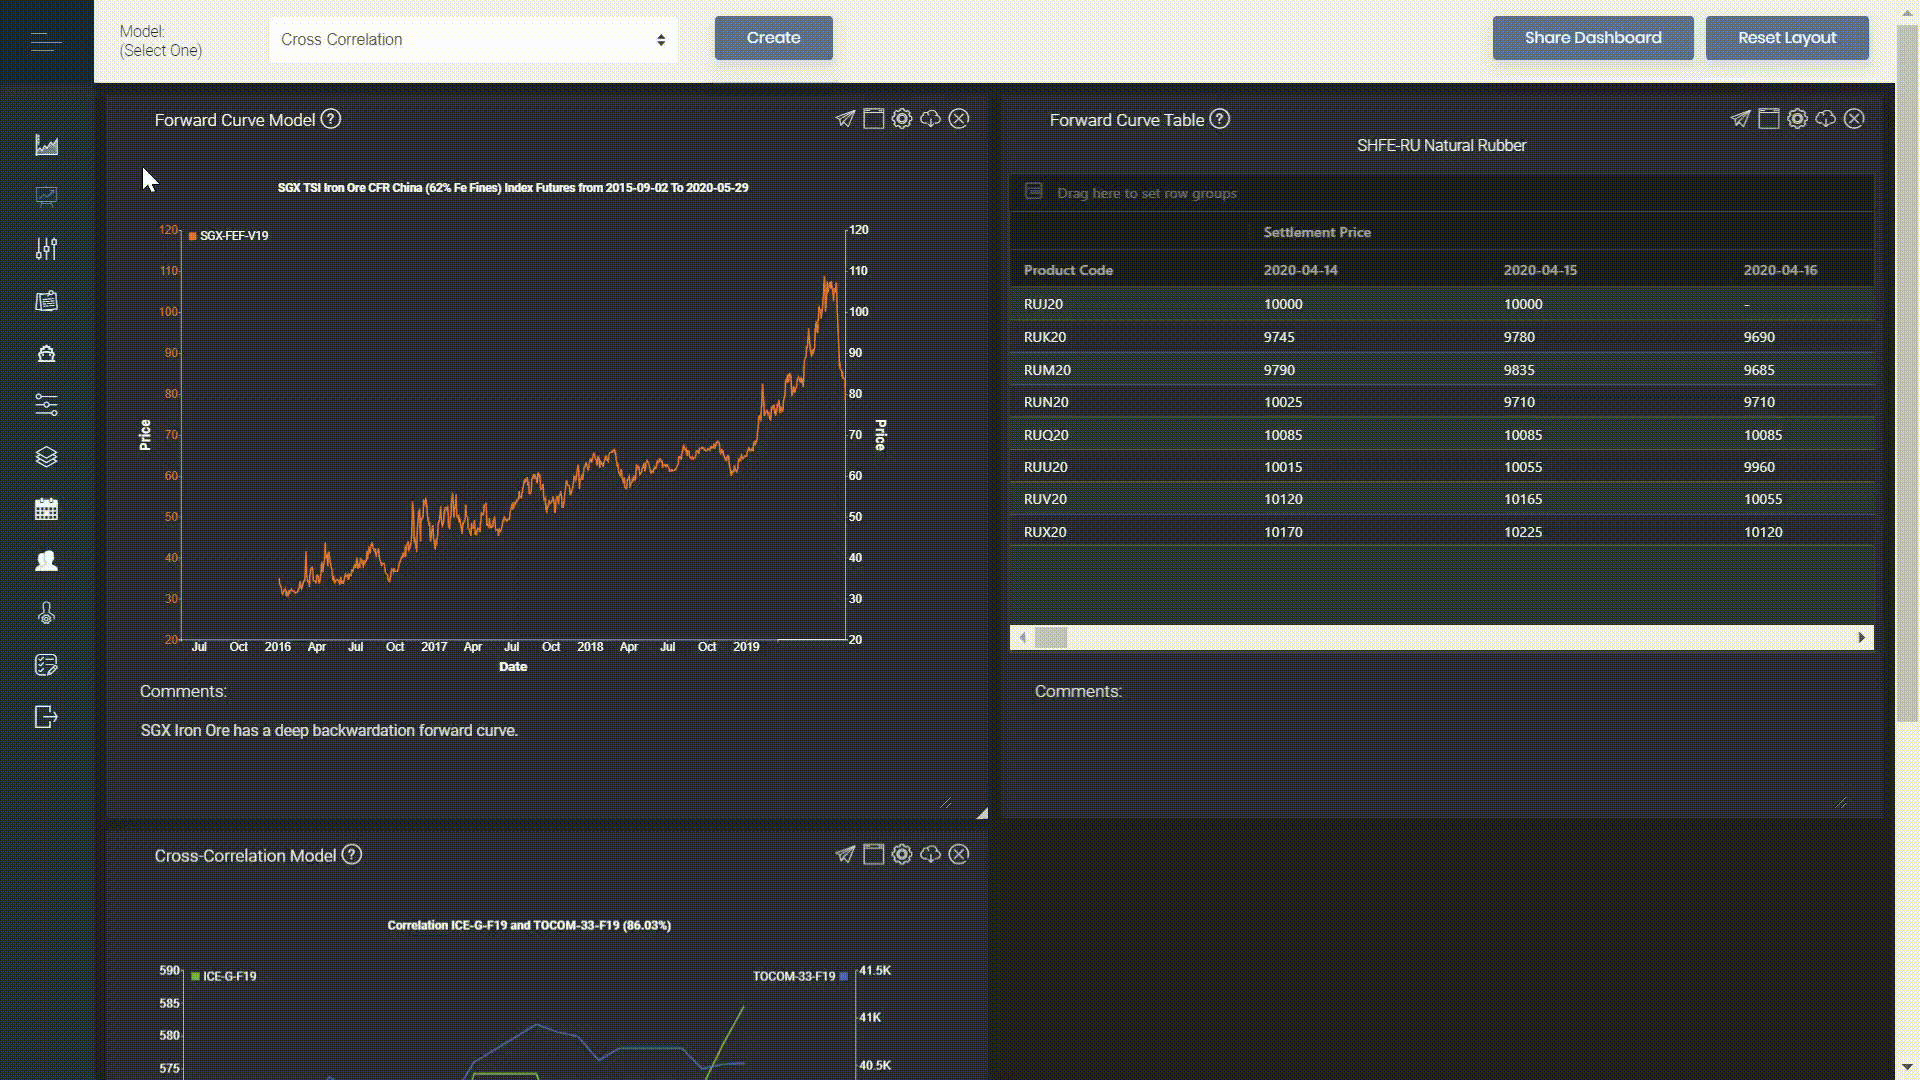
To create a new window, select your desired quantitative model in the drop-down list above, and click 'Create'.
(Please click here to learn more about the different quantitative models available.)
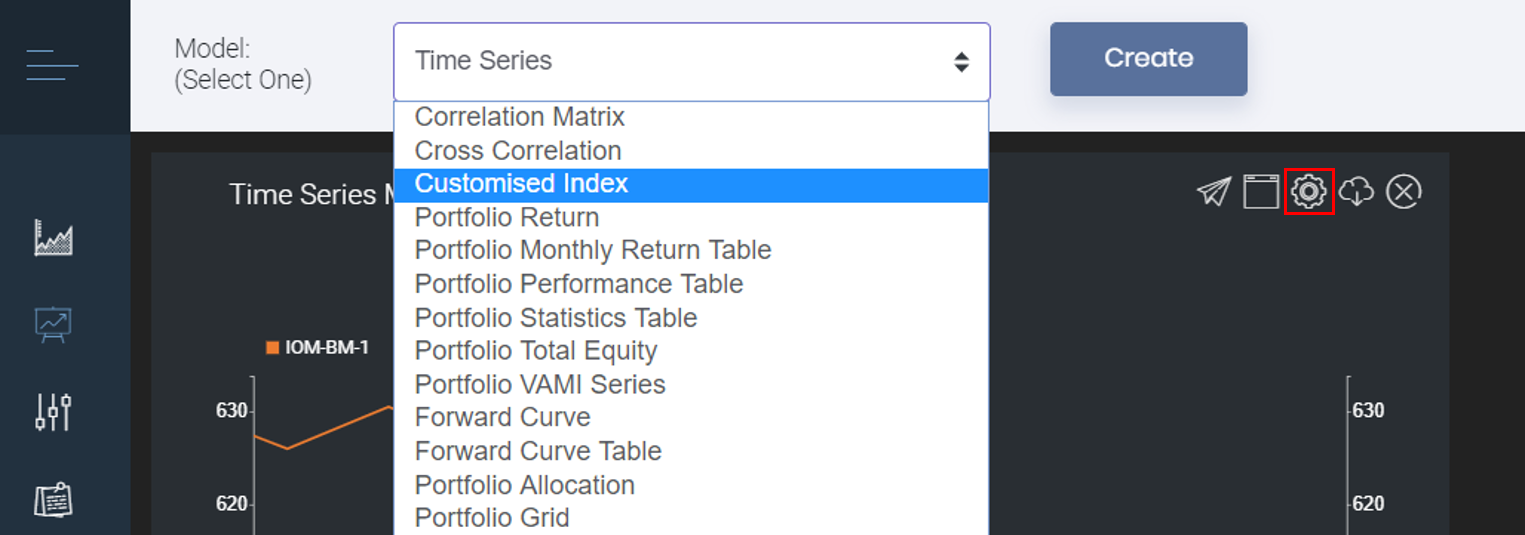
The chosen model will be added into the 'Dashboard'. The window will be blank when first created. Click on 'Settings' (represented by a 'gear' icon) at the top right corner of your model's window to input the model's required details accordingly, and simply click 'Submit' to view the output(s)!
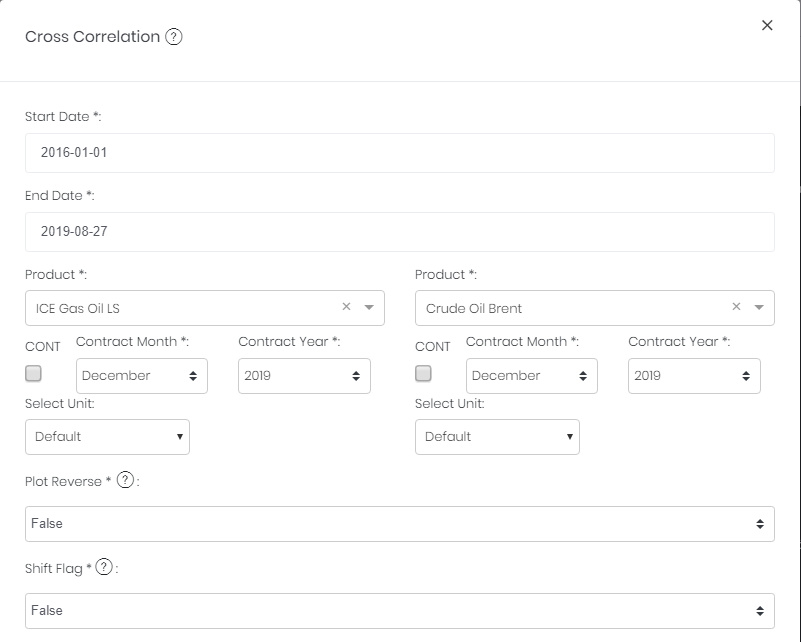
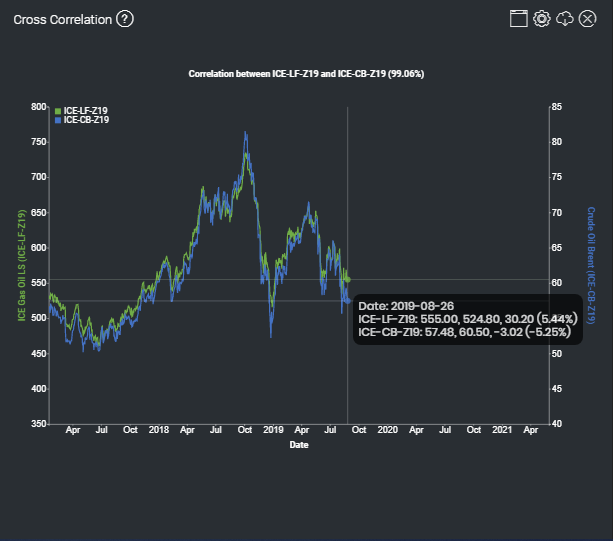
Here is an example using the Cross-Correlation Model.
The screenshot on the left shows the 'Settings' window where you fill in the details, while on the right is the output (quantitative model) displayed.
 |  |
|---|
How do I create a Demurrage Claim?
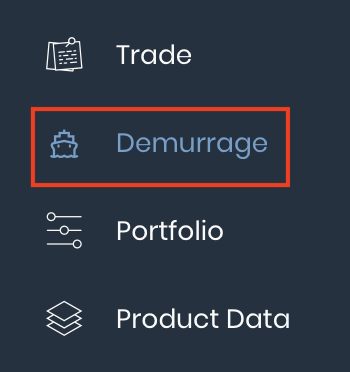
Click 'Demurrage' from the navigation sidebar on the left.
Click '+ New Claim' to add a new row.
To input your claims data, you may:
- Key in the details manually into each column (compulsory fields will be highlighted in red), or
- Copy the details from external sources (e.g. Excel spreadsheet) and paste them into the table. As the 'Actions' and 'Claim ID' columns are automatically generated in MAF Cloud, you may start with the third column if you wish to paste in your own data.
- Import data into the table directly
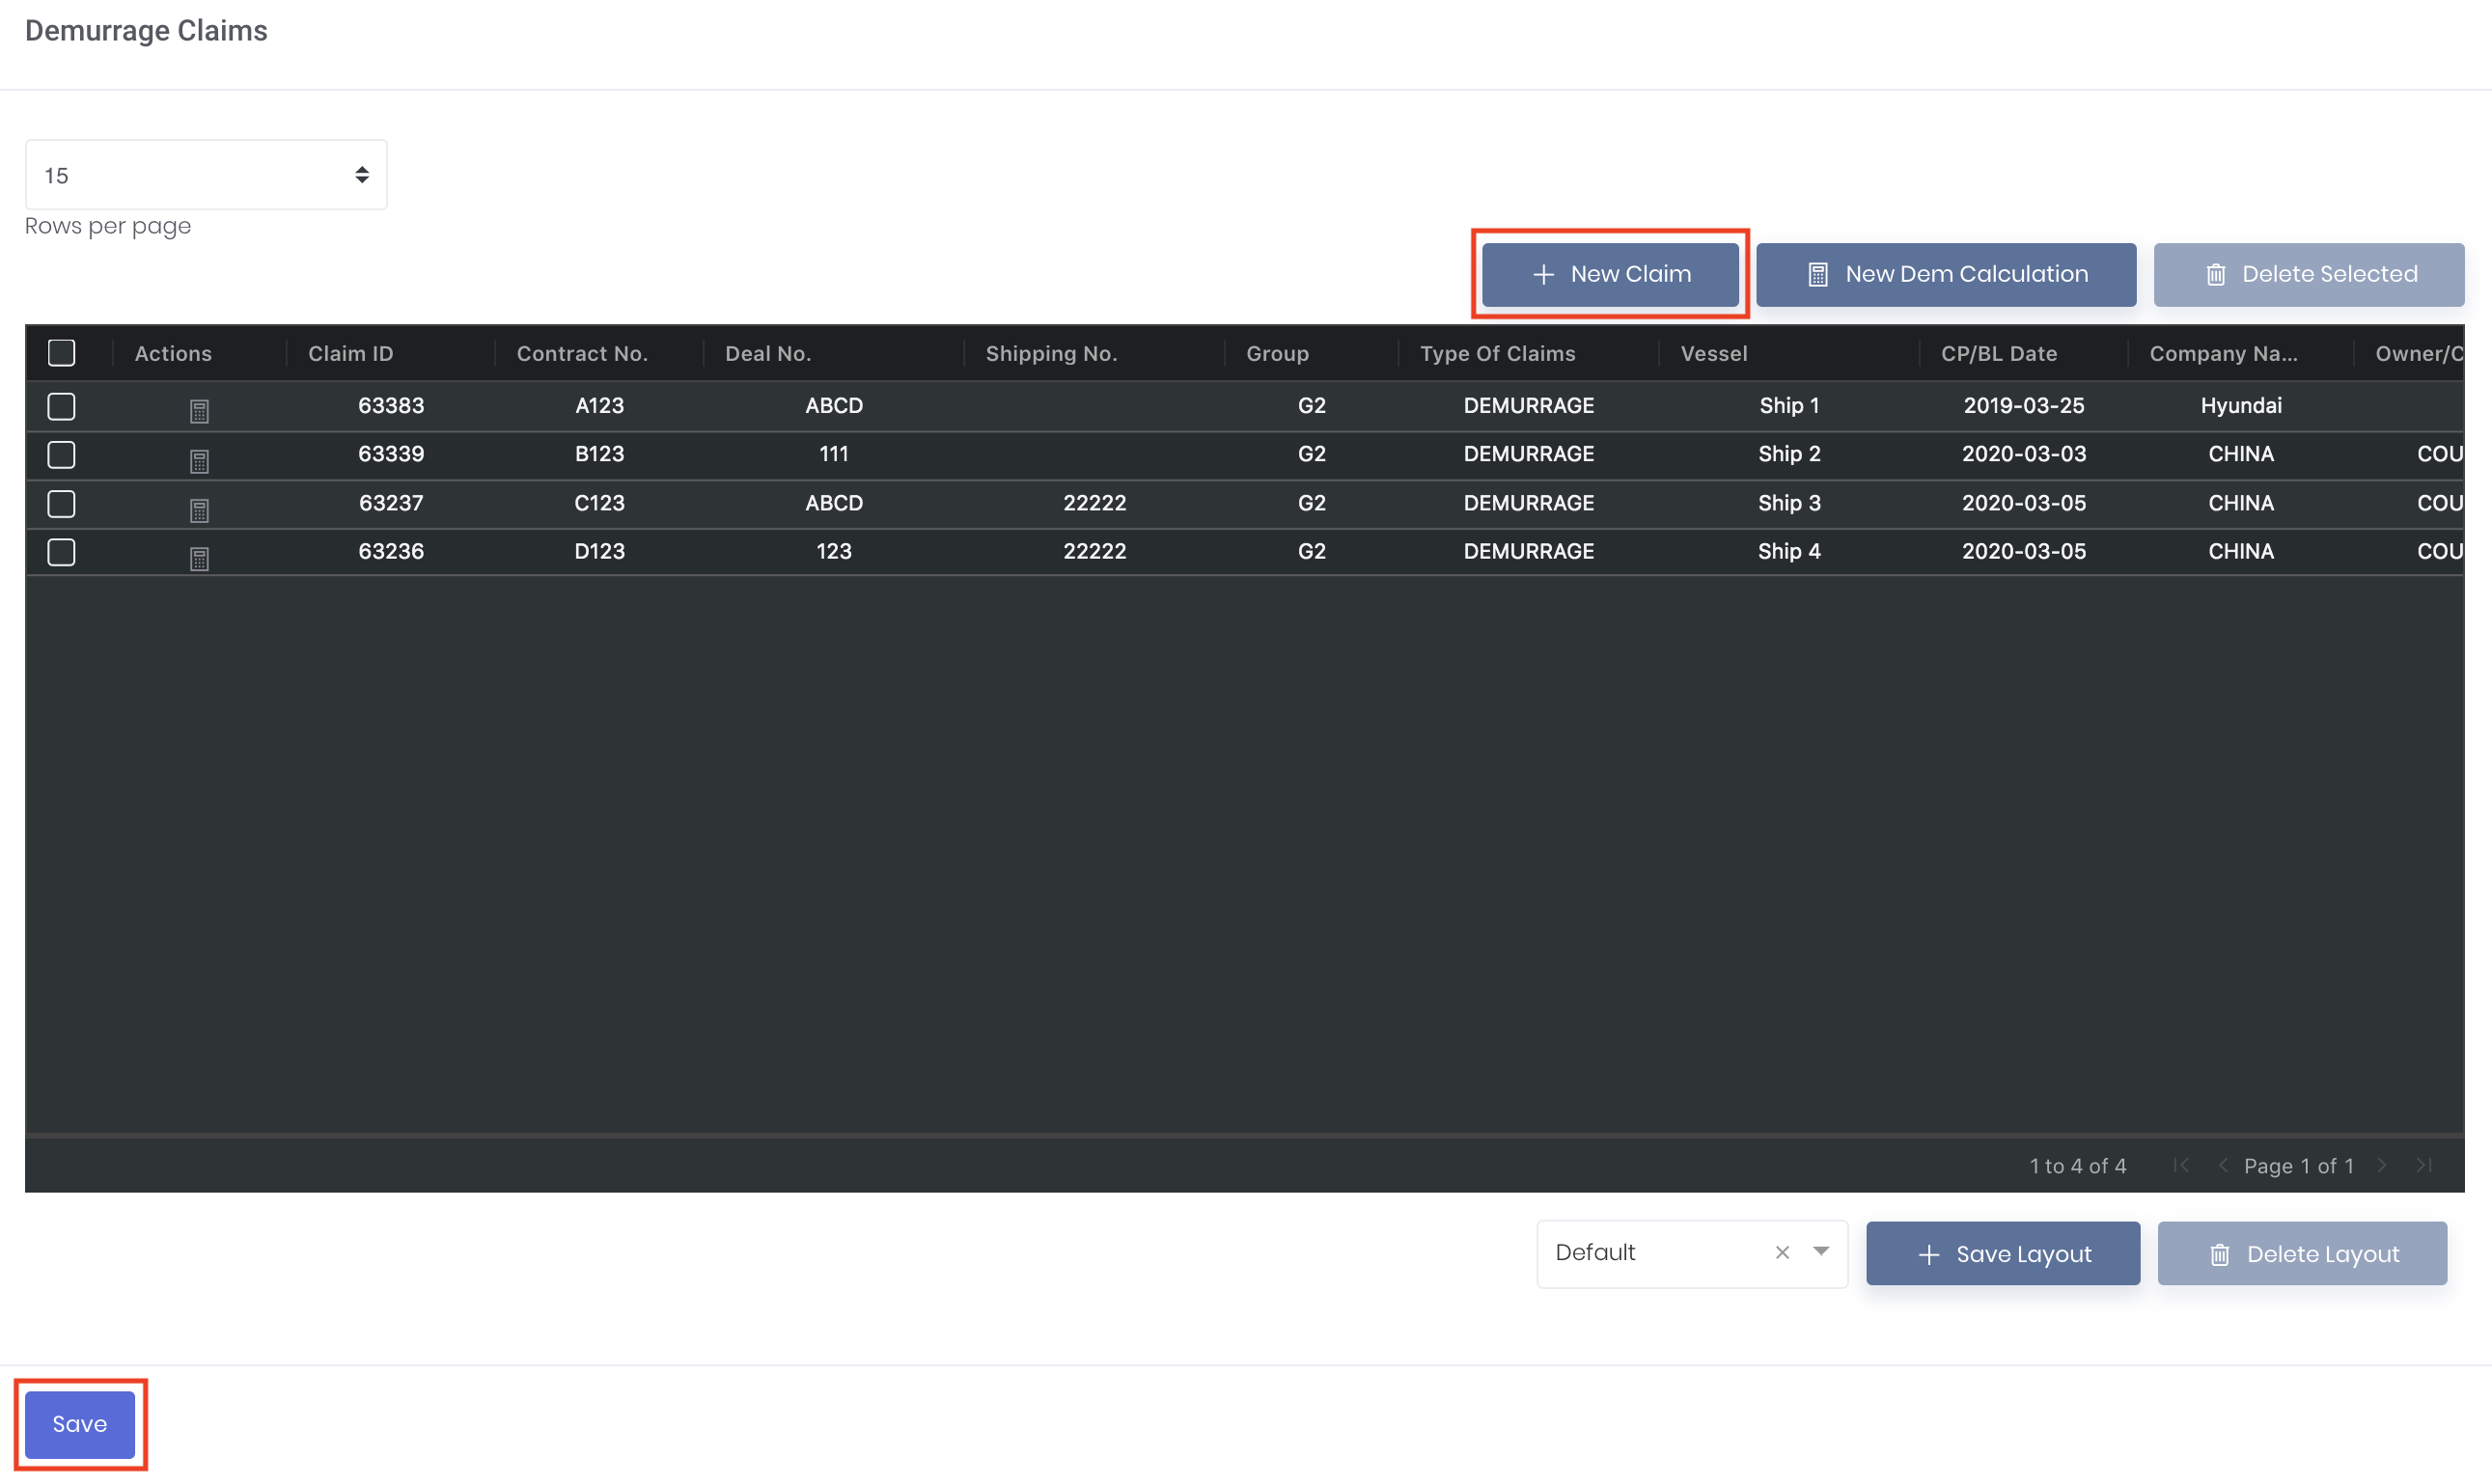
Click on 'Save Claims' at the bottom left corner of the page to save the details. To filter and adjust the columns to fit your data, you may refer to Table Layout Setting.
Please refer to Demurrage Claims Table for more details.
How do I create a new Demurrage Calculation?
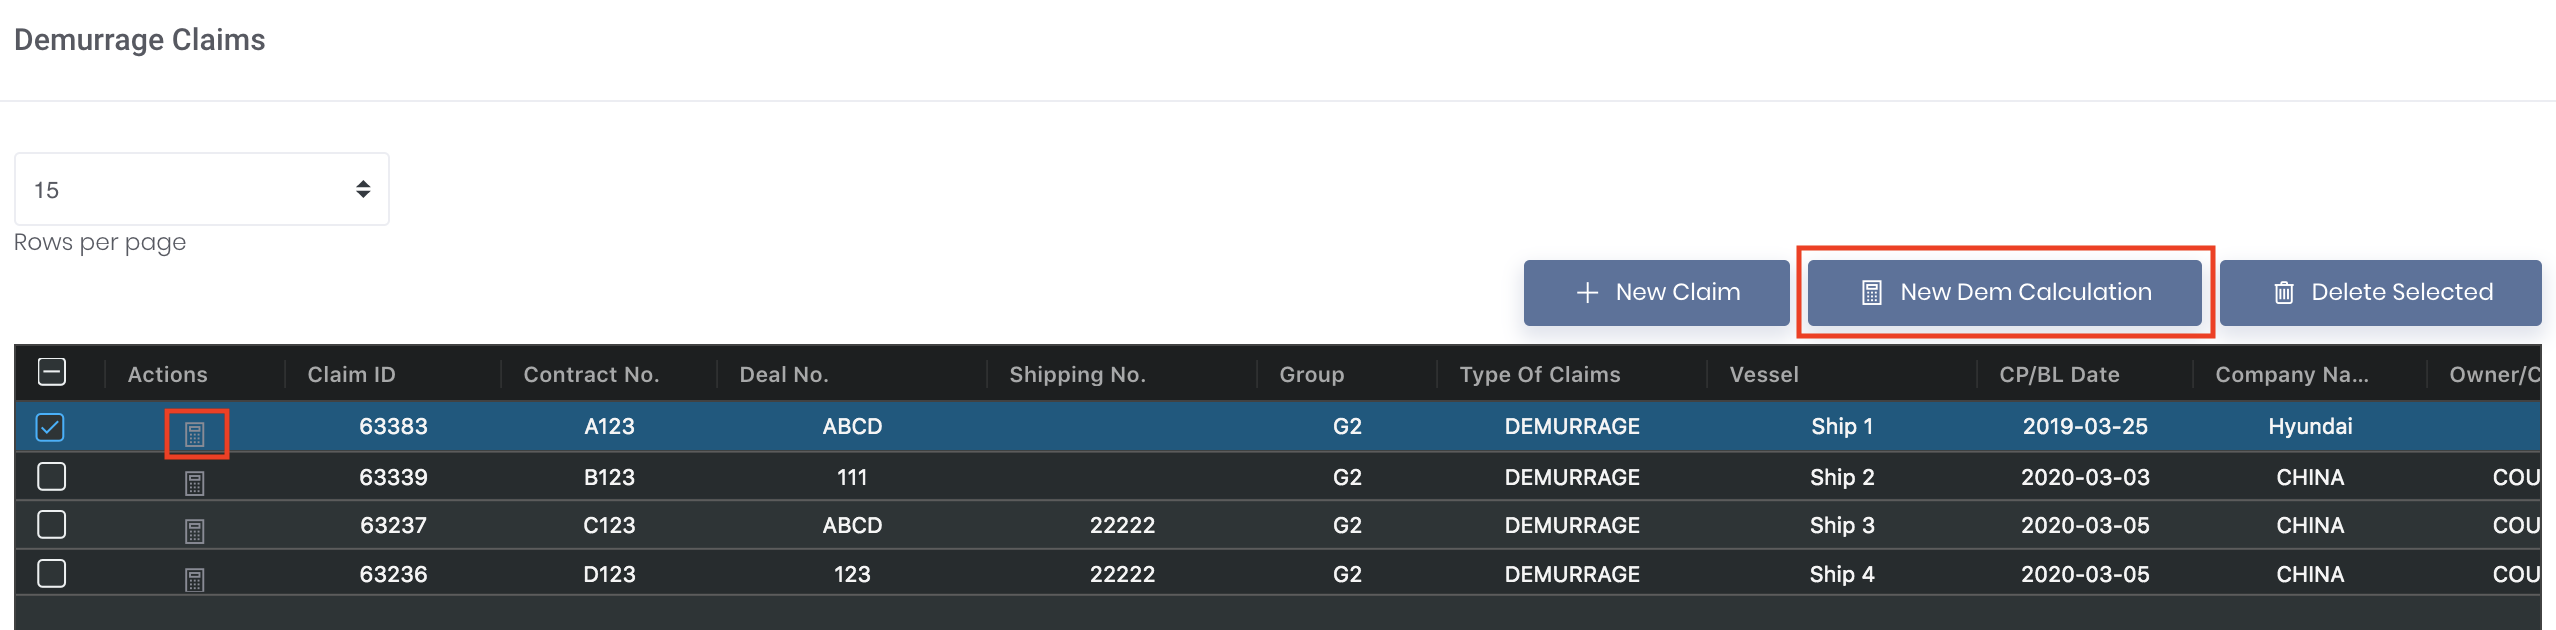
You may generate a new demurrage record by clicking 'New Dem Calculation' on the top right corner of the Demurrage Claims page. You can also click on the claim record's "Dem Calculation" (represented by a 'calculator' icon) under 'Actions' in the table to access the Demurrage Calculations page.
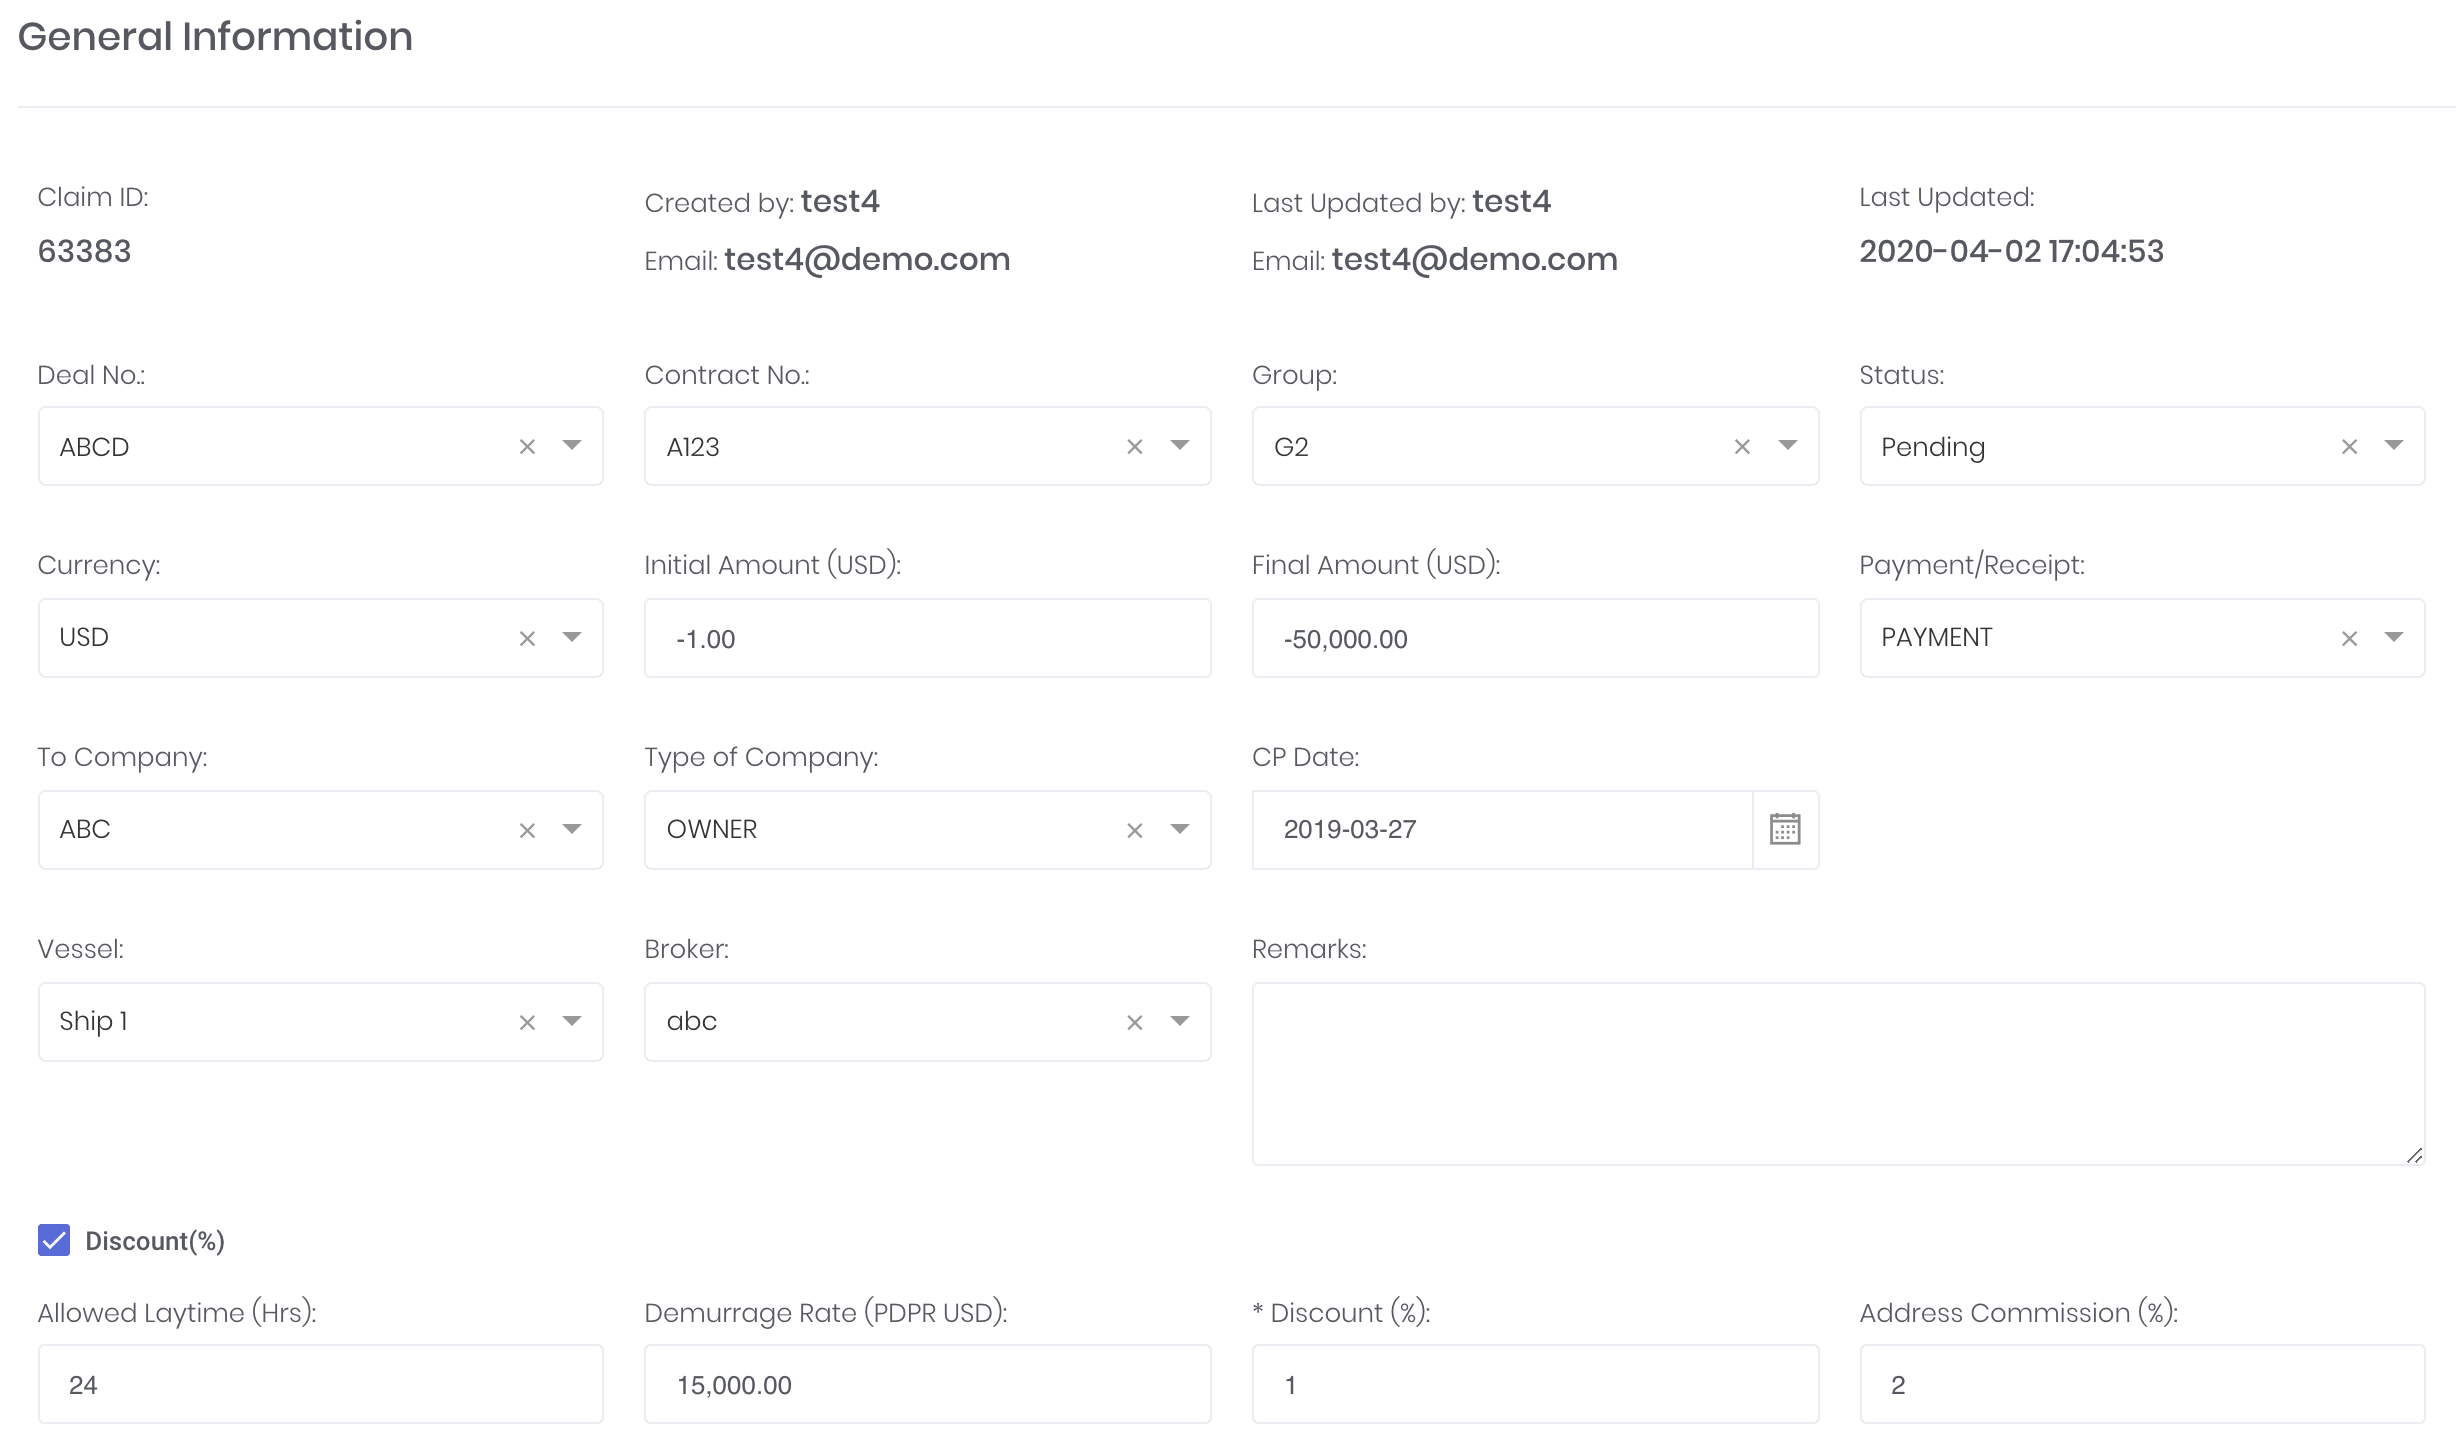
General Information
This section is to record the general information of the commercial terms in a shipping contract.
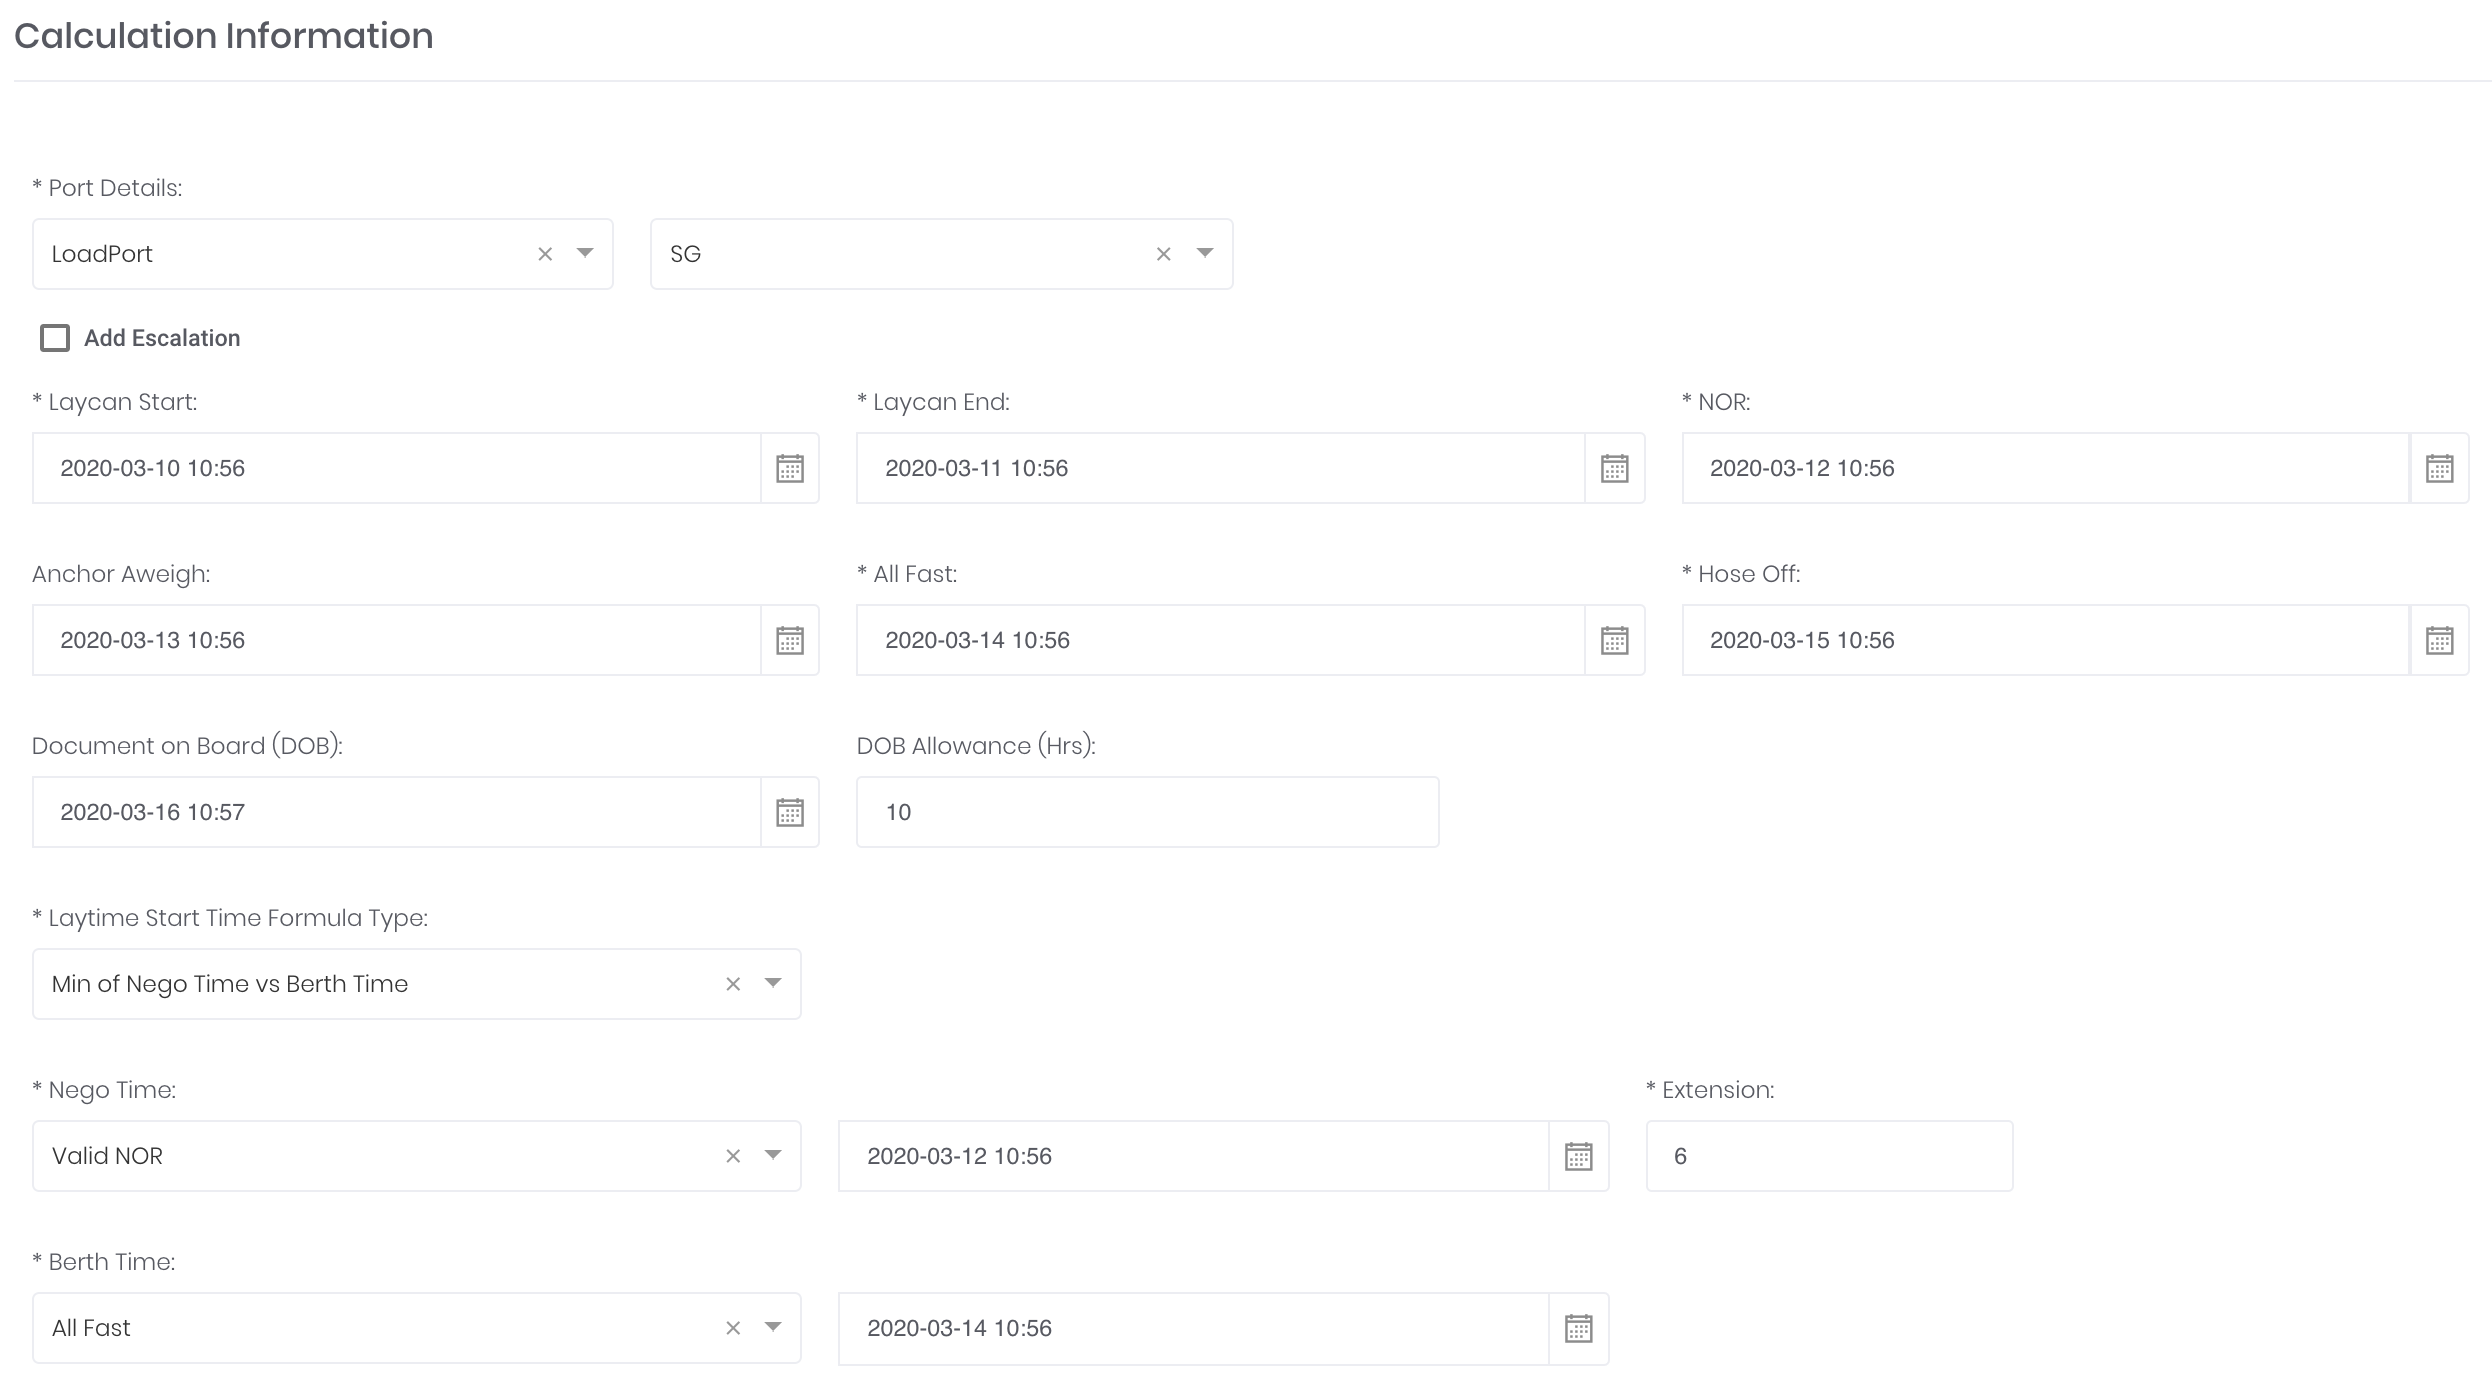
Calculation Information
This section is to input the loadport and disport details, for the demurrage and laytime calculations to be made.
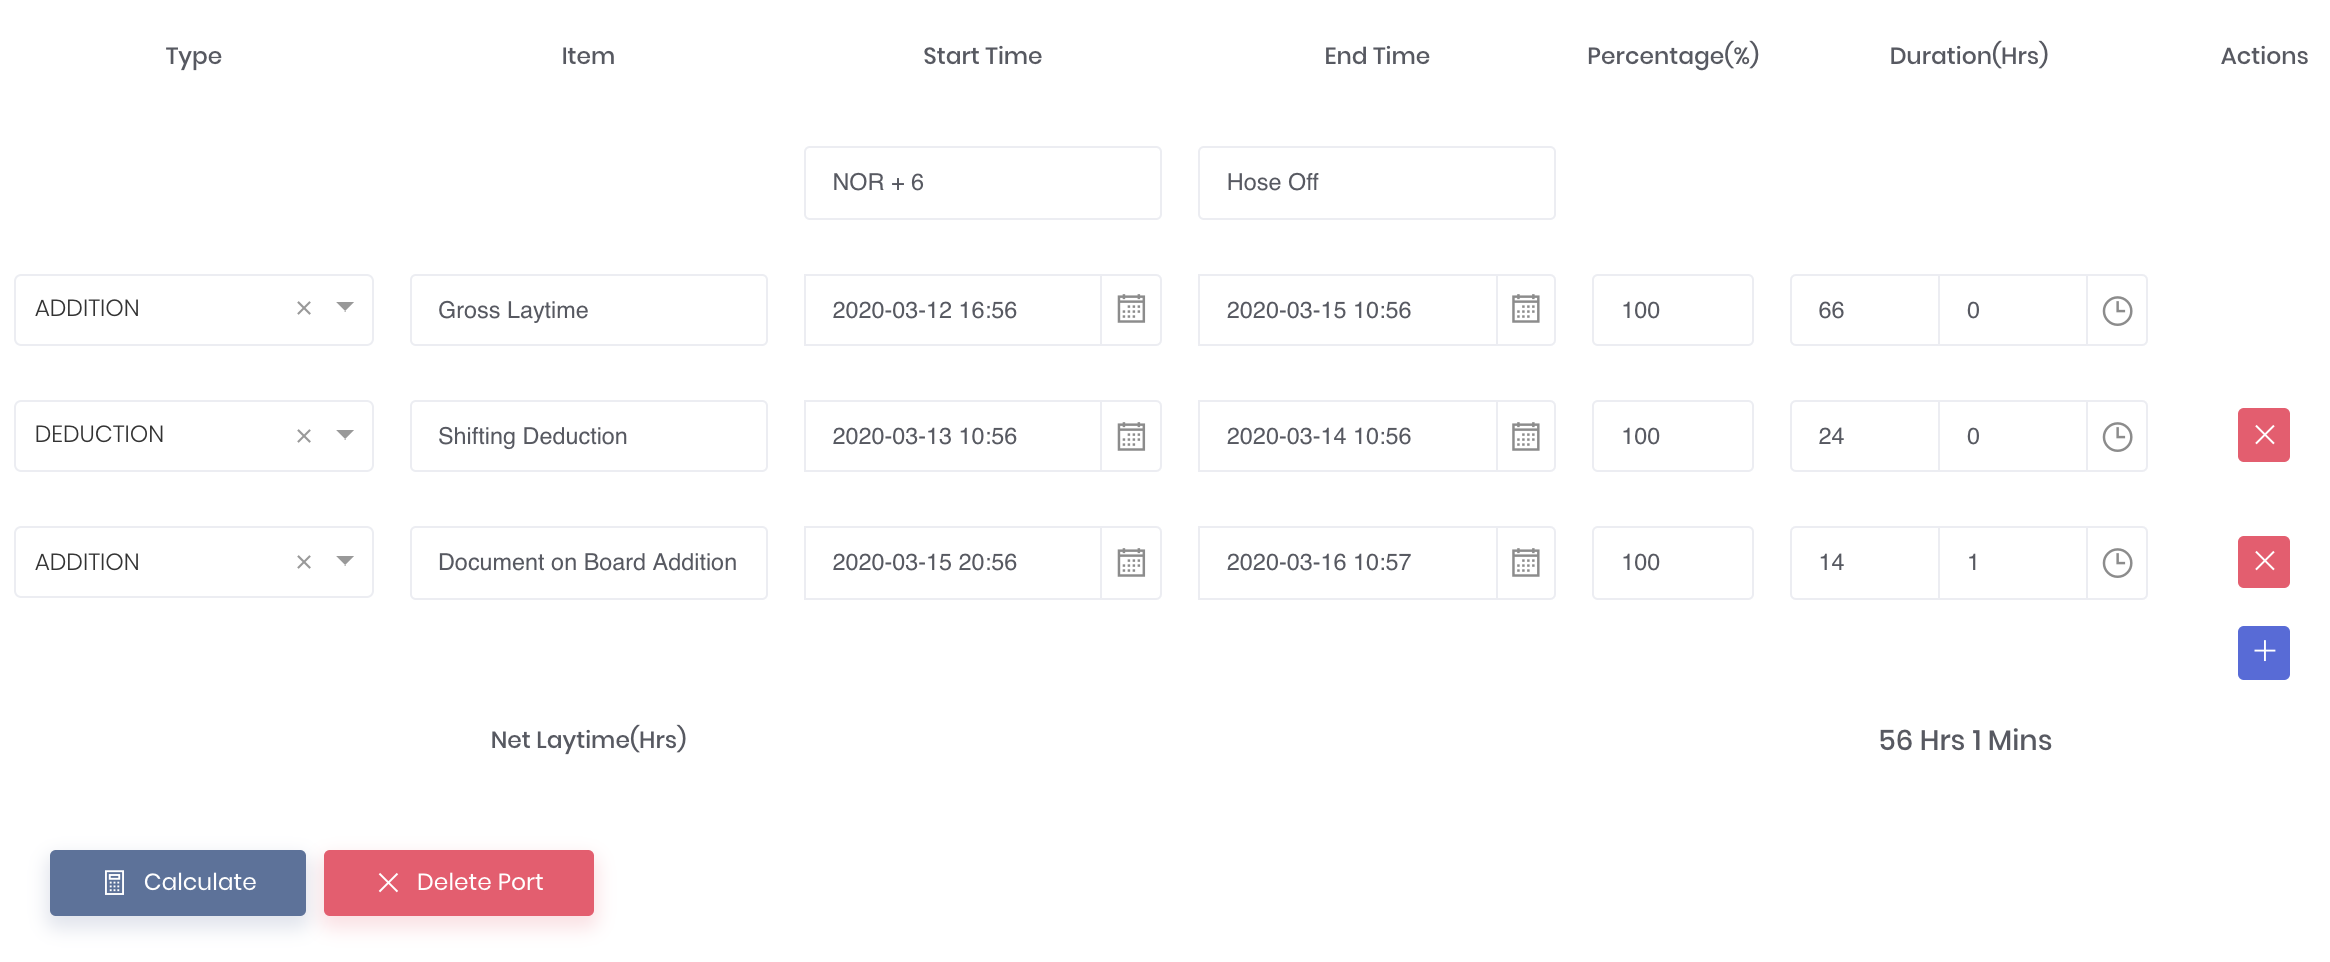
Demurrage Calculations
After filling in the Calculation Information section, the following calculations section will display the net laytime in hours based on the details you have keyed in.
Please refer to Demurrage Calculations for more details.
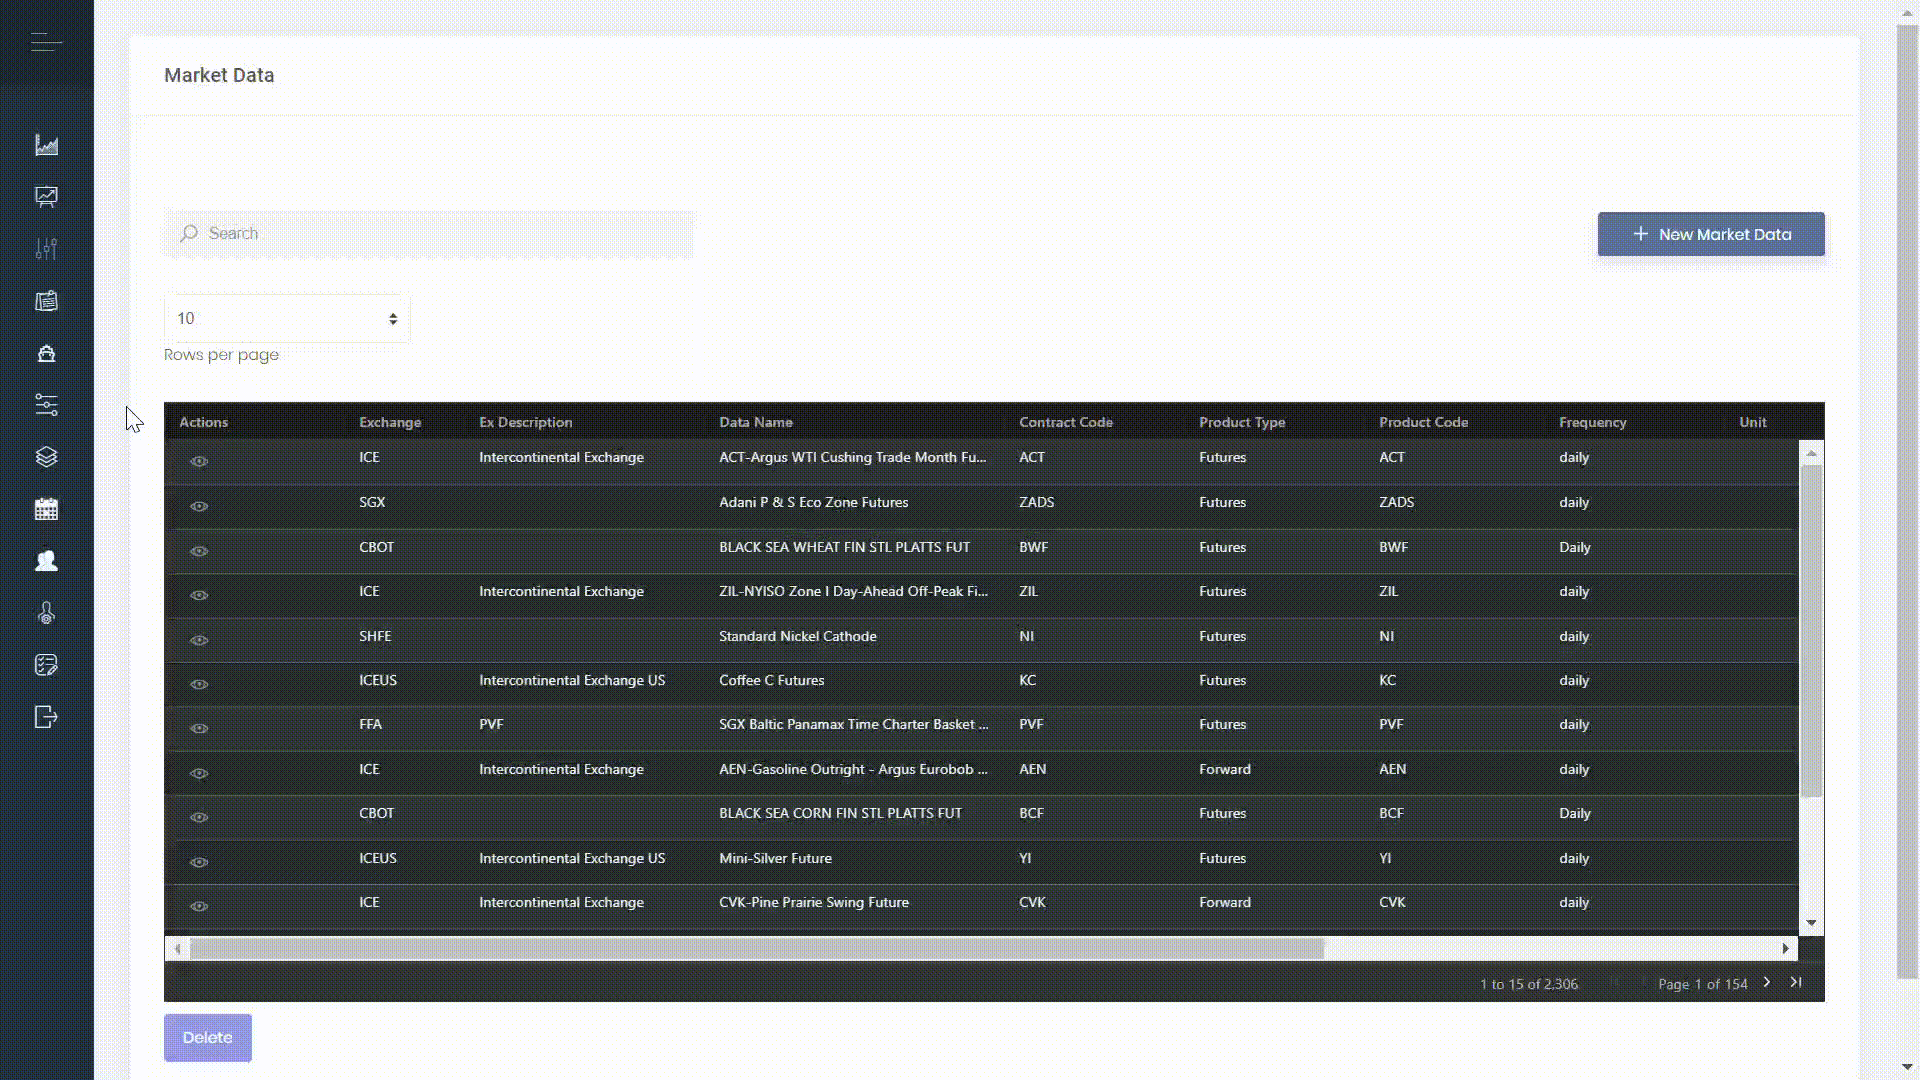
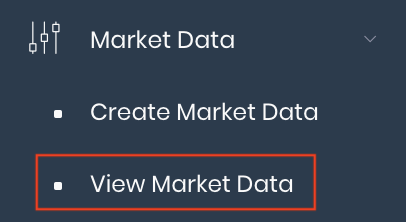
Where can I find all the available Market Data in my MAF Cloud account?
After you sign into MAF Cloud, click on 'Market Data', followed by 'View Market Data' from the navigation sidebar on the left.
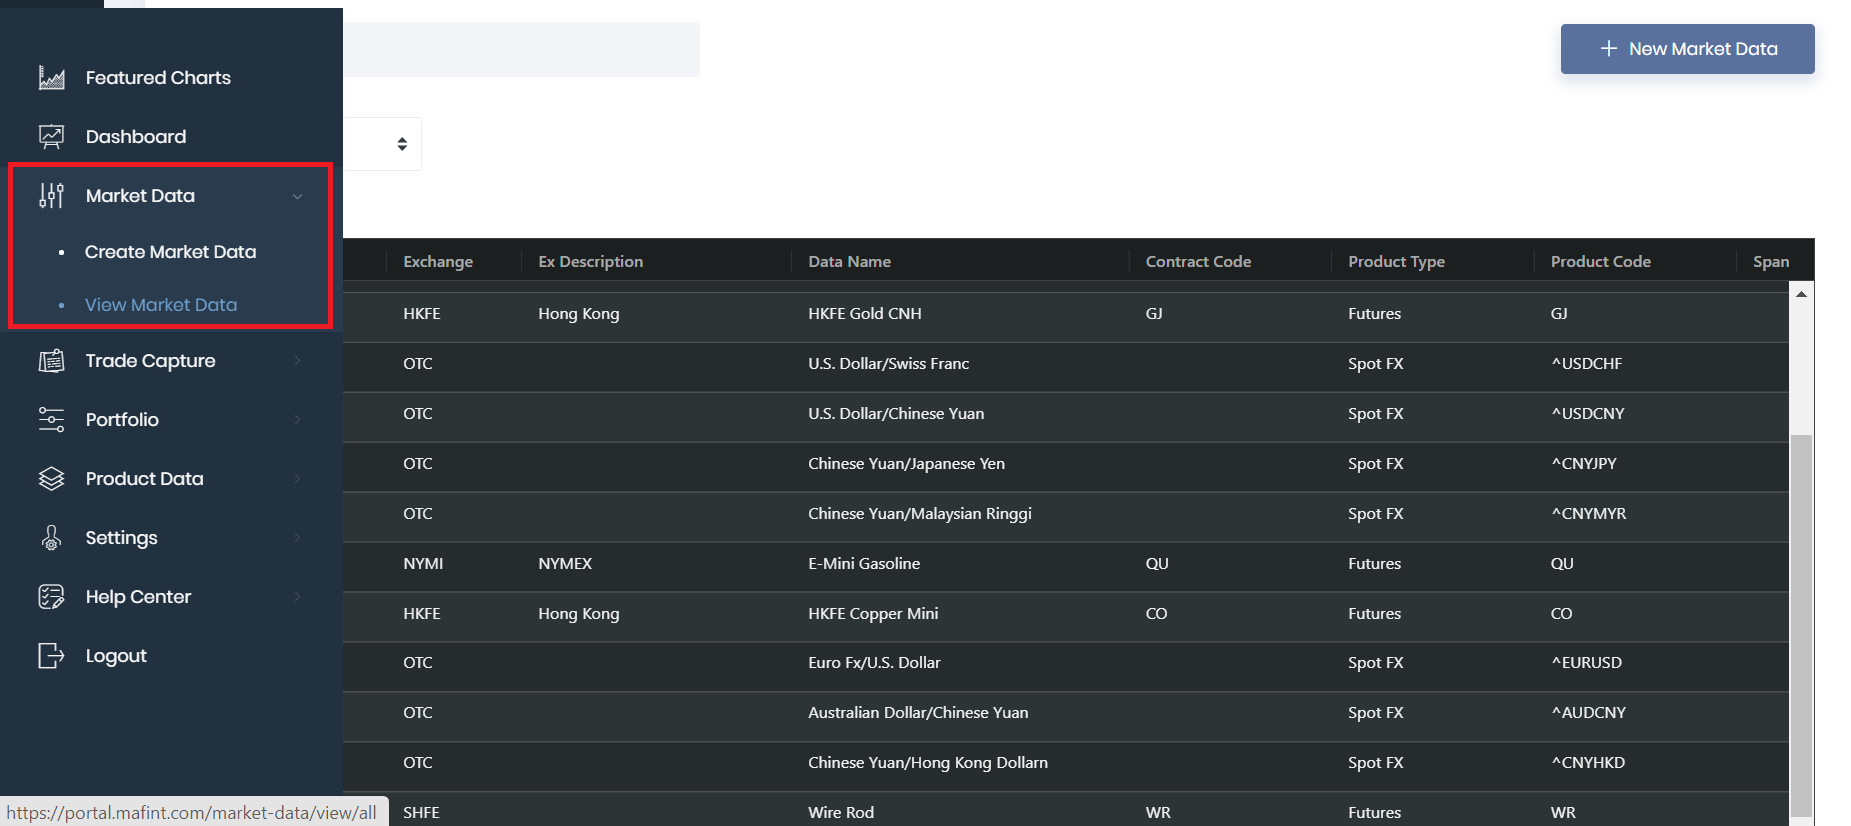
You will be able to find all the available market data here. The product name and basic information (such as exchange, product code etc.) are shown in this page. You may use the 'Search' bar, as well as the 'sort' and 'filter' functions available in the table headers, to find your desired product(s). Please refer to Table Settings for more information.
Click 'View' (represented by an 'eye' icon) to open the market data page for the selected product.

You may view the product's basic information, as well as various historical market data: open, close, settlement and/or other price(s), and trading volume etc.
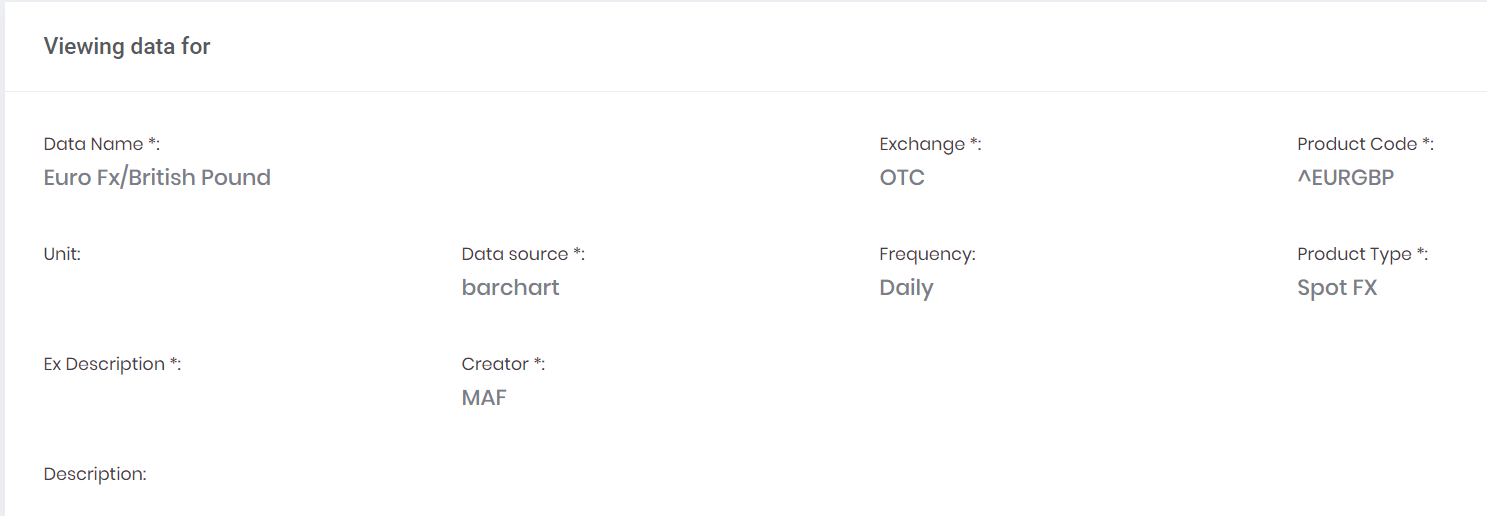

Please refer to Market Data and Futures Contracts Codes for more details.
GIF
How can I create my first Trading Portfolio?
MAF Cloud allows you to create portfolio(s), where you can record and analyse your trades and transactions.
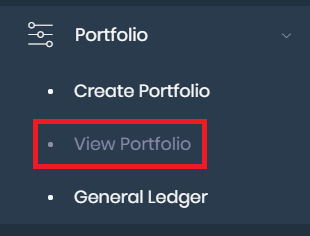
From the navigation sidebar on the left, click 'Portfolio', followed by 'Create Portfolio'. Alternatively, you can click on the '+ New Portfolio' button at the top right corner of the 'View Portfolio' page.
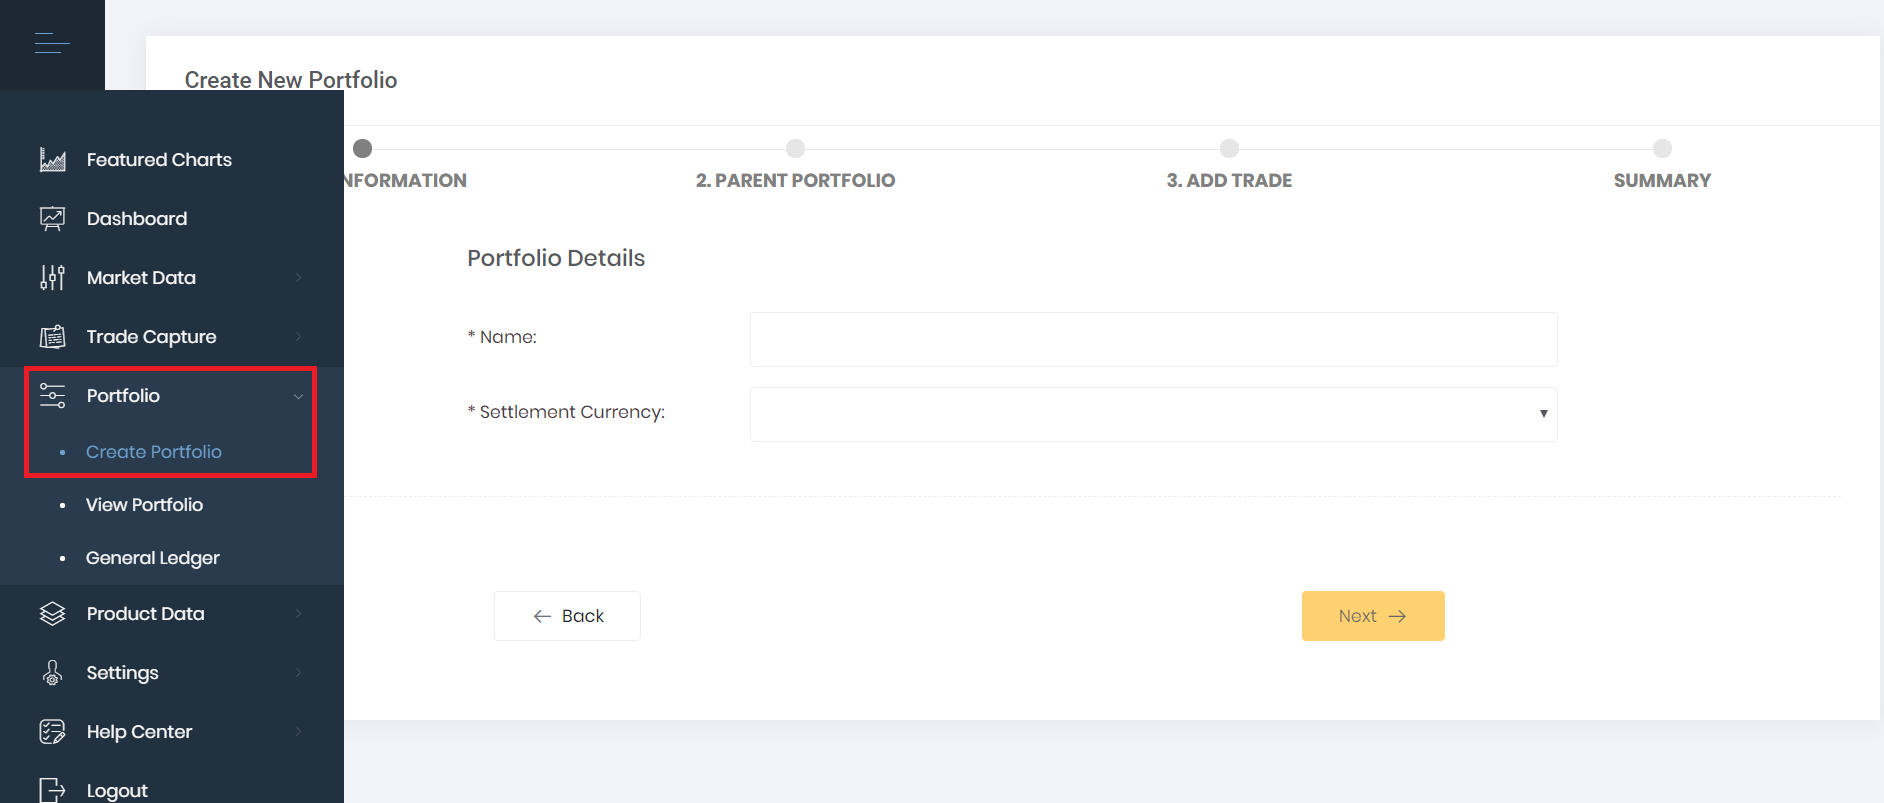
Fill in your portfolio details and you're good to go! Once your first portfolio is created successfully, it will be reflected in the portfolio hierarchy tree diagram located at the left corner in the 'View Portfolio' page.

Please refer to Creating New Portfolio and Viewing Portfolio for more details.
How do I capture my Trades and allocate them to my desired Portfolio?
The trades which you have created in MAF Cloud may be captured into your portfolio(s), where they may be collated for various quantitative analyses.
From the navigation sidebar on the left, click 'Trade', followed by 'Paper Trade'. It will display all existing captured trades.

Creating Trades in MAF Cloud
There are two methods to capture trades.
1. Trade Capture for China Futures Market via CTP:
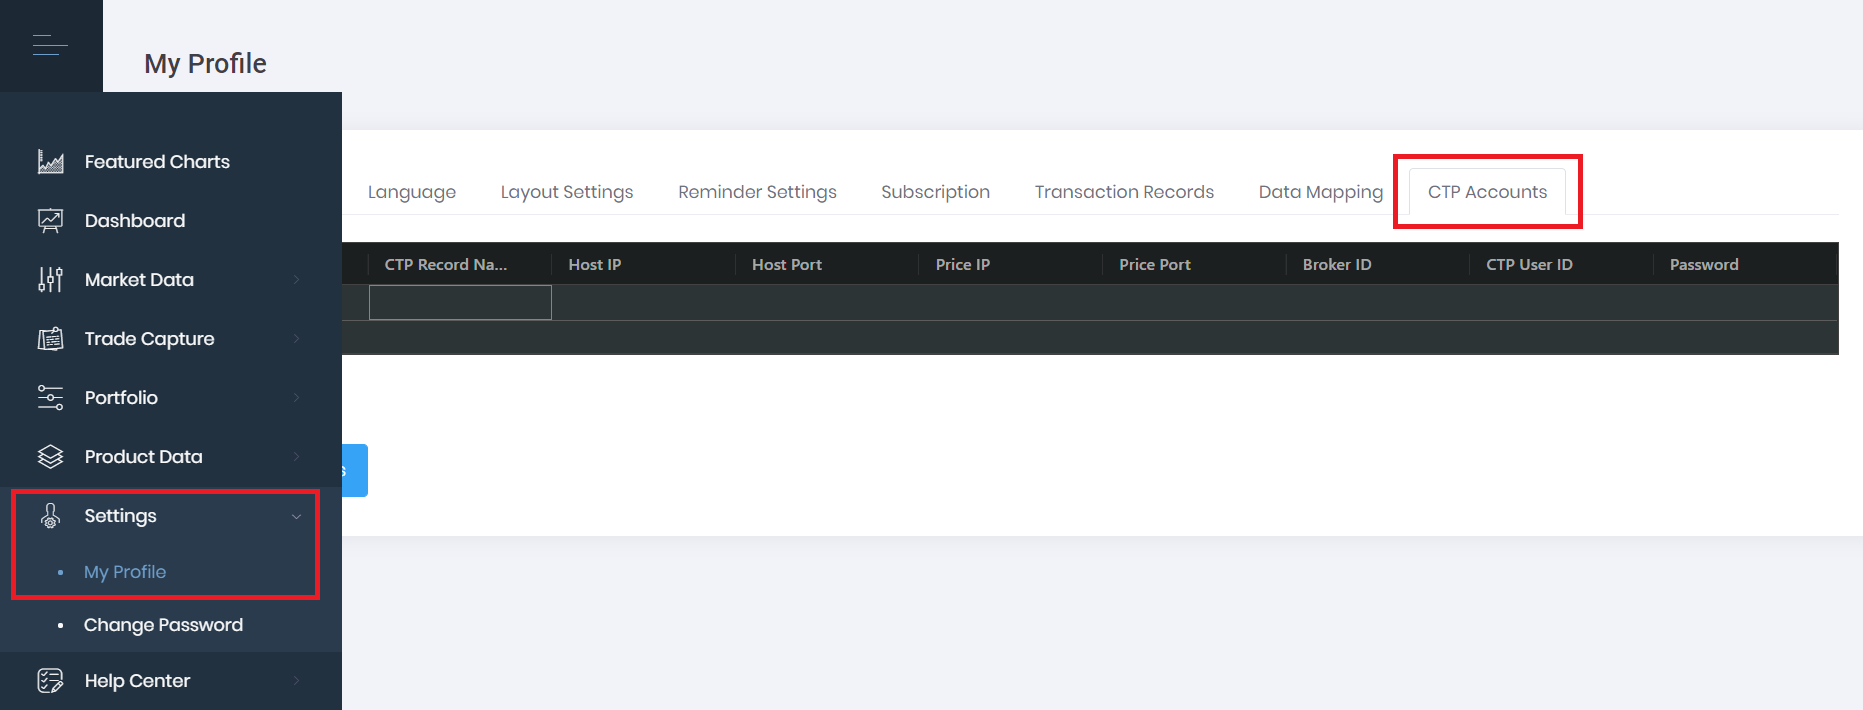
a. You will need to connect your CTP account(s) to MAF Cloud. On the navigation sidebar on the left, click 'Settings' followed by 'My Profile'. Click on the 'CTP Accounts' tab and key in the details of your CTP account(s) to connect.
b. Once your CTP account has been connected successfully, return to the 'Paper Trade' page. Click 'CTP', select a CTP account, then click 'Update CTP Trades'. 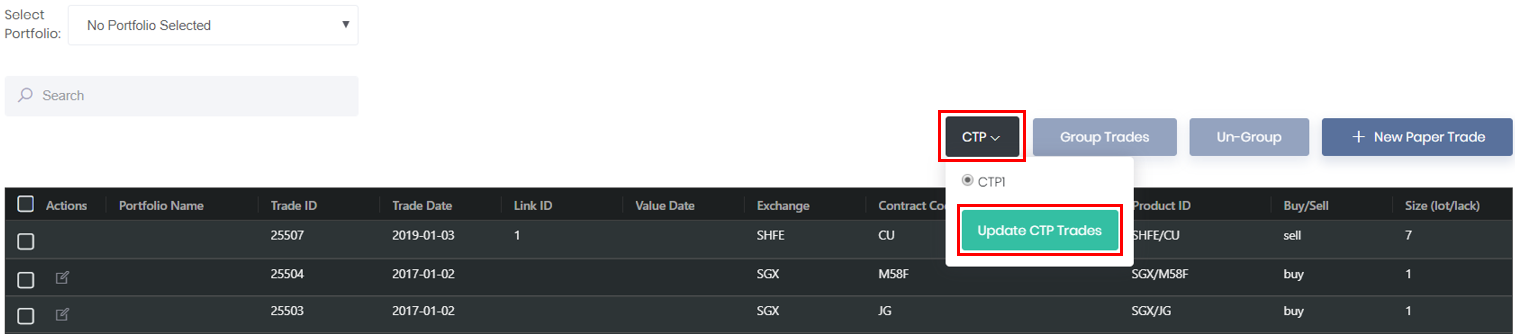
c. MAF Cloud will now automatically capture and update all trades in the chosen CTP account(s). You can allocate them accordingly to your desired portfolio(s).
Please refer to CTP Accounts for more details.
2. Trade Capture via Brokers' .CSV File:
a. For the global futures market, you can upload your trades via your broker's .CSV file. In the 'Paper Trade' page, click '+ New Paper Trade'.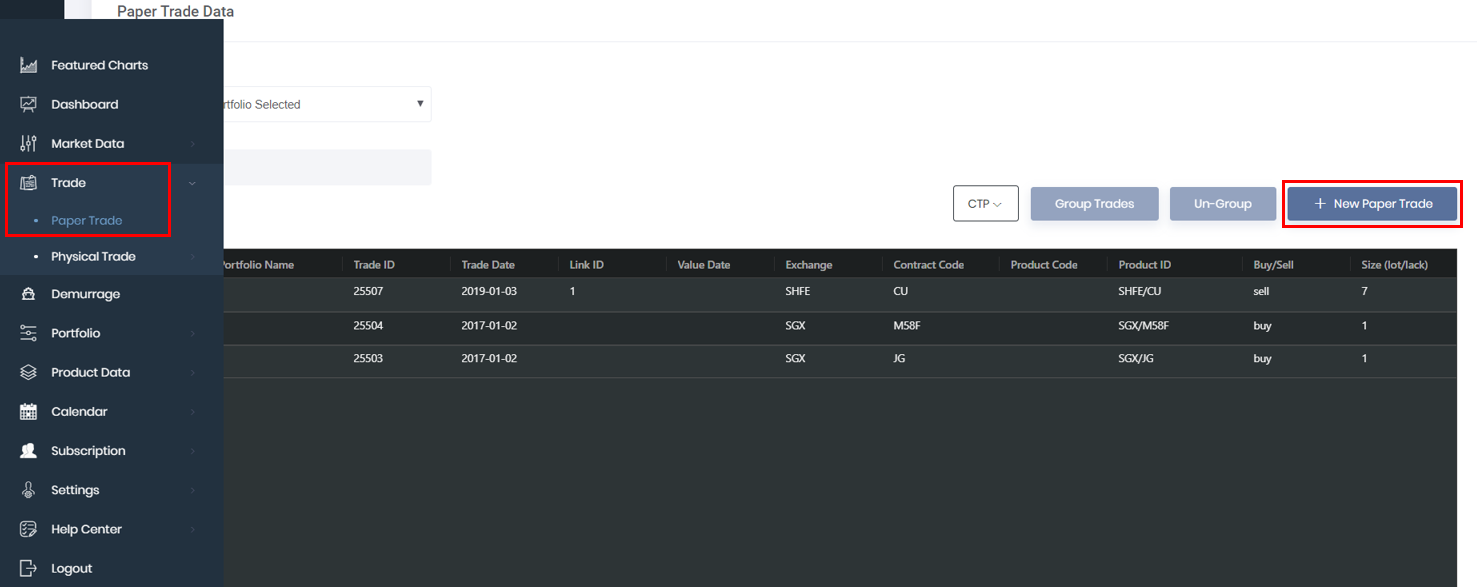
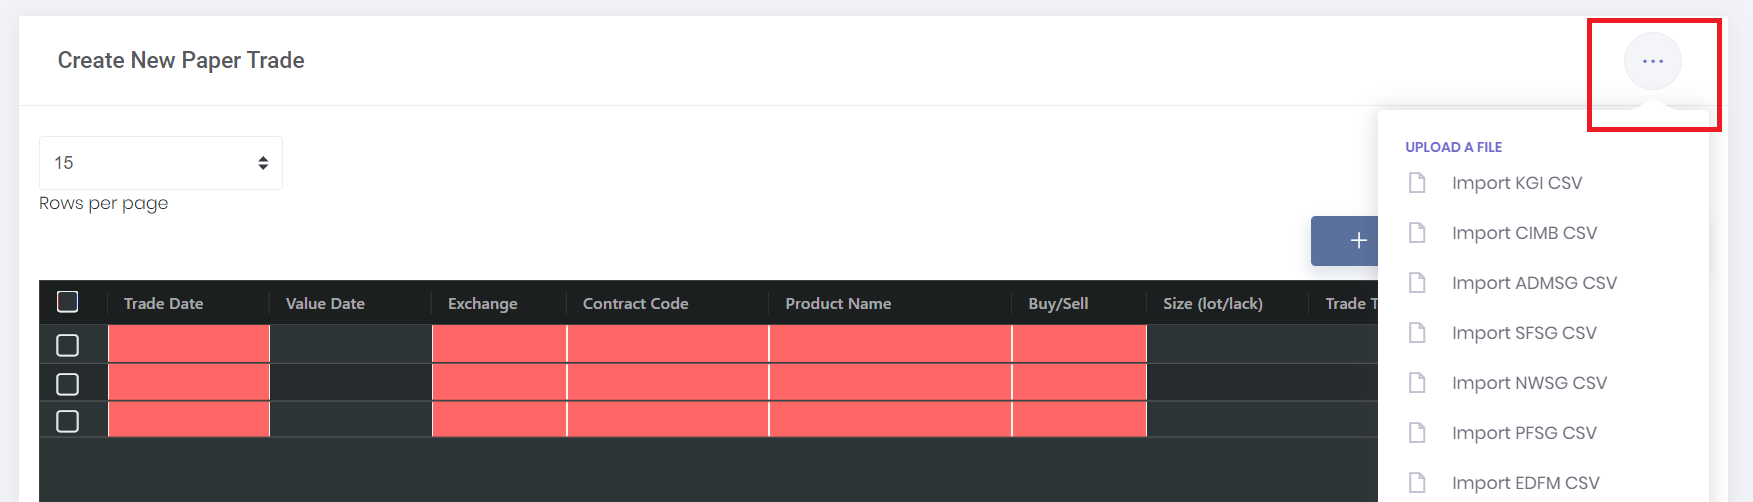
b. Click "..." on the top right corner of the page to choose the broker's name and upload your .CSV file (You may also type and/or copy and paste the data into the cells manually).
c. Once the trades have been uploaded successfully, you can allocate them accordingly to your desired portfolio(s).
Allocating Trades to your Portfolio
There are two ways to allocate new/existing trades to your portfolio (depending on which is more convenient to you).
1. Edit Details in Portfolio
a. In the navigation sidebar on the left, click on 'Portfolio' followed by 'View Portfolio'.
b. Choose your desired portfolio from the portfolio hierarchy tree diagram on the left, and then click on 'Edit' (represented by a 'pen and paper' icon) for that portfolio.

c. After making edits to the portfolio's basic information (if any), you may select the trade(s) to include/exclude from your portfolio,
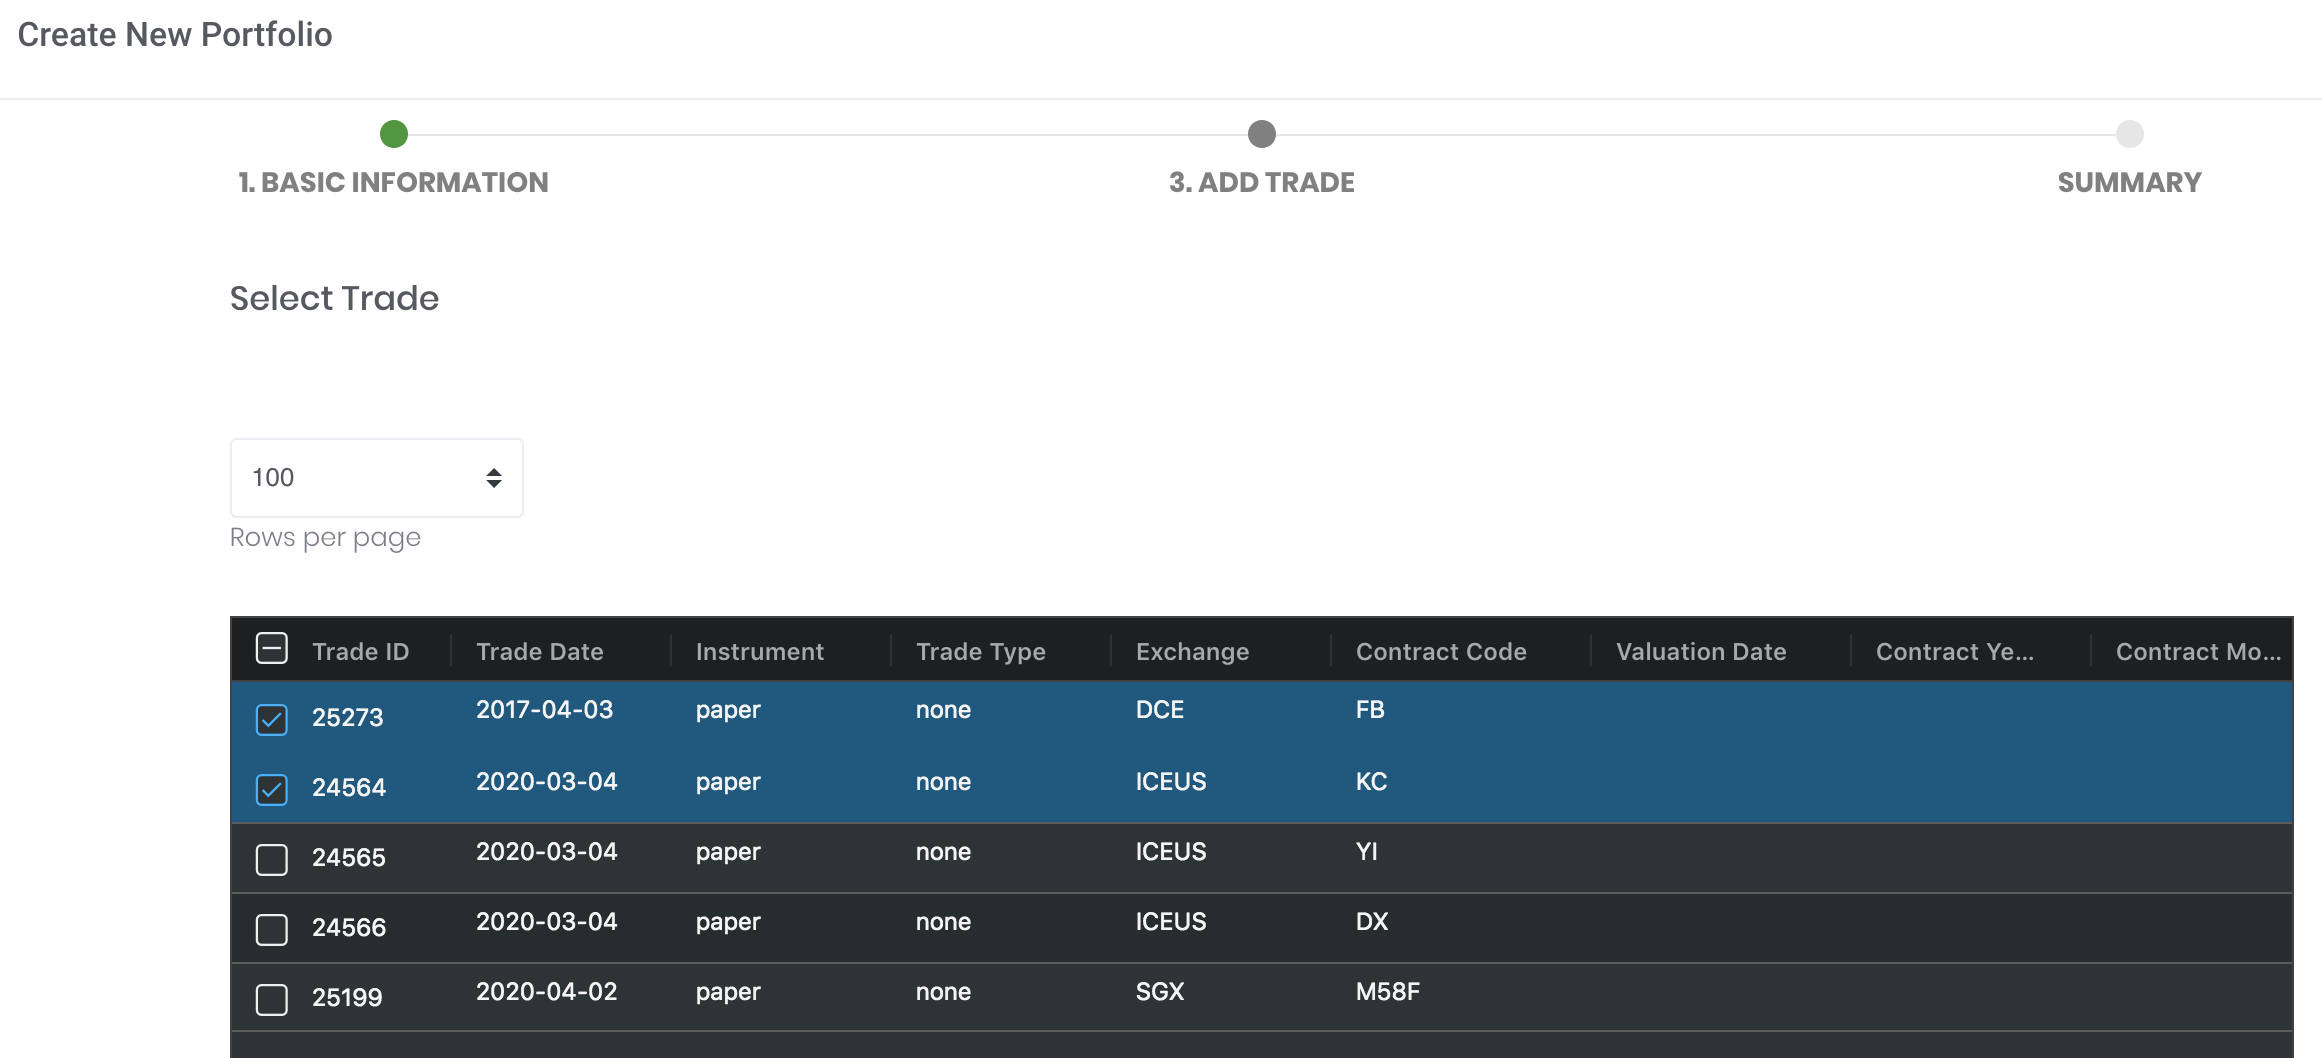
You may click on the table headers to sort and/or filter your trades. Please refer to Table Settings for more information.
2. Add Trades Directly into your Portfolio
You may also choose to add new trades directly into an existing portfolio (capturing of trades would be also be done here automatically).
a. In the navigation sidebar on the left, click on 'Portfolio' followed by 'View Portfolio'.
b. Select the desired portfolio from the portfolio tree hierarchy diagram on the left, and click 'Add Trades' (represented by a '+' sign).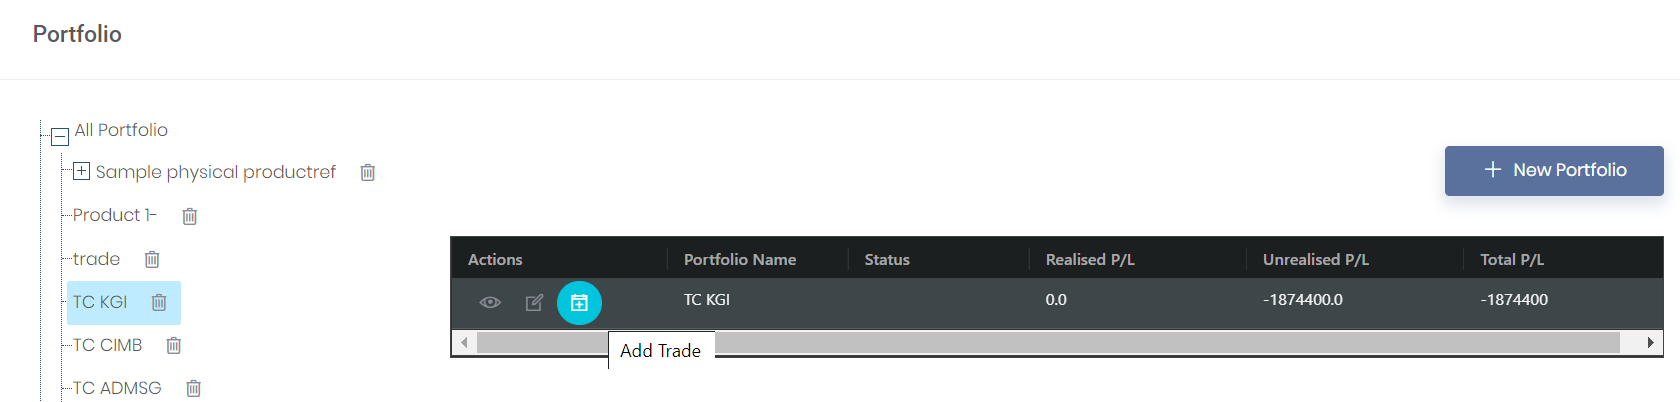
c. Here, you may upload, key in and/or paste trade data into the table provided (same procedures as "2. Trade Capture via Brokers' .CSV File"). The portfolio these trades would be allocated to is automatically selected for you at the bottom of the page (though you are free to change it). Press 'Submit' and you're good to go!
Please refer to Portfolio for more details.
GIF
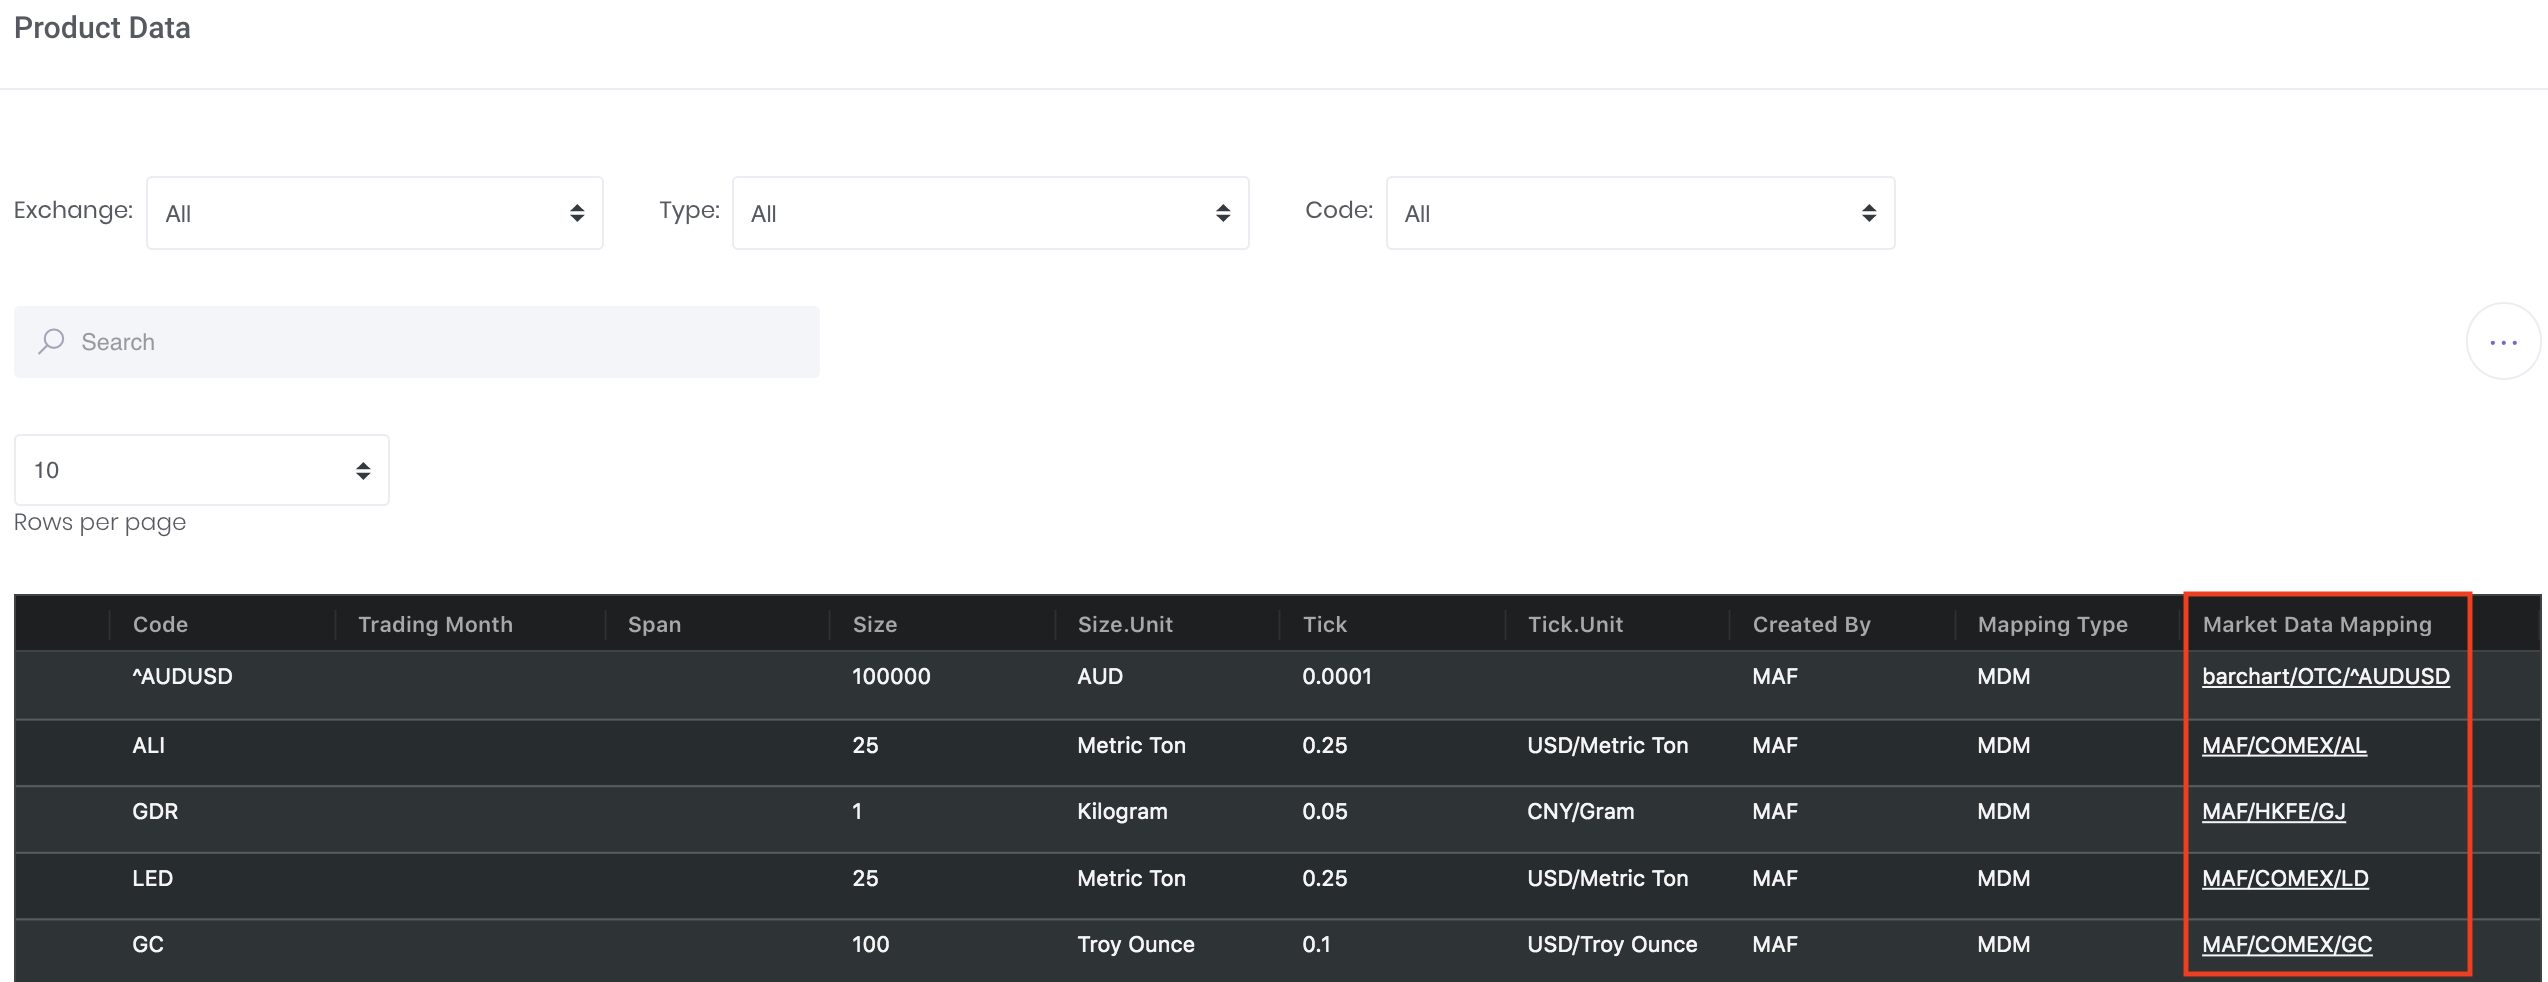
How do I view Product Data?
Click 'View Product Data' under 'Product Data' in the navigation sidebar on the left.
You may use the 'Search' bar, as well as the 'sort' and 'filter' functions available in the table headers, to find your desired product(s). Please refer to Table Settings for more information.
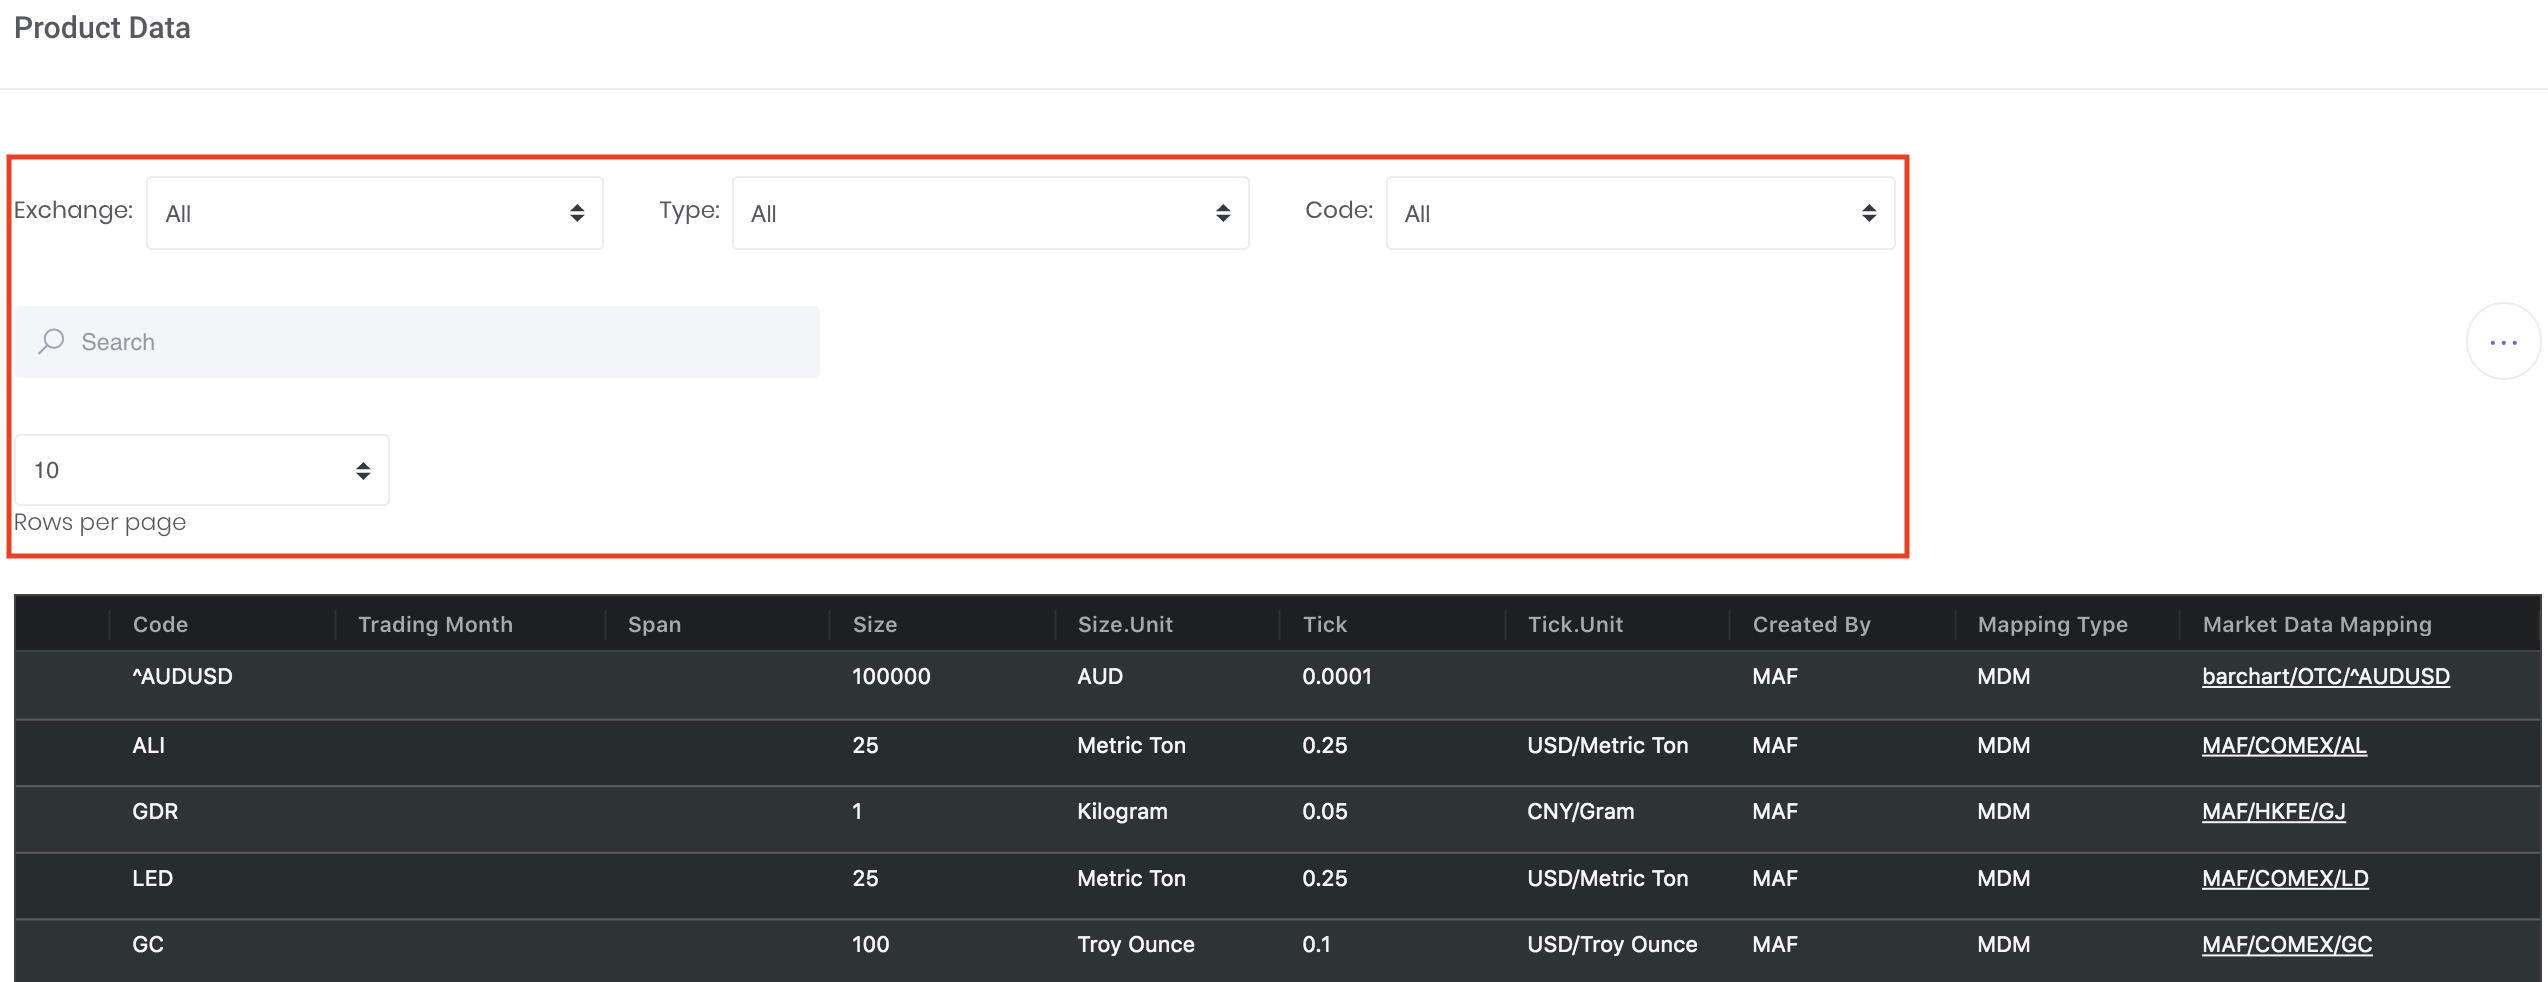
In the 'Product Data' database table, scroll to the last column to obtain the 'Market Data Mapping'. This will lead to the 'Historical Market Data' of the product.
Please refer to Viewing Market Data and List of Definitions: Market Data for more information.
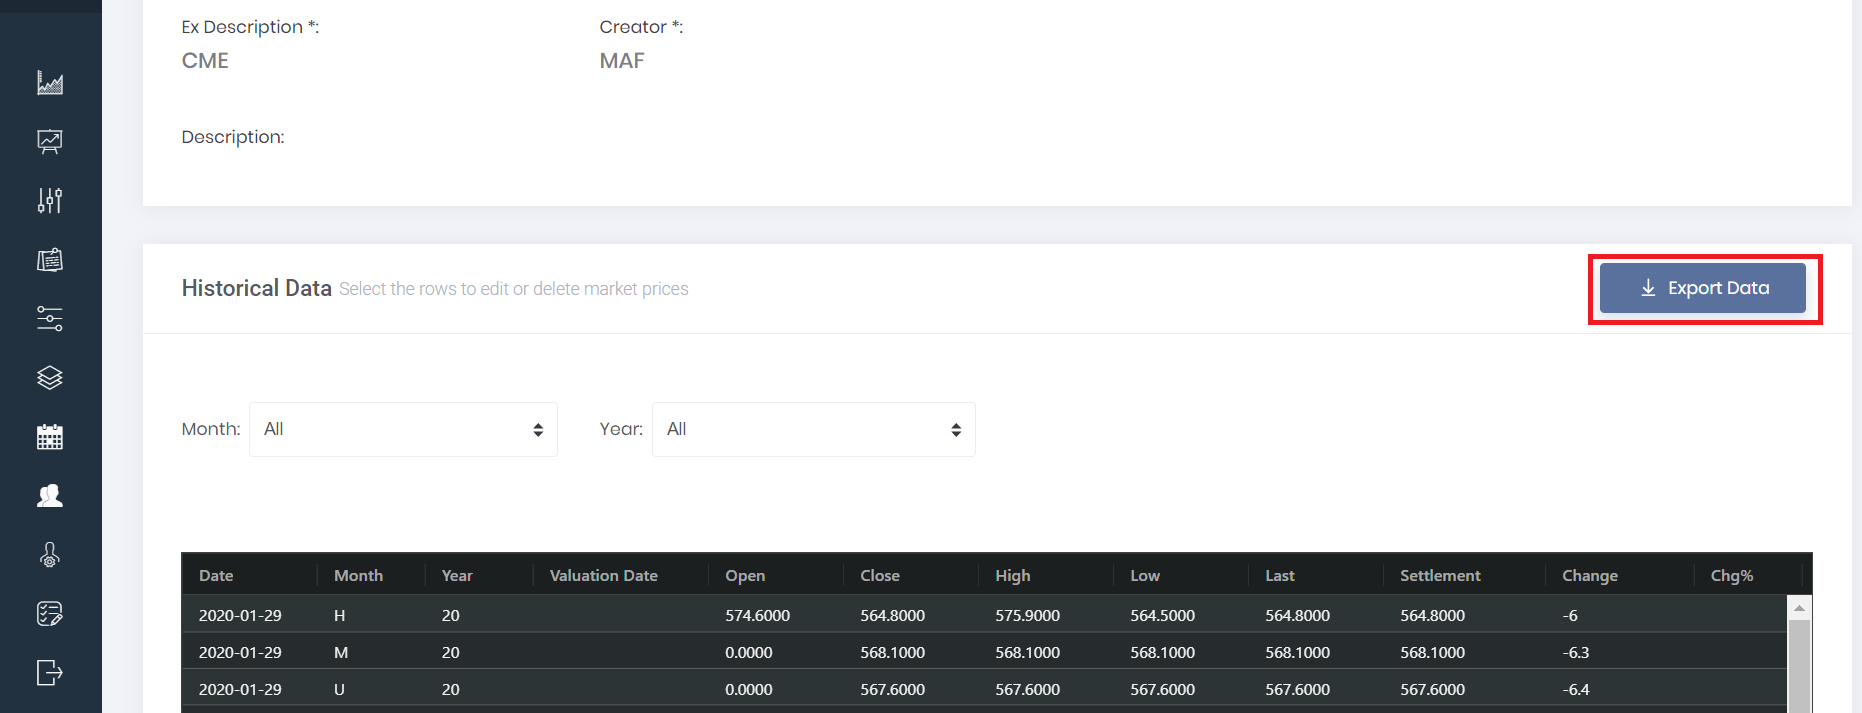
Can I download/share data from MAF Cloud?
Yes, you can download historical market raw data. In addition, you can also download derived data from your quantitative models and/or share them with others via a temporary web link.
Historical Market Raw Data:
- From the navigation sidebar on the left, click 'Market Data', followed by 'View Market Data'.
2. After you located your desired product, click 'View' under the 'Actions' column to open the market data page for the selected product.
3. Click on 'Export Data' (at the top right corner of the Historical Data section). The data will be exported in a .CSV file format. Alternatively, right-click in the table and click 'Export'.
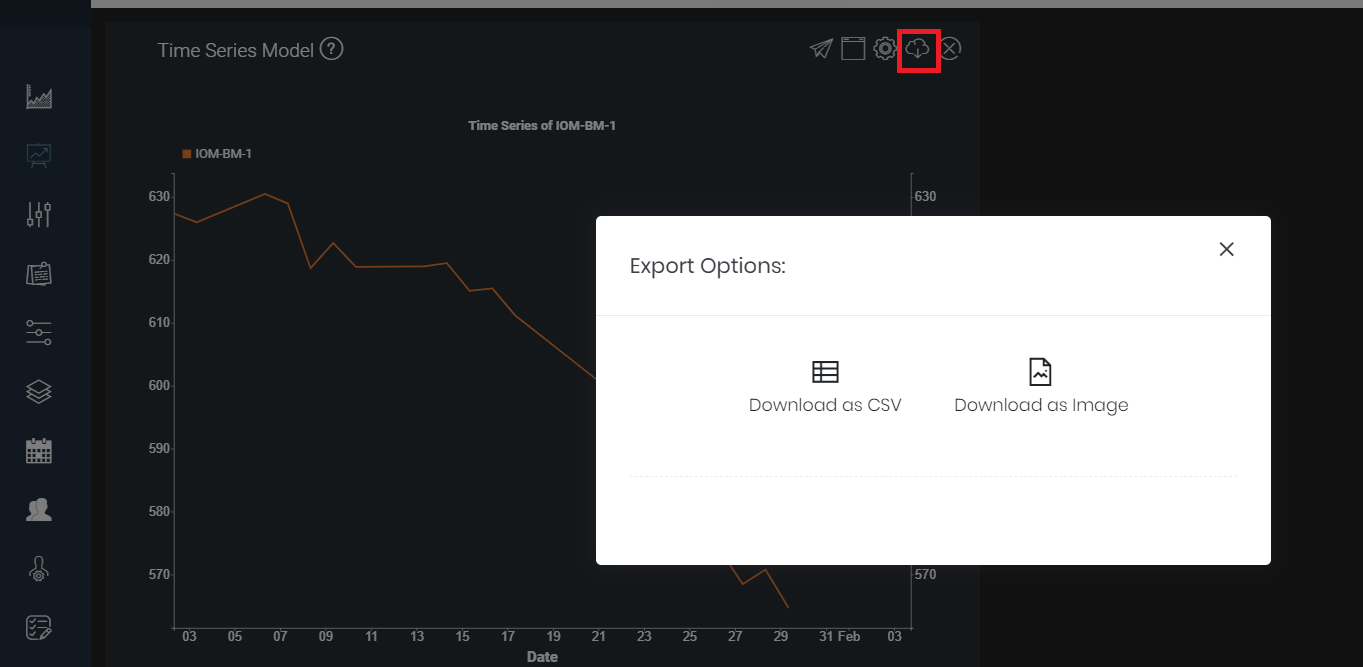
Quantitative Derived Data:
In your dashboard, click on 'Export' (represented by a 'cloud' icon) at the top right corner of the chosen model to download it. You may download the data as a .CSV file or the chosen model as an image (.PNG file).
By clicking on 'Share' (represented by a 'folded paper plane' icon), you may also generate a temporary web link (expires in 8 hours) that will be copied to your device's clipboard, which you can then share online with anyone! Anyone with the web link will only be able to view and interact with the chosen model in an independent web page, and will not have any access to other features in your MAF Cloud account.

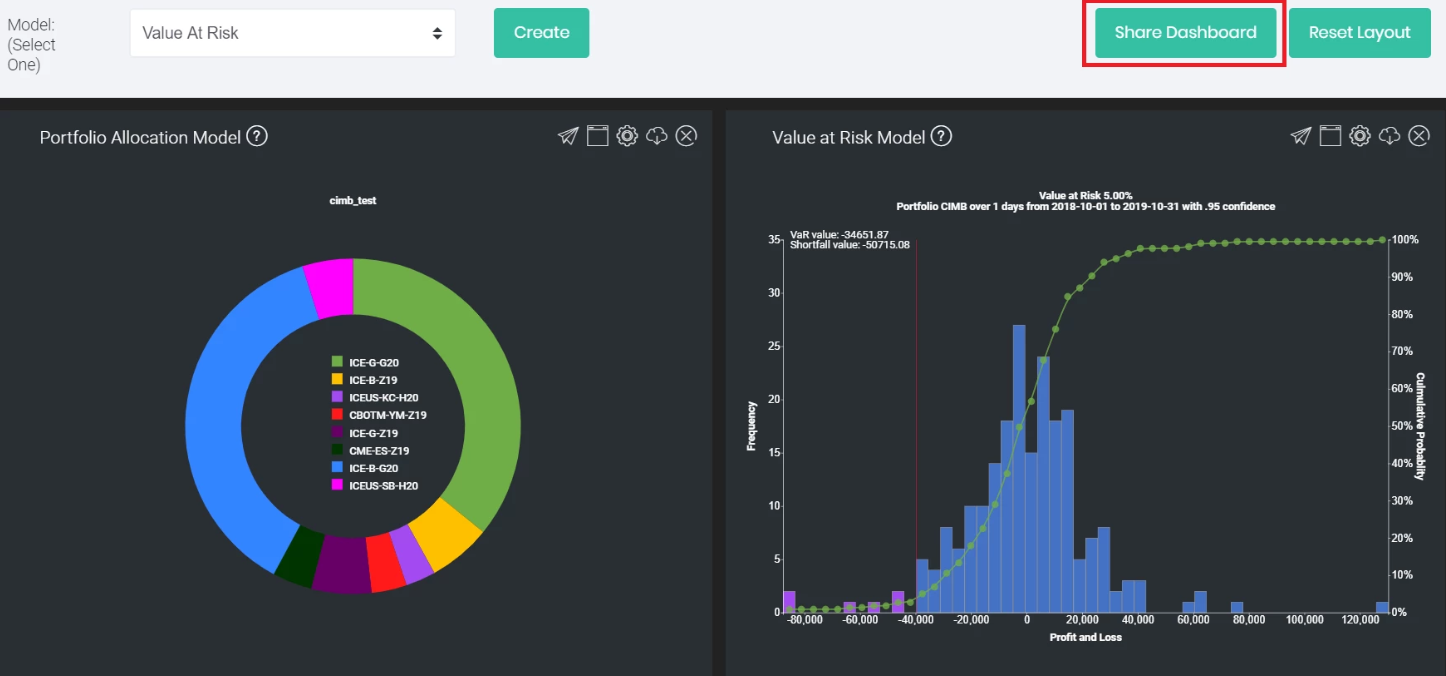
You can also share your entire 'Dashboard' with anyone online if you wish, where they will only be able to view and interact with the model(s) in an independent web page, and not have any access to other features in your MAF Cloud account.
Click on the 'Share Dashboard' button located on the top right corner of the page. A temporary web link (expires in 8 hours) will be generated and copied to your device's clipboard immediately. You can now share the web link with anyone!
Can’t find what you're looking for?
Don’t worry, we are here for you! Check out our User Guide and FAQs to find articles on navigating MAF Cloud and answers to common questions, or drop us an email at support@mafint.com and we'll get in touch shortly!
![]()
![]()
![]()
![]()