Creating a Shipping Instructions Document
Once your physical trade transactions and executions have been completed/settled/closed, you can use MAF Cloud system to generate a shipping instruction document from your trade execution and issue to your counterparties. The shipping instruction document will contain all the details needed to process your shipment and contain information that feeds directly into your Bills of Lading. All data input previously in the physical trades and trade executions sections will be directly linked here, saving you the hassle of manually creating your shipping instruction document from scratch!
TABLE OF CONTENTS:
Creating a Shipping Instructions Document
To generate a shipping instruction document, a physical trade and its trade execution have to be created first. Please refer to Creating New Physical Trade(s) and Creating Trade Execution for the guide on how to create a physical trade and trade execution.
1. In the 'Trade Execution List' table, select the trade execution by ticking its respective checkbox that you want to generate the shipping instruction document for and click on the '+ Shipping Instruction' button at the top right corner. You will be directed to a shipping instruction document page to fill in the relevant details.
2. You can now key in the necessary details to complete your shipping instructions document. Only details from '1. Key Info' are compulsory fields, details from other sections can be filled to include more details for the shipping instructions.
1. KEY INFO:
'AUTO SI NO.'/'SI NO.': Shipping Instructions Number. You can choose to input your shipping instructions number manually (input 'SI NO.') or let it run automatically (select 'Auto SI NO.'). Please refer to 'Auto Running Numbers Setting' Table for the guide on how to create an auto-running rule for Shipping Instruction Number to be generated automatically. This will be printed at the top in the SI pdf file.
'SI Date': The date the shipping instruction is generated. This will be printed at the top in the SI pdf file.
'CONTRACT NO.': Contract number of the trade. If you select this, it will be automatically filled if you have input this in the create physical trade page.
'FREIGHT': Details on whether the payment mode is Prepaid/Collect/Elsewhere. Inputting this field here will automatically fill in the same field (if selected) in the '5. BL DETAILS' section.
'FREIGHT PAYABLE': Details on how the payment for freight is made. Inputting this field here will automatically fill in the same field (if selected) in the '5. BL DETAILS' section.
'SHIPPER': The company that ships the goods. Inputting this field here will automatically fill in the same field (if selected) in the '5. BL DETAILS' section. This will be printed at the top in the SI pdf file.
'CONSIGNEE': The receiver of the shipment. Inputting this field here will automatically fill in the same field (if selected) in the '5. BL DETAILS' section.
'NOTIFY PARTY': The contact person to be notified when the shipment arrives at the destination. Inputting this field here will automatically fill in the same field (if selected) in the '5. BL DETAILS' section.
'QTY': Total quantity to be shipped. If you select this, it will be automatically filled if you have input this in the create physical trade page.
2. RE:
This section allows you to fill in the document's title or any description with regards/request to the recipient.
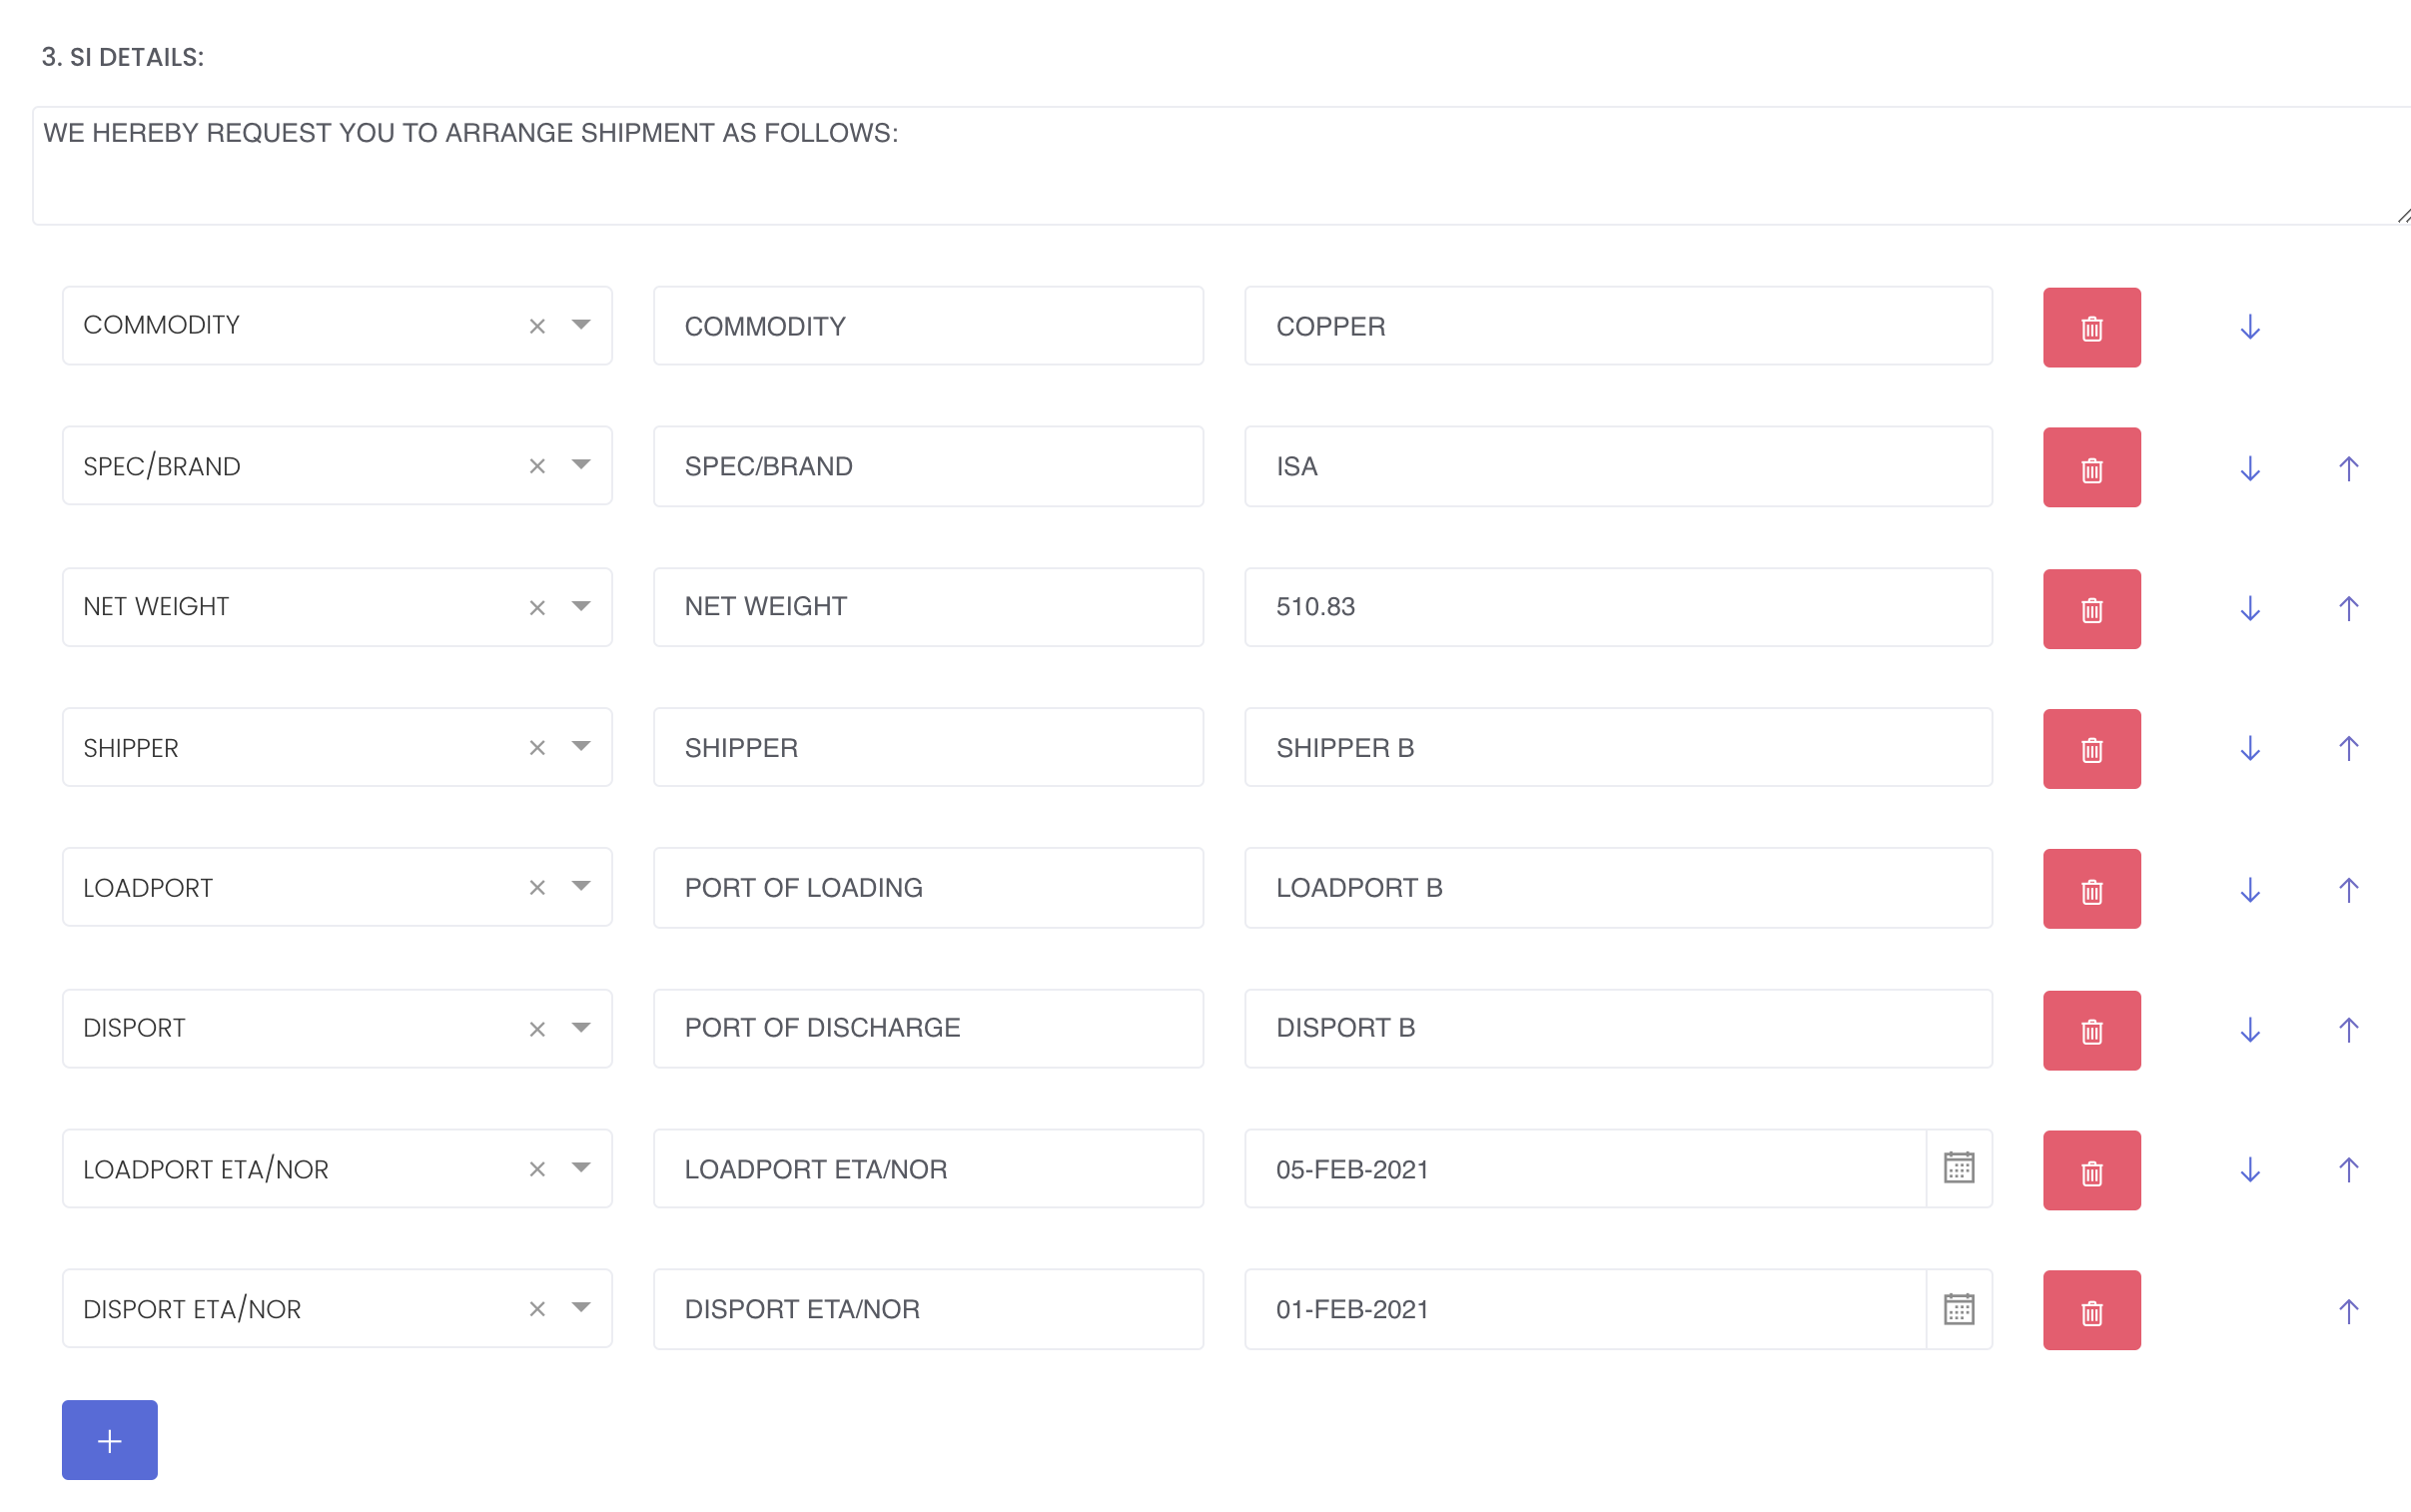
3. SI DETAILS:
In this section, you can fill in the specific information on how shipping can be arranged.
Click on the blue '+' sign and select from the dropdown list to add the details that you want to print in your pdf file as necessary. The LABEL box will be autofilled and you may leave it empty or edit this as necessary. Some inputs in the VALUE box will be auto-filled if the details are available from your previous inputs in the physical trade and trade execution page. Otherwise, you are free to add and edit the details as necessary. You may generate a PDF to test and adjust how certain data can be displayed in the invoice PDF.
Click on the red 'bin' button to delete the row and if multiple rows are available, you can click on the 'up and down' arrows to arrange and move the rows according to your preference.
'COMMODITY': The product that is being shipped. If you select this, it will be automatically filled if you have input this in the create physical trade page. Otherwise, you may input this field as necessary.
'SPEC/BRAND': The specification, brand or type of the product being shipped. If you select this, it will be automatically filled if you have input this in the create physical trade page. Otherwise, you may input this field as necessary.
'NET WEIGHT': Net weight or actual quantity of the product that is being shipped. If you select this, it will be automatically filled if you have input this in the create physical trade or trade execution page. Otherwise, you may input this field as necessary.
'PACKING': Packing details of the product being shipped. If you select this, it will be automatically filled if you have input this in the create physical trade page. Otherwise, you may input this field as necessary.
'PACKING QTY': Packing quantity of the product. If you select this, it will be automatically filled if you have input this in the create physical trade page. Otherwise, you may input this field as necessary.
'ORIGIN': Country where products were manufactured or where they were submitted to last substantial transformation. You may input this as necessary.
'SHIPPER': The company that ships the goods. This field will automatically be filled if you have filled the same field in the '1. KEY INFO' section.
'VESSEL/VOYAGE': The vessel or voyage for the shipment. If you select this, it will be automatically filled if you have input this in the trade execution page. Otherwise, you may input this field as necessary.
'LOADPORT': Name of the port where goods are loaded aboard a ship, secured and ready to be transported. If you select this, it will be automatically filled if you have input this in the trade execution page. Otherwise, you may input this field as necessary.
'LOADPORT AGENT': The agent who is responsible for organising, overseeing and coordinating all aspects of the port call, from booking berth allocations and services ahead of the vessel's arrival to finalising the accounts and other paperwork after the vessel has sailed. If you select this, it will be automatically filled if you have input this in the trade execution page. Otherwise, you may input this field as necessary.
'DISPORT': Name of the discharge port where the cargo is discharged from a ship’s tank(s) to shore tank(s). If you select this, it will be automatically filled if you have input this in the trade execution page. Otherwise, you may input this field as necessary.
'DISPORT AGENT': The agent who is responsible for organising, overseeing and coordinating all aspects of the port call, from booking berth allocations and services ahead of the vessel's arrival to finalising the accounts and other paperwork after the vessel has sailed. If you select this, it will be automatically filled if you have input this in the trade execution page. Otherwise, you may input this field as necessary.
'FEEDER VESSEL': Name of the ship that collect shipping containers from different ports and transport them to central container terminals. You may input this as necessary.
'ETD': The Estimated Time of Departure. If you select this, it will be automatically filled if you have input this in the trade execution page. Otherwise, you may input this field as necessary.
'LOADPORT ETA/NOR': Loadport Estimated Time of Arrival/Notice of Readiness. If you select this, it will be automatically filled if you have input this in the trade execution page. Otherwise, you may input this field as necessary.
'DISPORT ETA/NOR': Disport Estimated Time of Arrival/Notice of Readiness. If you select this, it will be automatically filled if you have input this in the trade execution page. Otherwise, you may input this field as necessary.
'UNIT': Measuring units used to quantify the products that are being shipped. If you select this, it will be automatically filled if you have input this in the create physical trade page. Otherwise, you may input this field as necessary.
4. DESCRIPTION IN DOCUMENTS:
In this section, you can fill in the description of the shipment.
Click on the blue '+' sign and select from the dropdown list to add the details that you want to print in your pdf file as necessary. The LABEL box will be autofilled and you may leave it empty or edit this as necessary. Some inputs in the VALUE box will be auto-filled if the details are available from your previous inputs in the physical trade and trade execution page. Otherwise, you are free to add and edit the details as necessary. You may generate a PDF to test and adjust how certain data can be displayed in the invoice PDF.
Click on the red 'bin' button to delete the row and if multiple rows are available, you can click on the 'up and down' arrows to arrange and move the rows according to your preference.
'SAID TO CONTAIN': Describing the goods loaded onboard a sea-going vessel in sealed containers and for which the shipping company makes the necessary reservations in terms of the correct contents of those loading units. You may input this as necessary.
'CARGO SIZE/TYPE': The size and type of cargo used for shipment. If you select this, it will be automatically filled if you have input this (PACKING AND PACKING QTY) in the trade execution page. Otherwise, you may input this field as necessary.
'CARGO DESCRIPTION': Details of the cargo. You may input this as necessary.
'HS CODE': A code that consists of at least six digits and is used by customs to classify the product being shipped. You may input this as necessary.
"PO NO.': Purchase Order number is a unique number assigned to a purchase order form. You may input this as necessary.
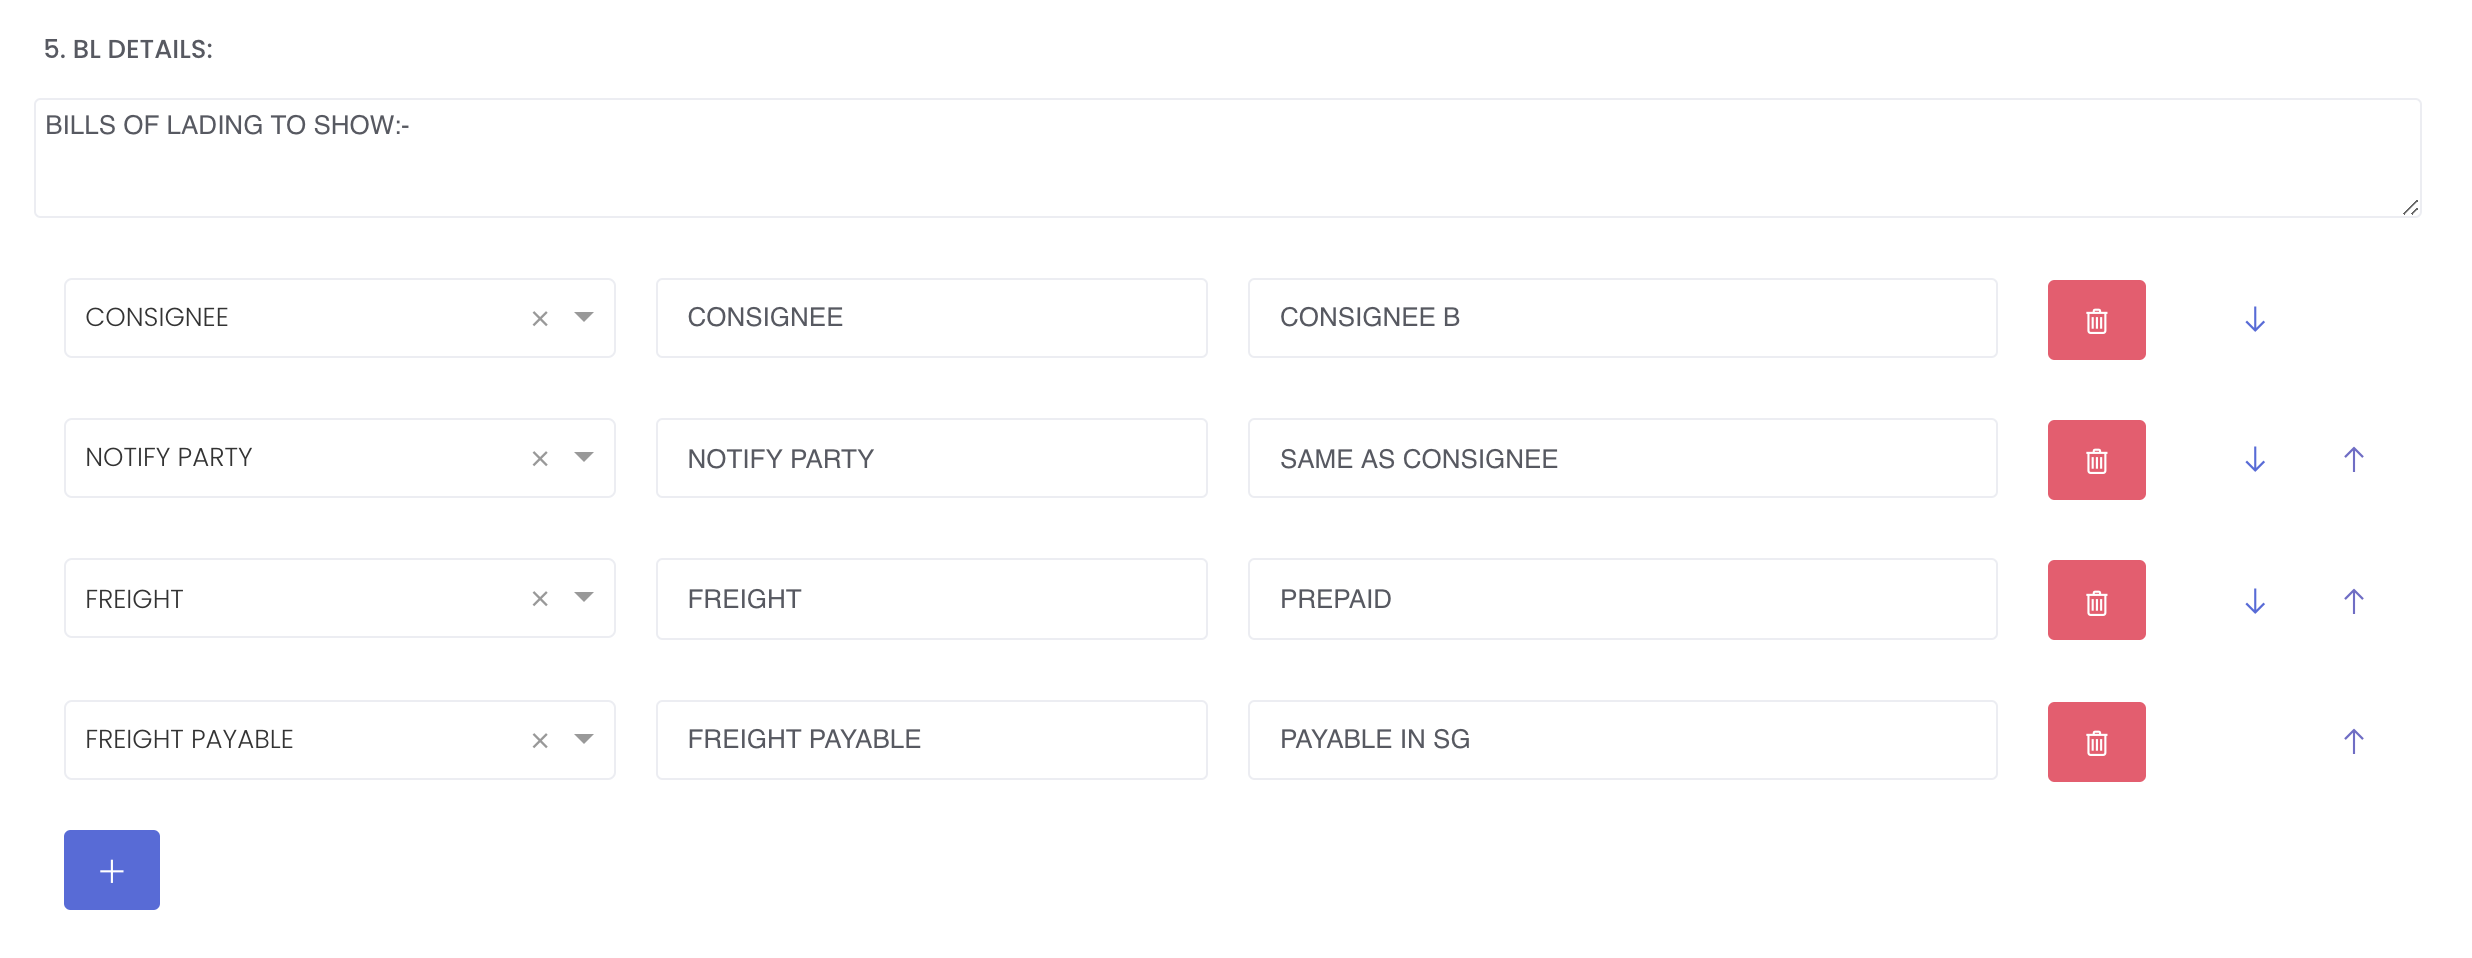
5. BL DETAILS:
In this section, you can fill in the specific information to be included in the Clean on Board Ocean Bills of Lading.
Click on the blue '+' sign and select from the dropdown list to add the details that you want to print in your pdf file as necessary. The LABEL box will be autofilled and you may leave it empty or edit this as necessary. Some inputs in the VALUE box will be auto-filled if the details are available from your previous inputs in the physical trade and trade execution page. Otherwise, you are free to add and edit the details as necessary. You may generate a PDF to test and adjust how certain data can be displayed in the invoice PDF.
Click on the red 'bin' button to delete the row and if multiple rows are available, you can click on the 'up and down' arrows to arrange and move the rows according to your preference.
'CONSIGNEE': The receiver of the shipment. This field will automatically be filled if you have filled the same field in the '1. KEY INFO' section.
'NOTIFY PARTY': The contact person to be notified when the shipment arrives at the destination. This field will automatically be filled if you have filled the same field in the '1. KEY INFO' section.
'FREIGHT': Details on whether the payment mode is Prepaid/Collect/Elsewhere. This field will automatically be filled if you have filled the same field in the '1. KEY INFO' section.
'FREIGHT PAYABLE': Details on how the payment for freight is made. This field will automatically be filled if you have filled the same field in the '1. KEY INFO' section.
'SHIPPING MARKS': The letters, numbers or other symbols placed on the outside of cargo to facilitate identification. You may input this as necessary
6. DOCUMENTS REQUIRED:
In this section, you can fill in your request for specific documents and the corresponding number of copies to be provided such as requesting for 3 copies of the commercial invoice.
7. REMARKS:
In this section, you can fill in additional remarks needed to complete the shipping instructions.
8. SIGN OFF:
In this section, you can fill in your greetings to the freight forwarder/ entity receiving the shipping instruction documents.
3. Once the shipping instructions document has been completed, click on 'Save' below to save the documenT in the 'Shipping Instruction' table accordingly.. Click 'PDF' to generate the shipping instructions in PDF format. Click 'Cancel' if you do not want to save the new document or update the details, and be directed back to the 'SHIPPING INSTRUCTION' page.
Note: Once you have completed your contract, you can save the contract template by clicking on the blue '+' sign at the top right corner and save the template layout (only values in LABEL boxes will be saved and not VALUE boxes). The next time you create a new contract, you will be able to use the same template, reducing the need to re-input similar data again. You may create and save multiple template layouts to suit your needs.
4. You may easily change the shipping instruction details on the 'Shipping Instruction' page, using the same procedures. To edit the shipping instructions, click on the 'Edit' button (represented by a 'pen and paper' icon) located on the left of each row. Click 'Save' below to save the changes.
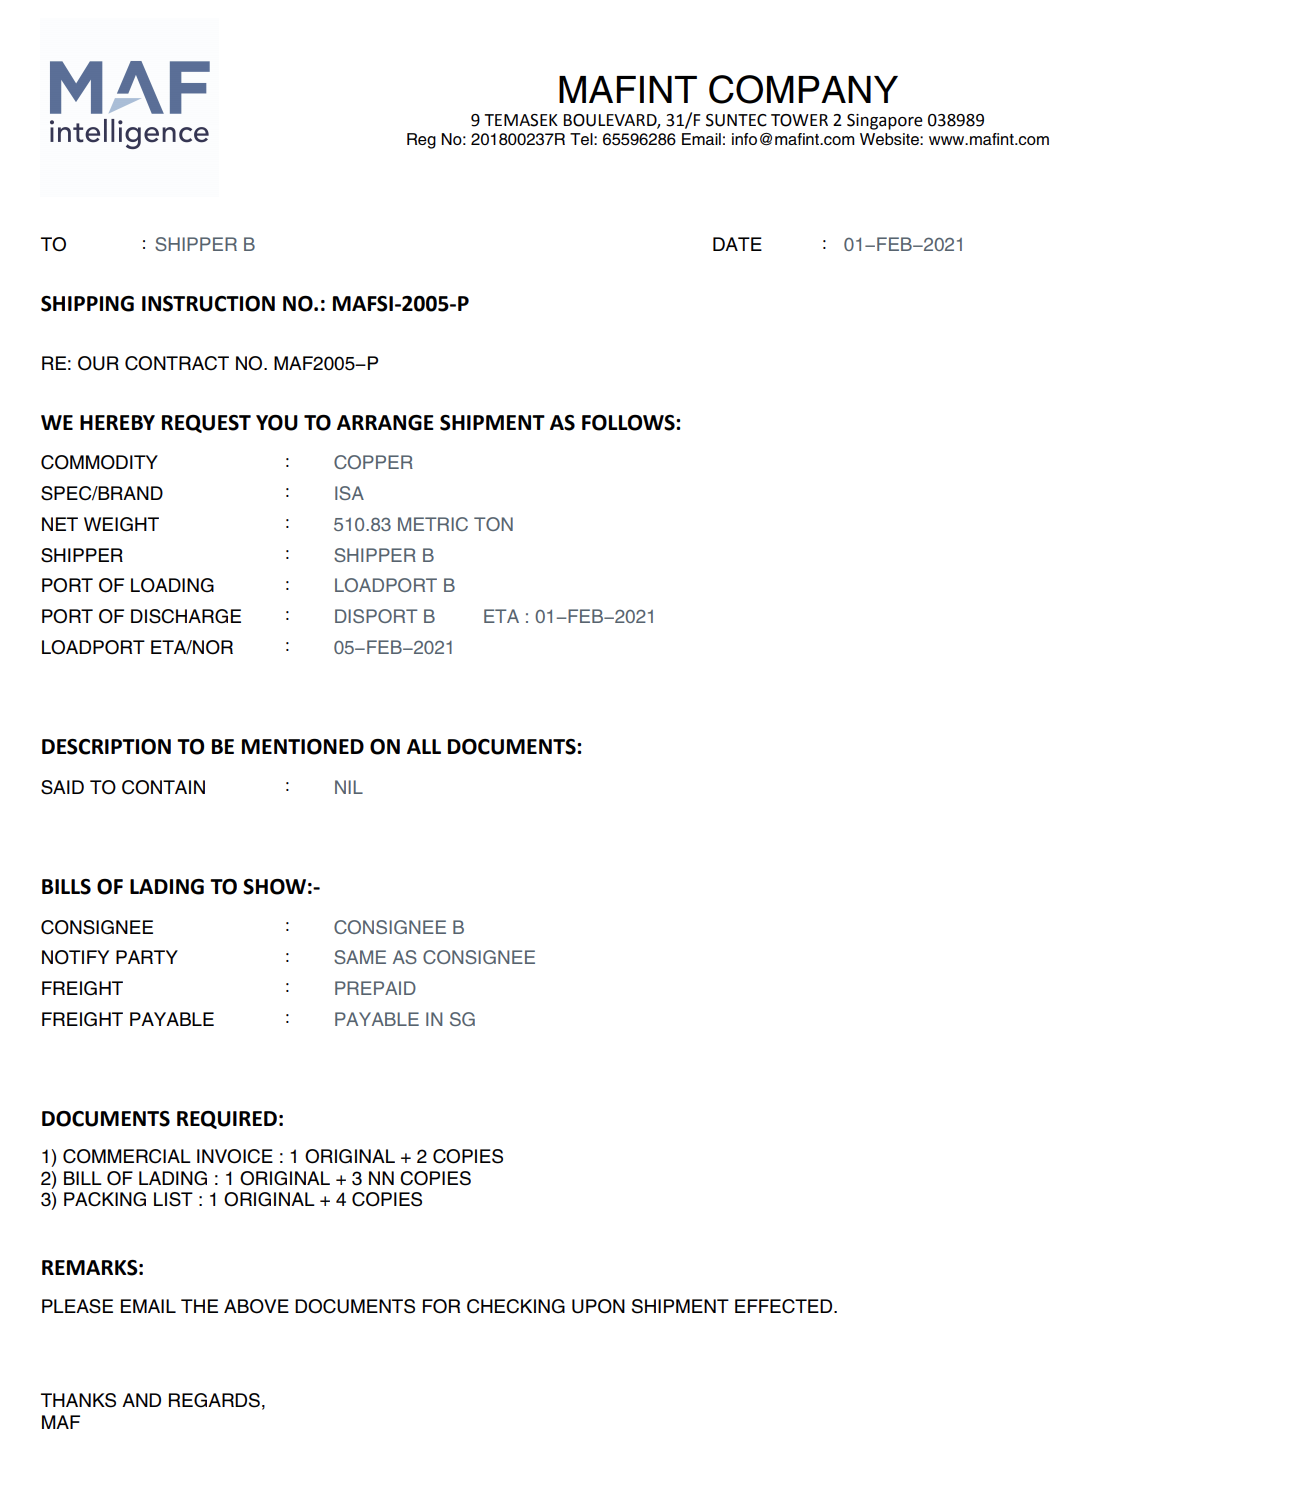
This is a sample of the Shipping Instructions document generated:
Functionality
Please refer to Table Settings for table functionalities.
Definition of Terms
Type | Description | Example |
|---|---|---|
| SI ID | Unique Term ID tagged to each shipping instruction, auto-generated by system | 11 |
| Date | Date shipping instruction is established | 19-Mar-2020 |
| SI No. | Shipping Instruction Number | PNS2I-011 |
| Contract No. | Contract Number | PB13112 |
| Shipper | Company that ships the goods | PT Prasidha-SAQ |
| Freight | Provides more details on whether the payment mode is Prepaid/Collect/Elsewhere | Collect |
| Freight Payable | Provides more details on how the payment for freight is made | Payable by FMS in Singapore |
| Consignee | Receiver of shipment | Company ABC |
| NotifyParty | Contact person to be notified when the shipment arrives at destination | Company ABC |
| Qty | Total quantity to be shipped | 50,000 |
| Unit | Unit at which the goods are being shipped | Metric Tons |
| Remarks | Any additional comments | |
| Created by | User who creates the deal | Max |
| Created on | Date/Time when deal was created | 17-Feb-2019 |
| Last Updated by | User who updated the trade last | Lydia |
| Last Updated | Date the trade was last updated on | 17-Jun-2019 |
Click to access:


