Groups
- IT Support
- MAF Intern (Unlicensed)
Sign up for a 30 days' free trial here & gain access to our Enterprise Solution Plan for free!
1. Upon signing up, you will receive 2 emails:
a. Account Verification Email. Please follow the instructions in the email to verify your email address to activate your account.
b. Welcome Email. This provides some guidance on navigating and using MAF Cloud, to help you get started!
2. Sign into your account and click 'Setting', followed by 'Group' or 'Company' from the navigation sidebar on the left and you're good to go! Please refer to Groups, Company Profile, Company Groups and Company Data to learn more!
The 'Groups' function allows members in the same group(s) to access, manage and share their data with one another, across different teams and departments. Depending on the access and role assigned, the members may view, edit and use the data (according to the 'Group Type', eg demurrage, trades, portfolio, general ledger etc.) of other members in the group. Members will be able to see which member has edited which input and when, by scrolling to the end of the table to view 'Last Updated by' and 'Last Updated'. This helps to improve productivity and promote team collaboration.
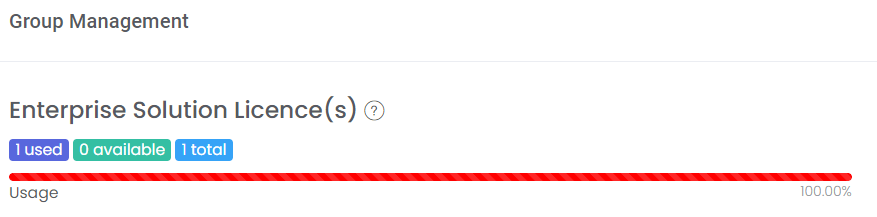
To access this function, you are required to purchase the Enterprise Solution Plan licence. Each licence entitles the user to invite up to 5 users (including the inviting user) into the group (multiple groups can be created). You may also purchase to combine multiple licences to invite more than 5 users into a group. For example, if you link 2 licences to a group, you can invite up to 10 users into the group. Groups can be invited to join a Company (and entitled to its benefits). Each free trial will be entitled to 1 group.
Kindly note that once all members have left the group, the data will be returned back to the Group Owner.
To access this page, click 'Settings' from the navigation sidebar on the left, followed by 'Group'.
Note: Once you set up your company profile (as Company Profile Creator), you will not be able to join other group or company group due to the different company IDs. You also cannot invite other group which has their own company profile (different company IDs) into your company.
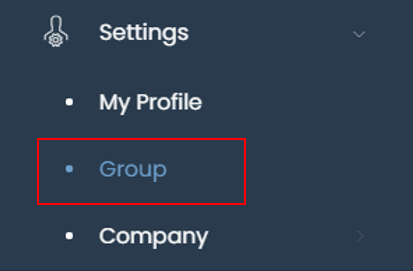
TABLE OF CONTENTS
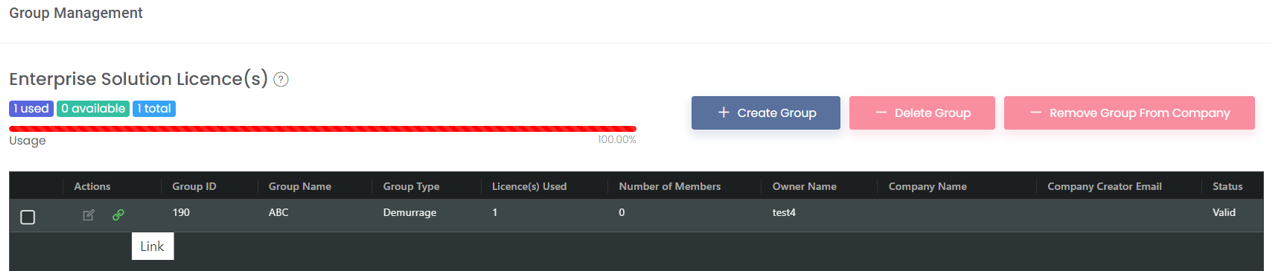
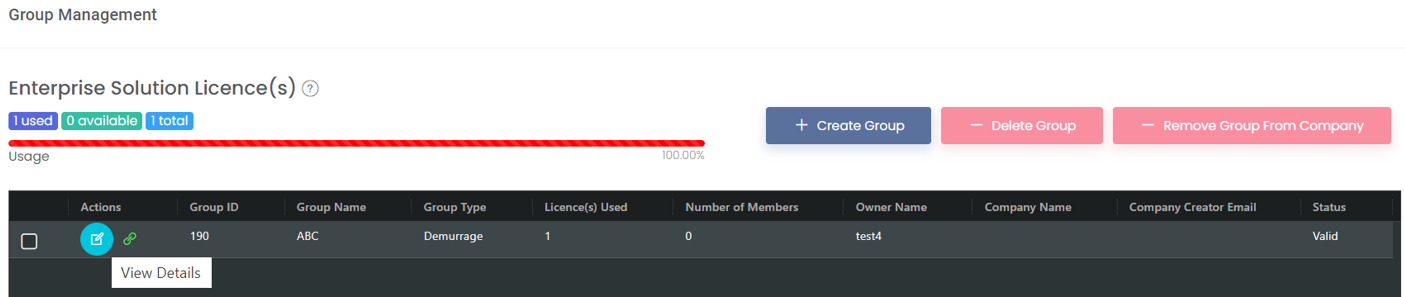
Enterprise Solution Licence(s)
The licences reflected in this page include those that you have purchased that are not assigned to others and those that have been assigned to you (you may view your licences in Assigned Licences). In this example, the user has 1 Enterprise Solution Licence that is used to create a group, and thus 0 licence is available for use.
Please note that the licences can be used to create group(s) or they can be combined (linked) with other licences to invite more than 5 users into a group.
Create Group
To create a new group, click the '+ Create Group' button located above the table.

Input a 'Group Name' and select the 'Group Type' in the drop-down list. For Group Type, please select 'Demurrage' if you are using the demurrage function. Demurrage group will be the main group that oversees and encompasses the Business group(s). So for instance, the demurrage team can create a Demurrage group type for themselves, and create other Business group type for the operations team. In this case, the Demurrage team will be able to view the claims done by the operations team but the operations team will not be able to view the claims in the demurrage team. Basically, Demurrage group type can access Business group type data but not the other way round.
For other functions such as paper and physical trades, please select 'Business' since the Demurrage group type level control is not necessary.
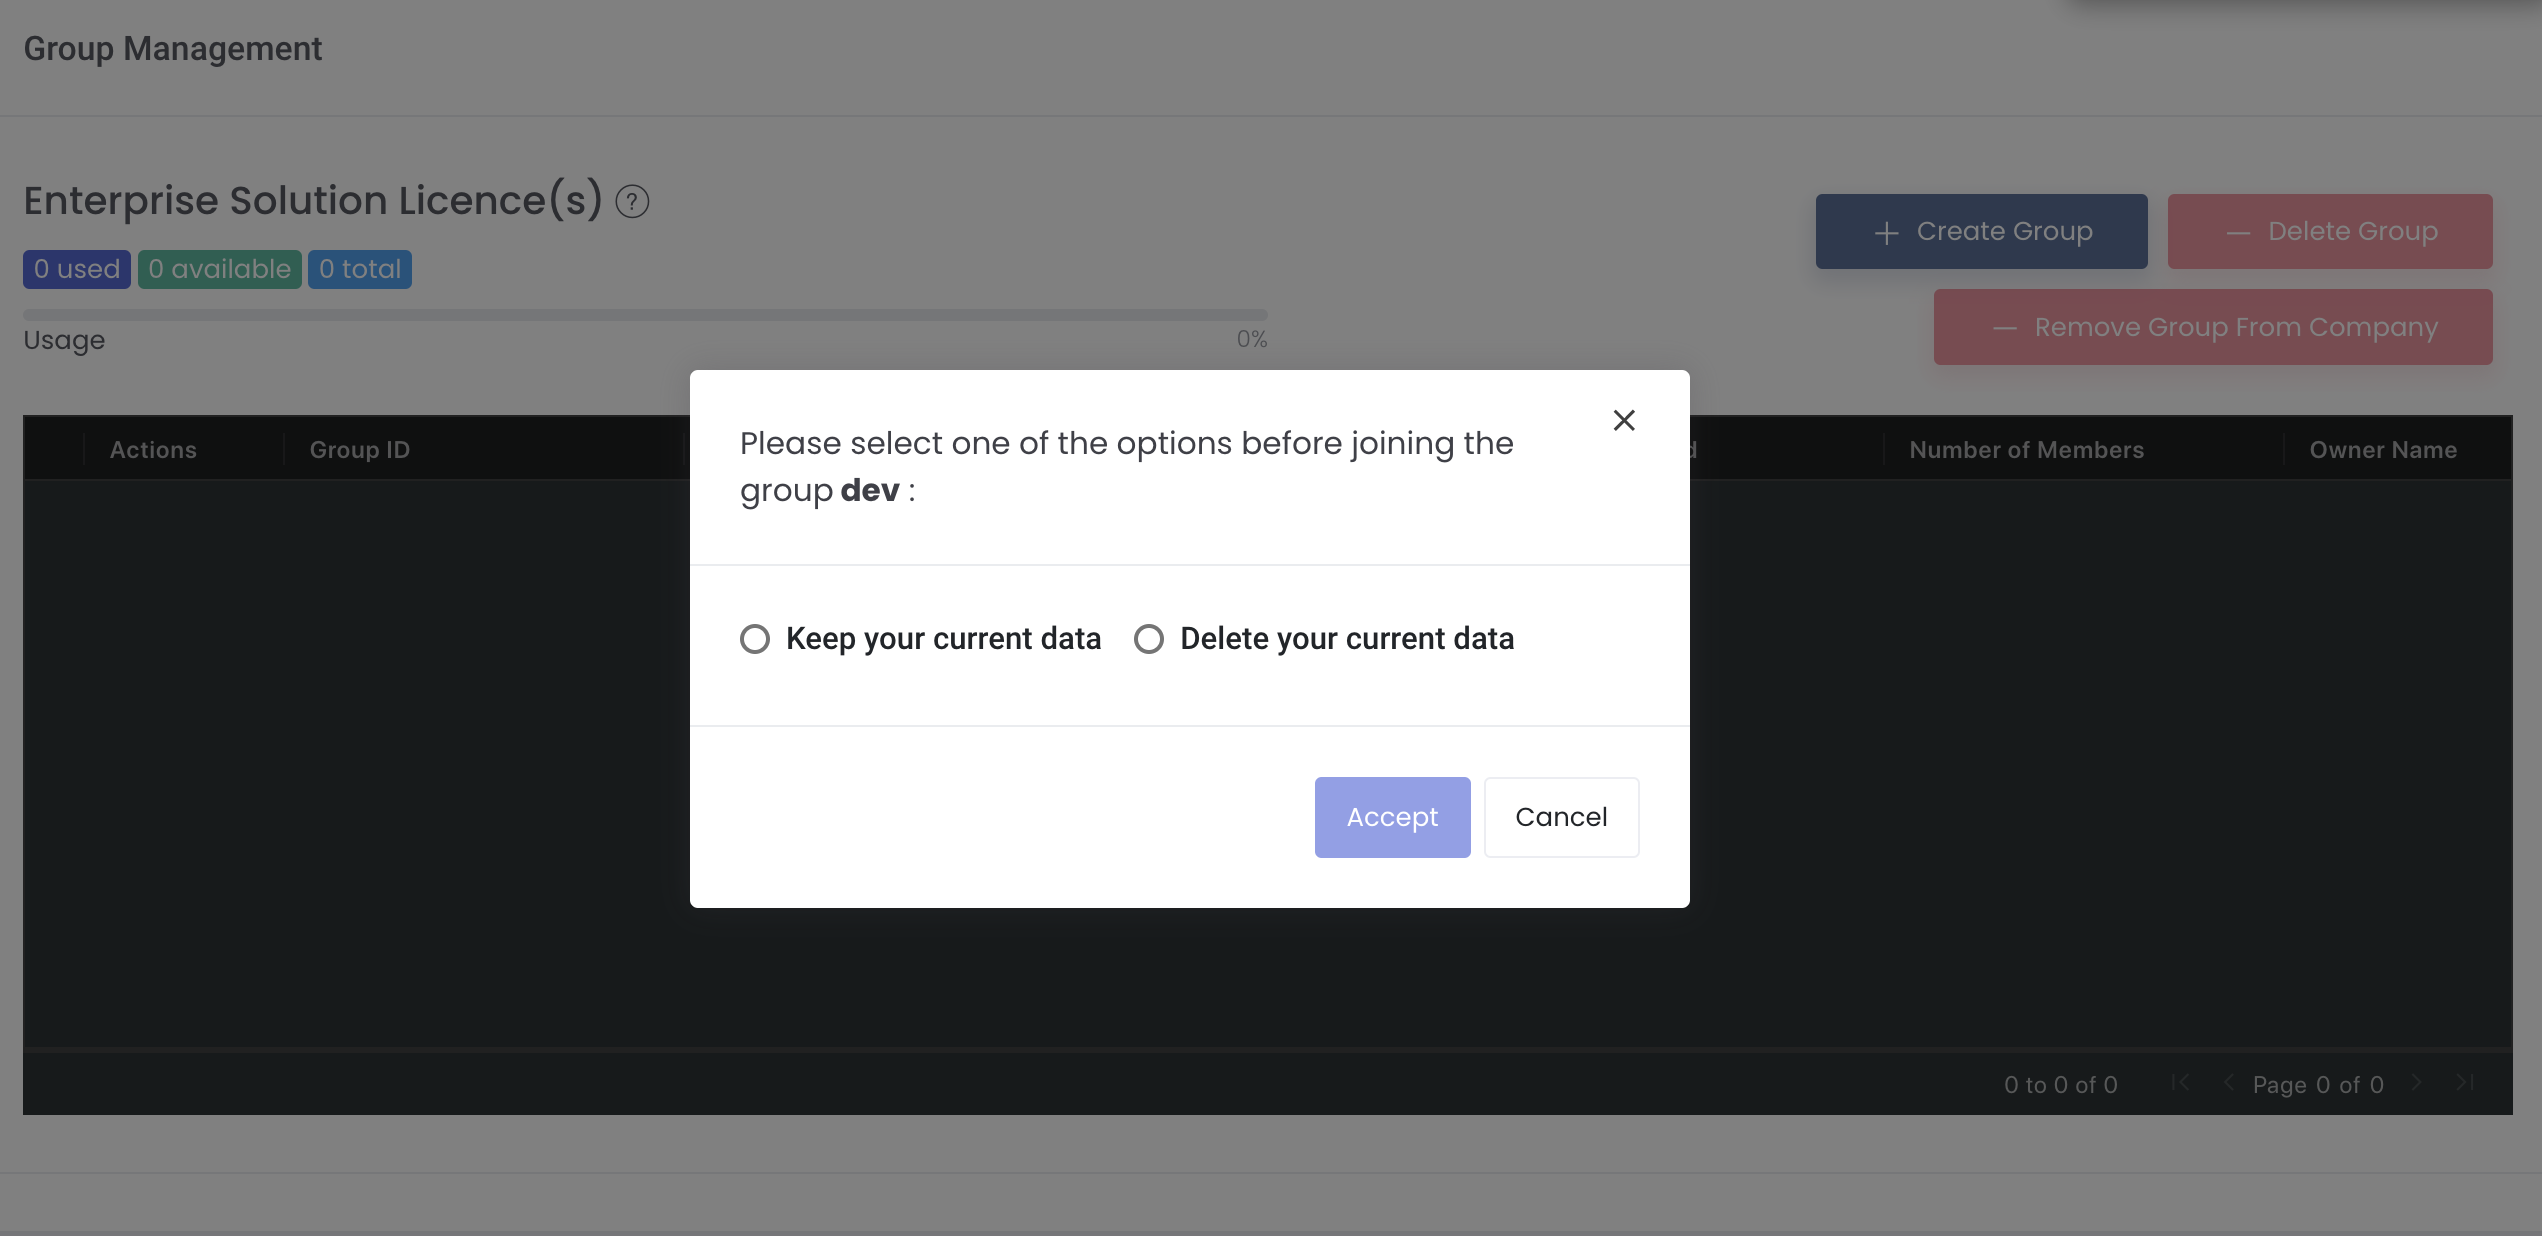
You may choose to join the group by clicking 'Join Group' and keep or delete your current data (according to the 'Group Type')
- Keep your current data: Your current data will be kept in your account and made accessible to other members in the group. The data will now belong to the group.
- Delete your current data: Your current data will be deleted from your account, and you will join the group with no data in your account.
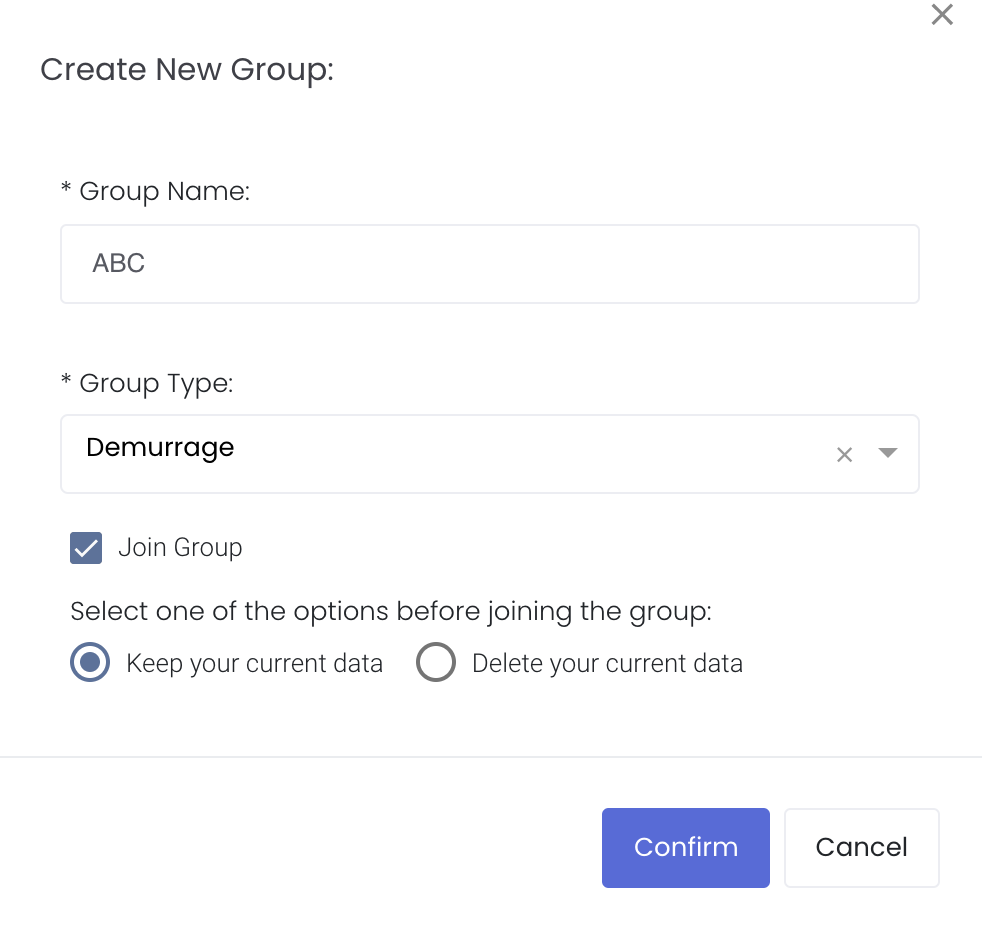
Click 'Confirm' and a pop-up message will appear if you have created the group successfully. You will be known as the 'Group Owner' of the group. Click Access Permission to learn more about the permissions.

Logic:
- Number of members to add into 1/multiple groups are dependent on the number of licences. If you have 2 licences, you can add up to 10 members into 1/multiple groups.
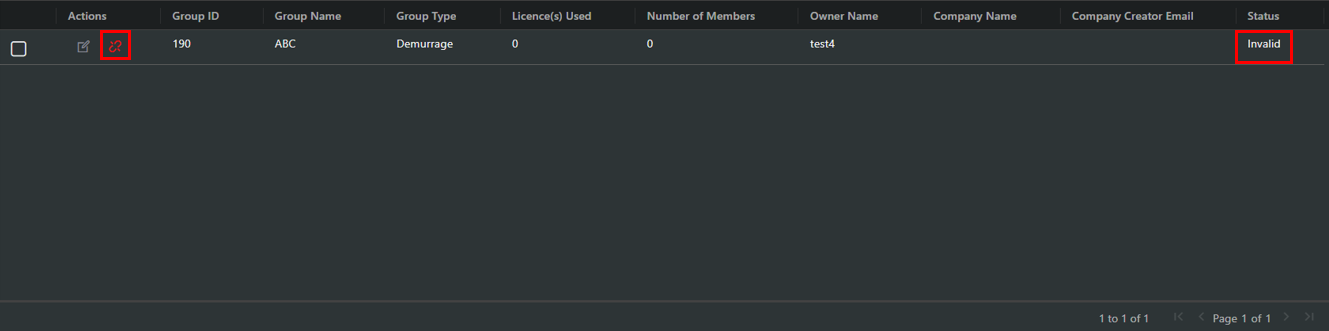
- The system will check the number of licences (and its member limit) against total valid members. Group will be invalid when the number of licence is not sufficient for the number of members in the group.
- Status Invalid: Group will be invalid if total members are outside of maximum members limit. For example, if you have 1 group of 10 members which has 2 licences, and you unlink 1 licence from the group, the group's status will become invalid. You will need to buy a new licence to reactivate the group.
- Status Valid: If you have 0 licence in a group, the group status will still be valid if other group has sufficient licences for total members to be under maximum members limit. One example is if you have 4 licences, but have 1 group with 1 member and another group with 10 members (total members to add = 20 (4 licences); members available to add: 20 - 11 = 9), and you unlink 1 licence from the group with 10 members, the group's status will still remain valid since your other licences' member limit is sufficient for the additional 5 members whose 1 licence has been removed. But note that the other licences must be assigned to other groups to make it valid.
- If licence is removed/unassigned or subscription is cancelled, the system will unlink the licence to the group and change group status accordingly.
- Members available to add will be based on the group owner's licences' member limit. For instance, group owner has 2 licences (max 10 members) and assigns to Group A (4 members) and Group B (1 member); so Admin in Group A will only see members available to add as 5, since the group owner has used 1 member limit for Group B.
Delete Group
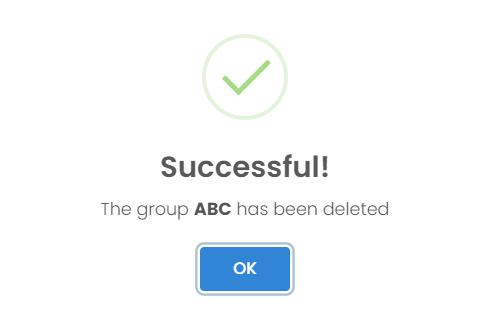
To delete a group, tick the checkbox of the group and click on the 'Delete Group' button located above the table.
Please note that only the Group Owner can delete group (which does not have any members). Click Access Permission to learn more about the permissions.
You can only delete group with no members inside the group, so removing members in the group first is required before you can delete a group.

Click 'Confirm' when prompted and a pop-up message will appear if you have deleted the group successfully.
Remove Group From Company
To remove a group from the Company, tick the checkbox of the group and click on the 'Remove Group From Company' button located above the table. Once the group is removed from the Company Group, the group will not be linked to the Company (Company Profile will be empty/revert back to the original Company Profile created before joining the Company)
Please note that only the Group Owner can remove a group from the Company. Click Access Permission to learn more about the permissions.

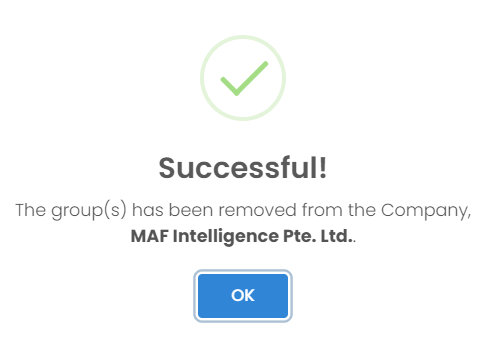
Click 'Yes, delete!' when prompted and a pop-up message will appear if you have removed the group from the Company successfully. This change will be reflected automatically in the Company Groups page.
Group Management Table
The table will show various information about the group.
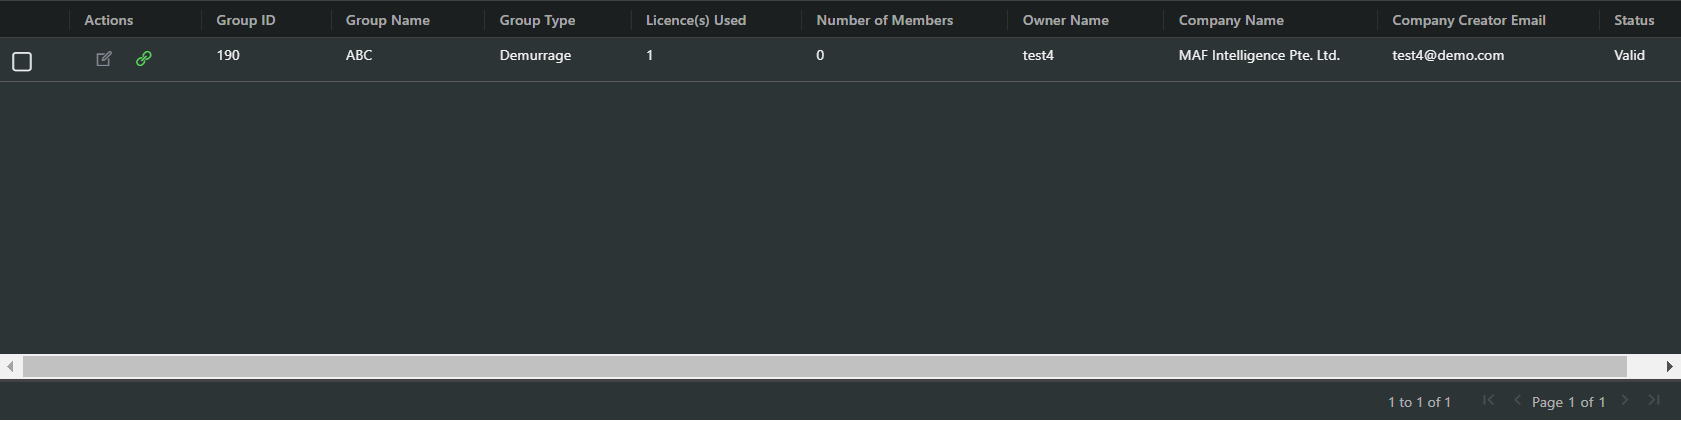
| Column Name | Description | Example |
|---|---|---|
| Group ID | Unique number that is assigned to each group after it is created | 190 |
| Group Name | Unique name that you have chosen when creating the group | ABC |
| Group Type | Type of data that will be shared in the group | Demurrage |
| Licence(s) Used | Number of licence(s) used | 1 |
| Number of Members | Number of members in the group | 0 |
| Owner Name | Name of Group Owner | test4 |
| Company Name | Name of Company | MAF Intelligence Pte Ltd. |
| Company Creator Email | Email of user who has filled in the 'Company Profile' (Company Profile Creator) | test4@demo.com |
| Status | Status of the group. The group will be available for use (valid) if a licence has been linked | Valid |
Unlink Licence from Group
If you want to deactivate a group and transfer the licence to another group, you may choose to unlink the licence from the group. To do so, click on the green 'Link' icon in the 'Actions' column of the table.
Please note that only the Group Owner can link/unlink licence to/from a group. Click Access Permission to learn more about the permissions.
Select the email address of the licence owner in the drop-down list and the number of licences tied to the group and its status will be reflected automatically. Input the 'Number of Licence(s)' to unlink from the group.
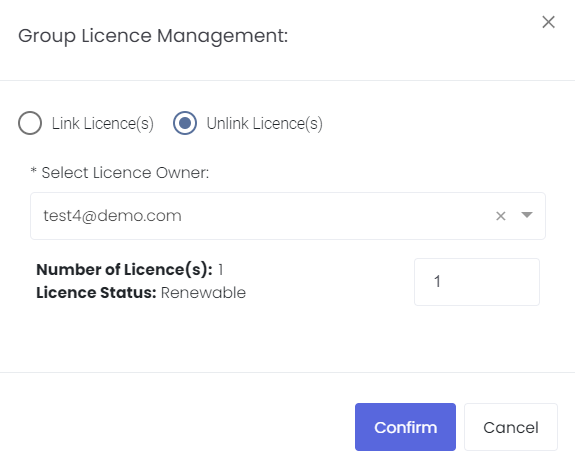
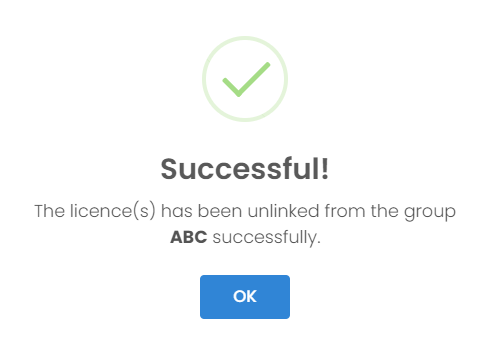
Click 'Confirm' and a pop-up message will appear if you have unlinked a licence from the group successfully. You will be able to use the licence to create a new group or link to (activate) other groups.
Once the group does not have any licence linked to it (inactivated), the green 'Link' icon will turn red and the 'Group Status' will change from 'Valid' to 'Invalid'.
Please note that if you are not the Group Owner, you will not be able to see the green/red 'Link' icon in the 'Actions' column in the table.
Link Licence to Group
If you want to activate a group, you will need to link a licence to the group. Click on the red 'Link' icon in the 'Actions' column of the table.
Please note that only the Group Owner can link/unlink licence to/from a group. Click Access Permission to learn more about the permissions.
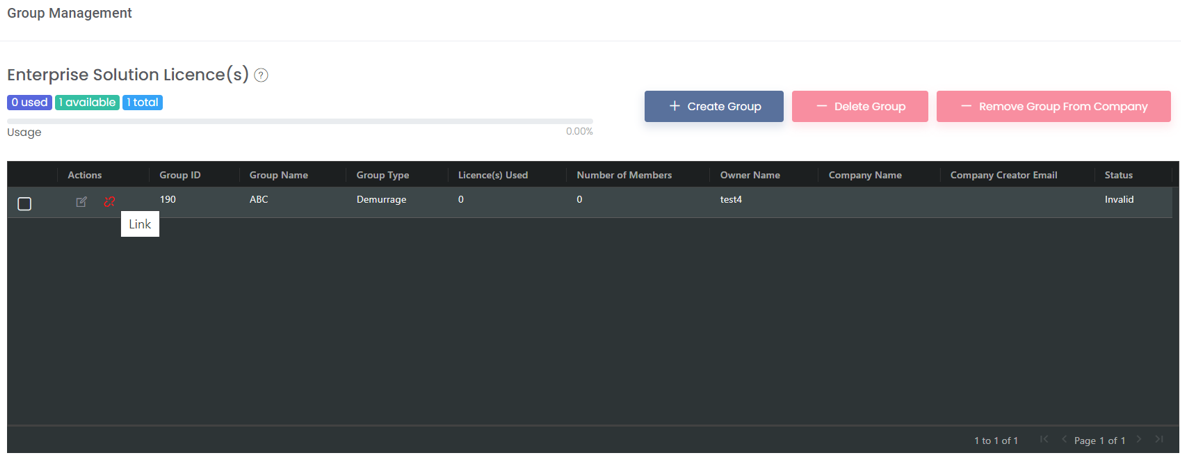
Select the email address of the licence owner in the drop-down list and the number of licences available to you and its status will be reflected automatically. Input the 'Number of Licence(s)' to link to the group.
Please note that each licence entitles you to invite up to 5 users (including the inviting user) into the group. Linking multiple licences allows you to invite more than 5 users into a group. For example, if you link 2 licences, you can invite up to 10 users into a group.

Click 'Confirm' and a pop-up message will appear if you have linked a licence to the group successfully. You will be able to manage the group and add members immediately.
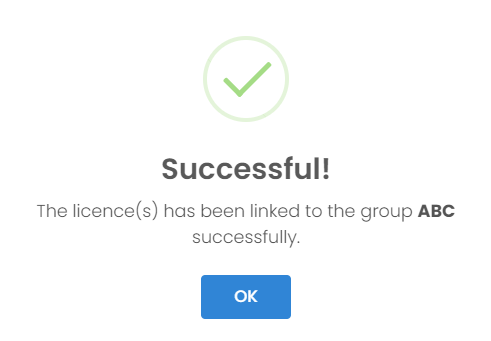
Once the group has a licence linked to it (activated), the red 'Link' icon will turn green and the 'Group Status' will change from 'Invalid' to 'Valid'.
Please note that if you are not the Group Owner, you will not be able to see the green/red 'Link' icon in the 'Actions' column in the table.

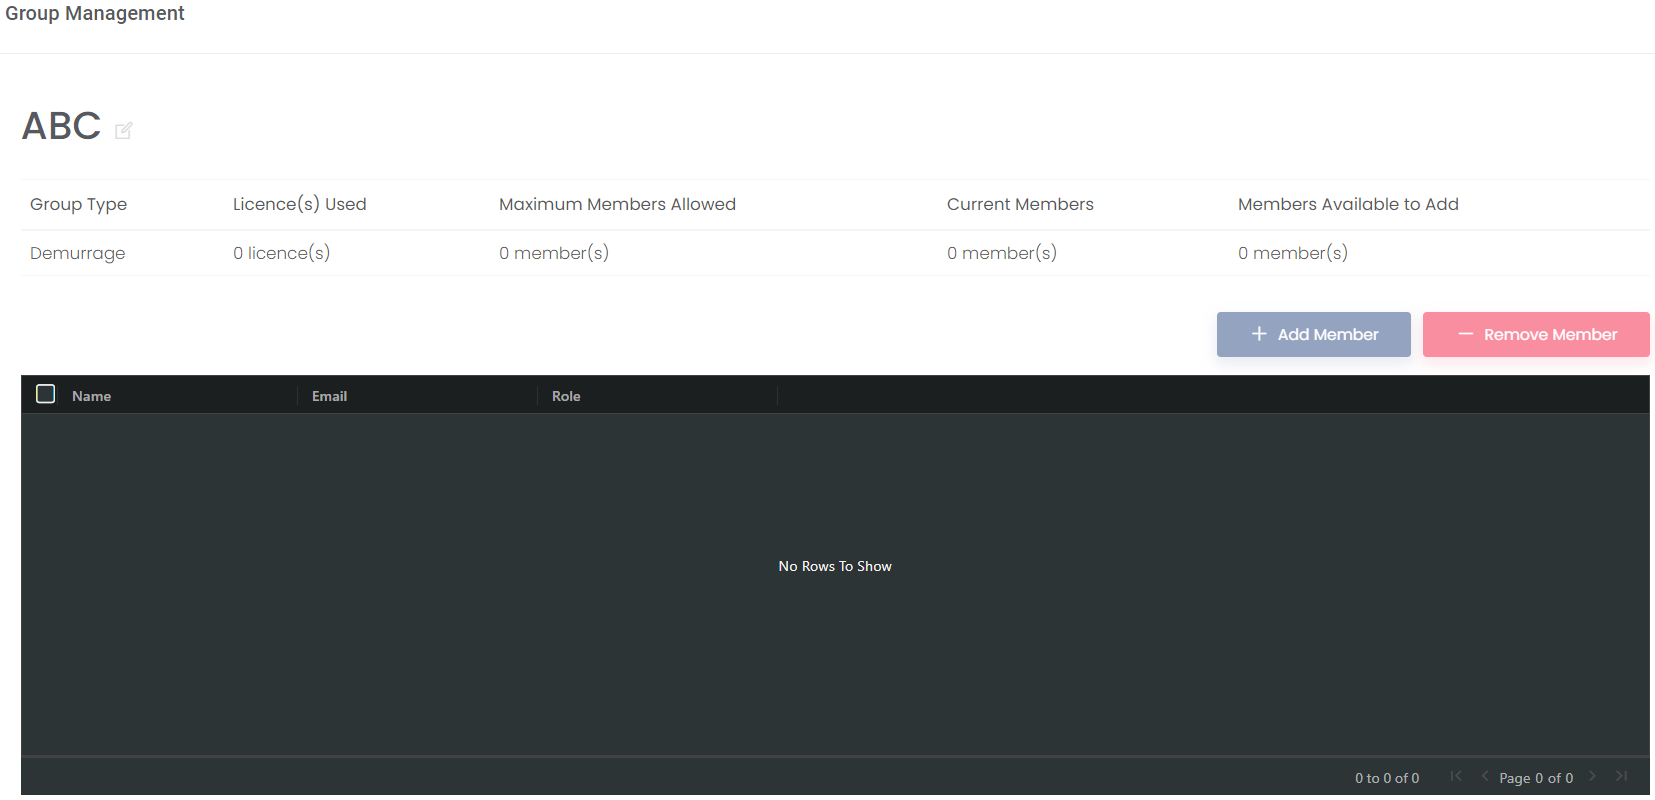
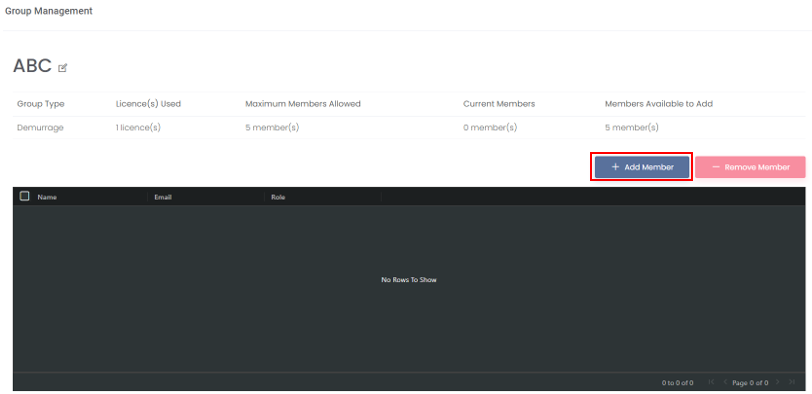
View Group Details
To view group details, click on the 'View Details' button (represented by an 'eye' icon) in the 'Actions' column of the group.
You will be able to view:
- 'Group Name': Name of the group that you have created
- 'Group Type': Type of data that will be shared in the group
- 'Licence(s) Used': Number of licence linked to the group
- 'Current Members': Current number of members in the group
- 'Members Available to Add': 'Maximum Members Allowed' - 'Current Members'
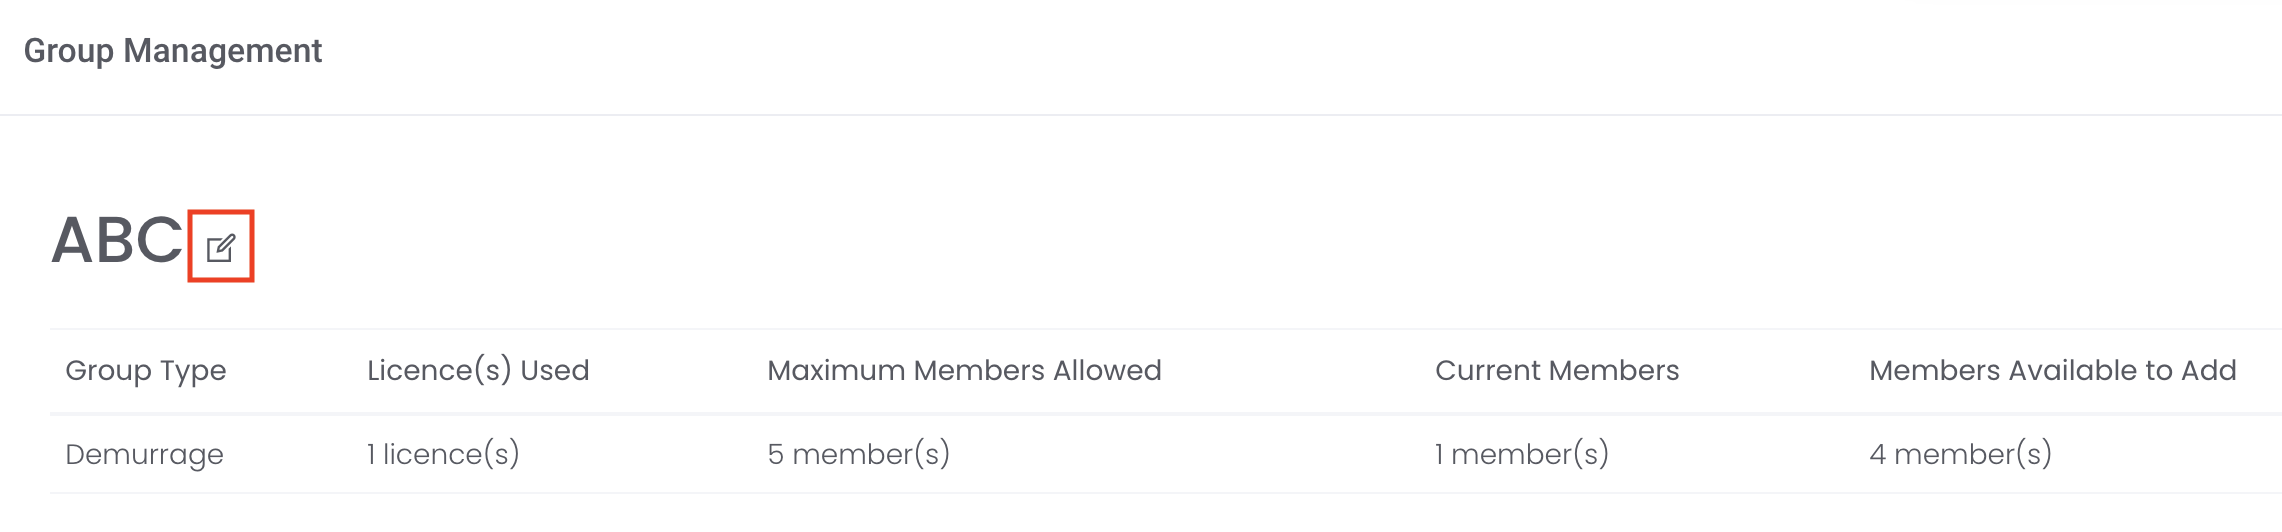
Edit Group Details
To edit group details, click on the 'Edit' button (represented by a 'pen and paper' icon) next to the group name.
Please note that only the Group Owner can edit the group details. Click Access Permission to learn more about the permissions.
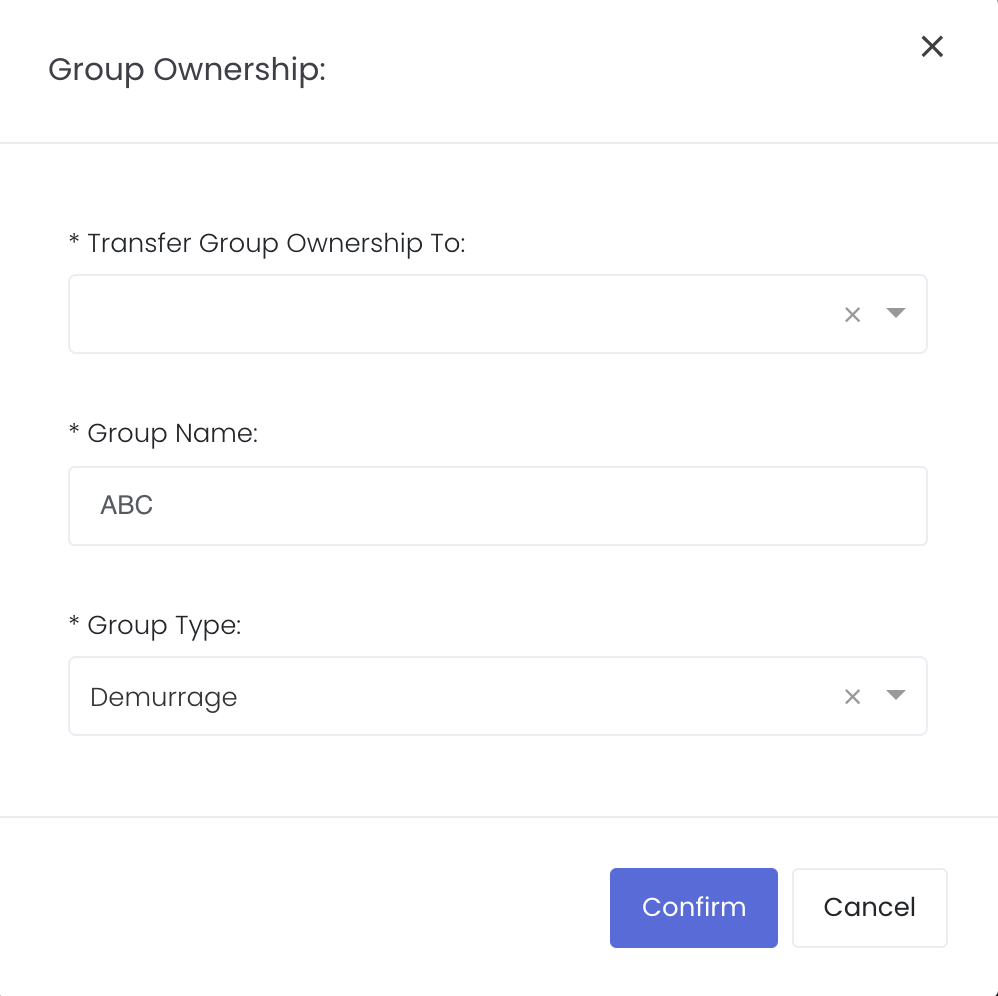
Group Ownership: You may choose to transfer the ownership of the group to another user (who must be a member of the group).
Please note that once you transfer the group to another user, your 'Group Owner' role will be removed from you immediately, and you may or may not be able to view the group in the 'Groups' page, depending on whether you have a role in the group. The licence that you have previously linked to that group will be removed from that group and immediately be made available to you for other use. The user who became the 'Group Owner' of your previous group has to link (activate) that group using his/her own licence.
Change Group Ownership: Current status of existing group owner will apply to the new group owner when transferring group ownership:
If user is under Free Trial status, when user transfers group ownership to another user, no licence is required and the group’s owner will be auto updated to the new group owner
If user is under Active status, when user transfers group ownership to another user, a licence is required and the new owner will require a licence to activate the group before officially becoming the group owner of the group
Edit Group Details: You may choose to edit the 'Group Name' and 'Group Type' here. Click 'Confirm' to update the group details.
Add Members
Click on ‘Settings’, followed by ‘Groups’ from the navigation sidebar on the left. Click on 'View Details' (represented by an 'eye' icon) to view the details of the group.
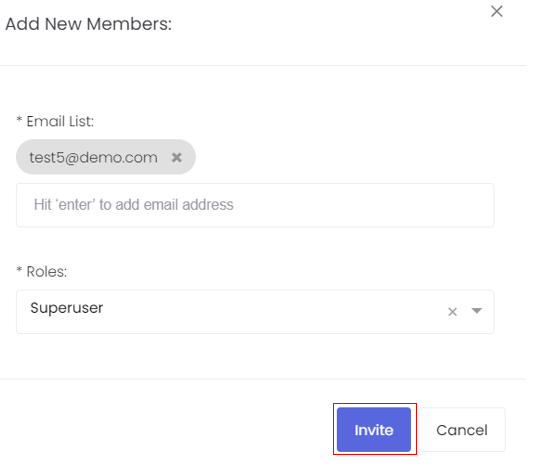
Click the '+ Add Member' button located above the table to invite user(s) into the group.
Please note that only the Group Owner and Admin can invite member(s) into a group. Click Access Permission to learn more about the permissions.
As 1 licence allows you to add up to 5 members, you will be allowed to add more than 5 members if you have more than 1 licence. So if you have 2 licences, you will be able to add up to 10 members into any groups in your company. You will be required to link licence to your groups and reactivate the groups accordingly.
For Example:
Total licences are 2, so maximum number of members is 10 (in same company)
Group A has 9 members, Group B has 1 member
If unlink 1 licence from Group B, Group B will become invalid; and
Group A will also become invalid as now there is only 1 licence linked to Group A and maximum number of member is 5, but Group A has 9 members
So now let’s say 1 licence is relinked to Group B,
Group B becomes valid as Group B only has 1 member and maximum number of members for 1 licence is 5
But Group A is still invalid. So you can reactivate Group A (click on Reactivate Group button) without linking any new licence as Group A + Group B = 10 which is still within maximum number of members of 10, so
So the logic is focused on the maximum number of members allowed for all licences linked, and members can be added into any groups as long as it is within the maximum number of members allowed.
Type the email address of the user whom you want to invite and select the role as 'Admin' or 'User'. Click Access Permission to learn more about the permissions of the roles.
You may invite any user or key in an email address which has not been registered in MAF Cloud yet. Once the invitee has received your email invitation, he/she will need to create an account before accepting your invitation.
Please note that each user can only join 1 group and be assigned 1 role.
You can change the role of the user after you have invited him/her successfully. Please note that only Group Owner can change the role of the user, by selecting from the "Role" drop down list and click "Save" to update successfully.
All members invited into the group will be able to view, access and manage all the data (according to the 'Group Type') of one another immediately. You will be able to see which user has edited which input and when, by scrolling to the end of the table and view 'Last Updated by' and 'Last Updated'.
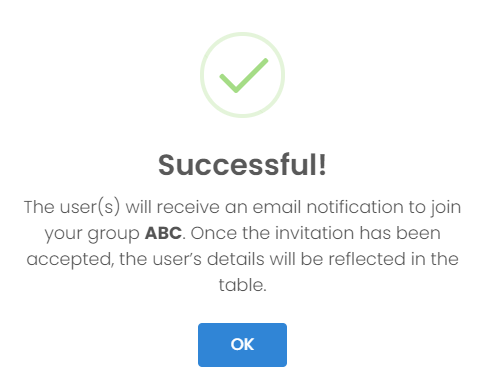
Click 'Invite' and 'Confirm' when prompted.
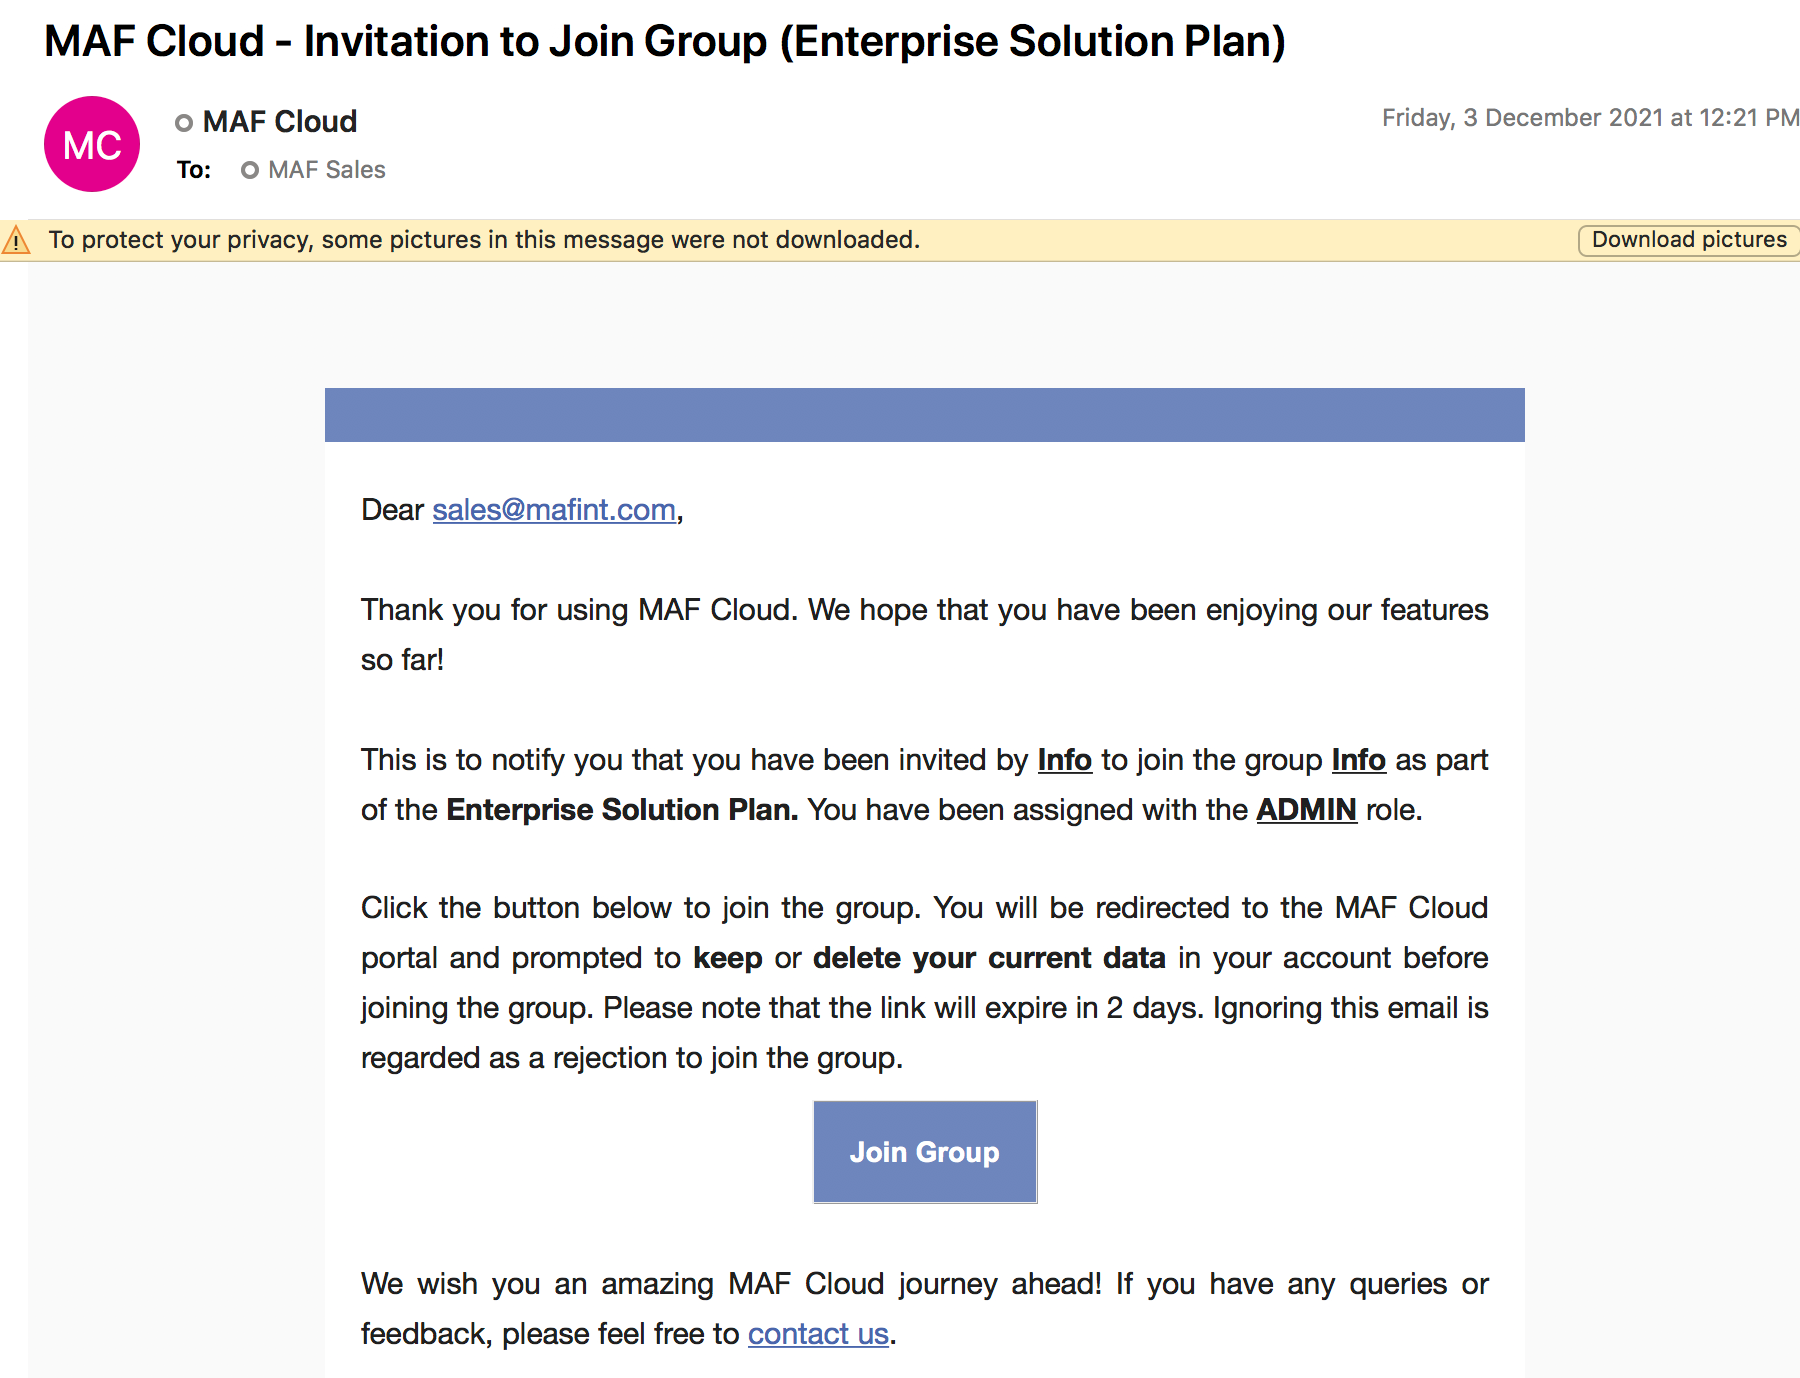
A pop-up message will appear if you have invited the user to join your group successfully. The user will receive an email invitation to join the group and will be prompted to keep or delete their data before joining:
- Keep your current data: Your current data will be kept and made accessible to other members in the group. The data will now belong to the group.
- Delete your current data: Your current data will be deleted from your account, and you will join the group with no data in your account.
Please note that the invitation link will expire in 2 days. Once the invitation has been accepted, the invitee's details will be reflected in the 'Groups' table.
Remove Members
To remove member(s) from the group, tick the checkbox of the user and click 'Remove Member' located above the table.
Please note that only the Group Owner and Admin can remove member(s) from a group. Click Access Permission to learn more about the permissions.

Please note that once you remove the member, his/her data will be kept in the group only (not available to him/her) and transferred to any Admin (regardless of whether it's the Group Owner, Admin or Member who removed the member).
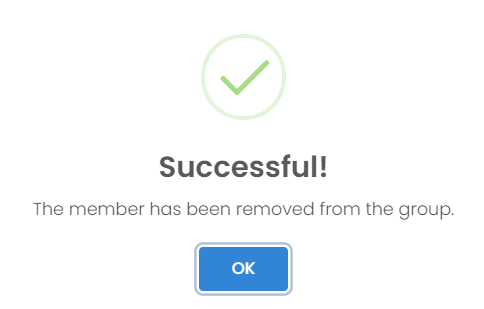
Click 'Yes, delete!' when prompted and a pop-up message will appear if you have removed the member from the group successfully. The removed member will no longer be able to access and share data with other members in the group immediately.
Access Permission
| Function | Group Owner | Admin | User |
|---|---|---|---|
| Invite Member | Yes | Yes | No |
| Remove Member | Yes | Yes | No, but can remove self |
| Change User Role | Yes | No | No |
| Change User Access Permission | Yes | Yes | No, unless he/she is Group Owner |
| Access to Data of Members in Group | No | Yes | Yes |
| Delete Group | Yes | No | No |
| Remove Group from Company | Yes | No | No |
| Link/Unlink Licence to/from Group | Yes | No | No |
| View Group Details | Yes | Yes | Yes |
| Edit Group Details | Yes | No | No |
Functionality
Please refer to Table Settings for table functionalities.
Click to access: