Import Data - Demurrage Claims Table
- IT Support
There are 4 methods to upload your demurrage data from your Excel spreadsheet into our 'Demurrage Claims' table. Please note that this function is currently supported by Google Chrome browser only.
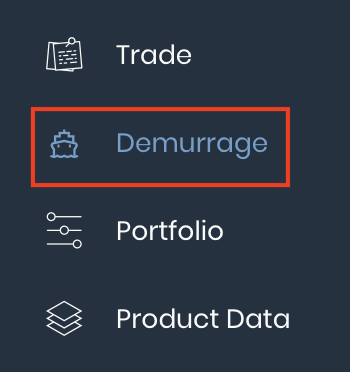
To access the 'Demurrage Claims' page, click 'Demurrage' from the navigation sidebar on the left.
1. 'Upload File' Function - Match Headers
You may upload your Excel file to import the data directly into our 'Demurrage Claims' table. Please note that you may upload multiple individual files at one go (use Ctrl to select more than 1 file) and only the main spreadsheet in your Excel file will be imported.
1. You will need to ensure that the header names of the columns in your Excel spreadsheet match exactly with those in the 'Demurrage Claims' table. You may use any table layout (reset or customised) as long as the header names in your Excel spreadsheet match.


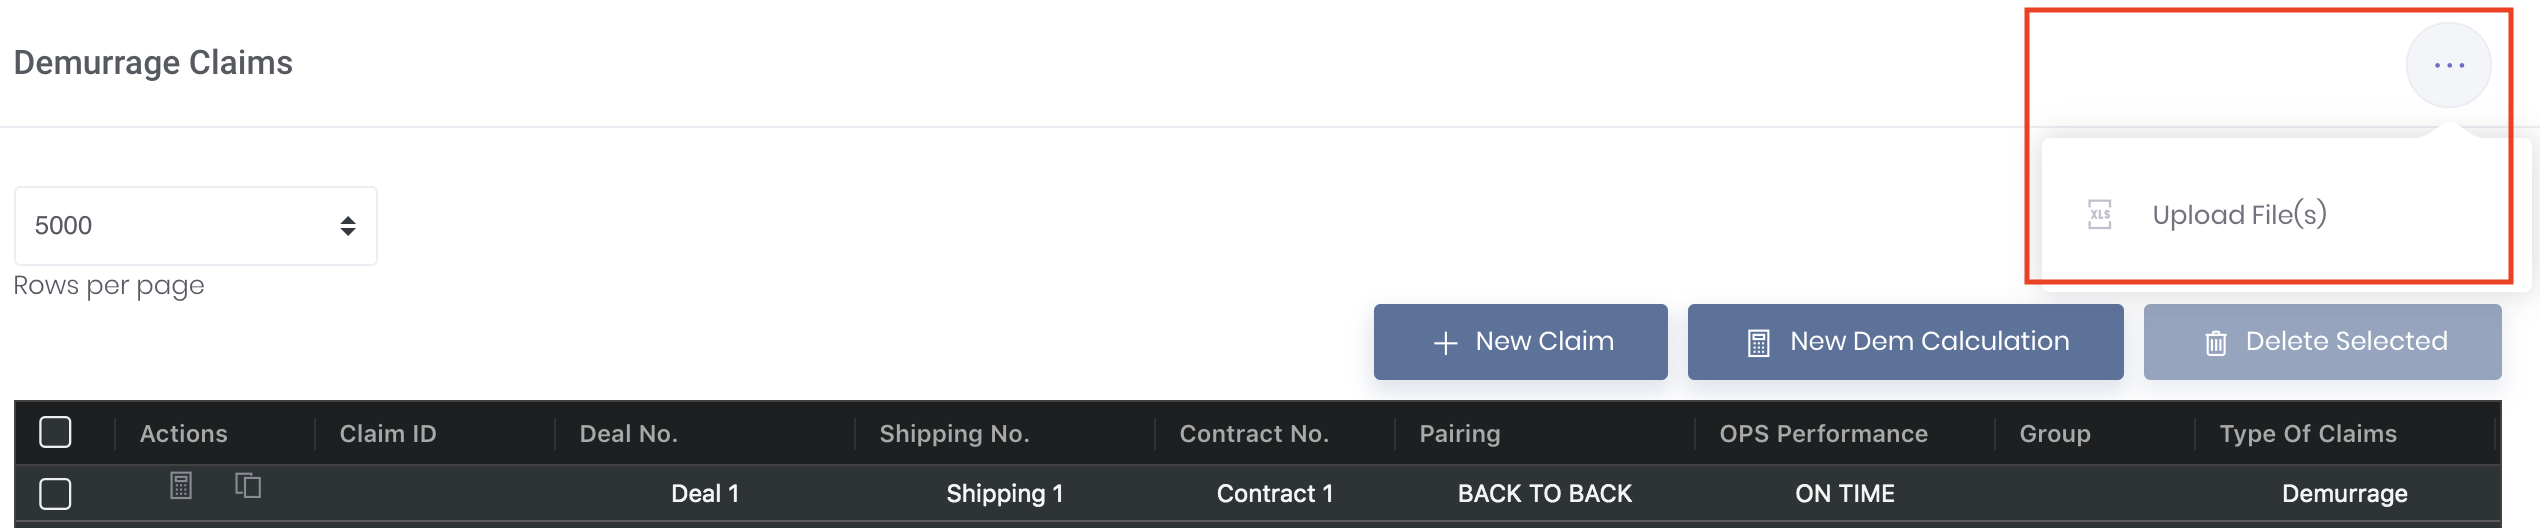
2. You are now ready to upload your file. In the ‘Demurrage Claims’ page, click on the three dots located at the top right corner of the page, followed by ‘Upload File(s)’. Upload your Excel spreadsheet and a pop-up message will appear if the data has been uploaded successfully.
Please note that once you upload your file, only the data records in that file will be displayed in the ‘Demurrage Claims’ table. This allows you to check your uploaded data first before saving and does not mean that your existing data has been replaced. Once you click 'Save Claims', all your existing data, together with the uploaded data will be reflected.
Note: For data exported directly as an excel file from the demurrage claims table (right click>export>excel), you will be required to save the file first before you can upload the file.

3. You will be able to see all the uploaded data in the ‘Demurrage Claims’ table. Click 'Save Claims' to save your data in the table. Please note that values in red are invalid and have to be resolved before saving your data. Otherwise, clicking 'Save Claims' will save all the other data successfully but will only save the values in red as empty values.

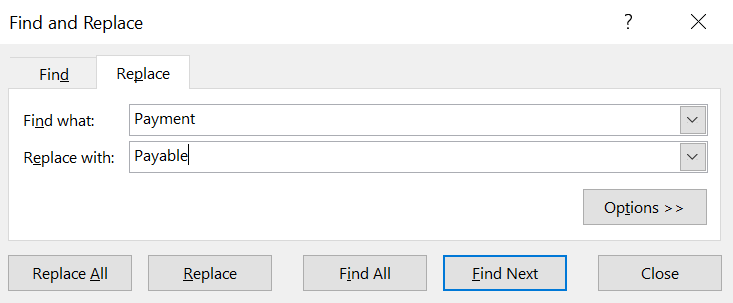
4. In your Excel spreadsheet, if you have any items that are not named exactly as those in the drop down list in the 'Demurrage Claims' table, you may use the 'Find and Replace' function in Excel. For example, you may change ‘Payment/Receipt’ (listed in your Excel) to ‘Payable/Receivable’ (listed in the 'Demurrage Claims' table). Use Ctrl + F and click on the 'Replace' tab. Type 'Payment' under 'Find what' and type 'Payable' under 'Replace with' and click ‘Replace All’. Do the same for 'Receipt'. You may then upload the data into the table successfully.
2. 'Upload File' Function - Download Standard Table Layout
You may upload your Excel file to import the data directly into our 'Demurrage Claims' table. Please note that you may upload multiple individual files at one go (use Ctrl to select more than 1 file) and only the main spreadsheet in your Excel file will be imported.
1. To ensure that the header names of the columns in your Excel spreadsheet match exactly with those in the 'Demurrage Claims' table without changing the former, you may download the standard table layout as an Excel or CSV file from the 'Demurrage Claims' table and input your data before uploading the file.
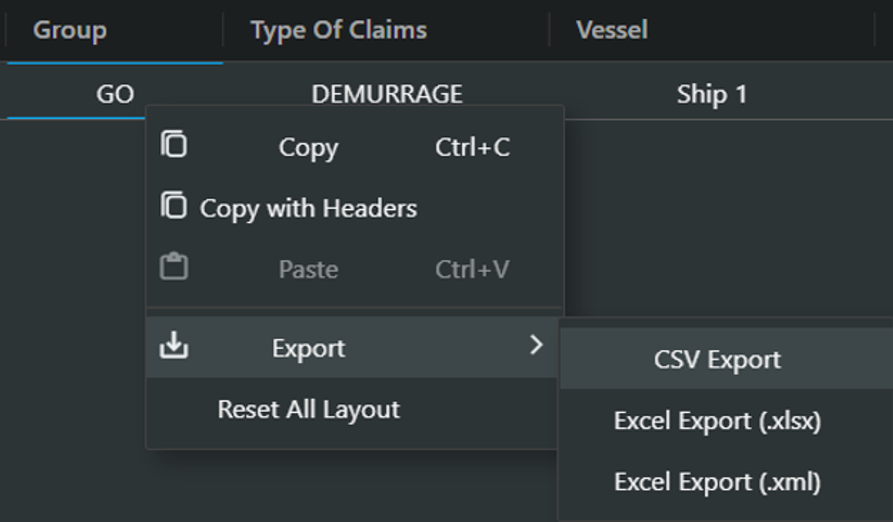
2. You may use any table layout (reset or customised). Right-click anywhere in the table and click 'Export', and choose the format of the file (CSV or Excel) to be downloaded into your device for your usage.
Please note that this function will export any existing data in your 'Demurrage Claims' table into the Excel spreadsheet. Otherwise, you may delete any existing data first before exporting the table for use as the standard table layout.
3. Open the newly exported file (standard table layout) and fill in your data. You are now ready to upload your file.

In the ‘Demurrage Claims’ page, click on the three dots located at the top right corner of the page, followed by ‘Upload File(s)’. Upload your Excel spreadsheet and a pop-up message will appear if the data has been uploaded successfully.
Please note that once you upload your file, only the data records in that file will be displayed in the ‘Demurrage Claims’ table. This allows you to check your uploaded data first before saving and does not mean that your existing data has been replaced. Once you click 'Save Claims', all your existing data, together with the uploaded data will be reflected.
Note: For data exported directly as an excel file from the demurrage claims table (right click>export>excel), you will be required to save the file first before you can upload the file.
4. You will be able to see all the uploaded data in the ‘Demurrage Claims’ table. Click 'Save Claims' to save your data in the table. Please note that values in red are invalid and have to be resolved before saving your data. Otherwise, clicking 'Save Claims' will save all the other data successfully but will only save the values in red as empty values.
5. In your Excel spreadsheet, if you have any items that are not named exactly as those in the drop down list in the 'Demurrage Claims' table, you may use the 'Find and Replace' function in Excel. For example, you may change ‘Payment/Receipt’ (listed in your Excel) to ‘Payable/Receivable’ (listed in the 'Demurrage Claims' table). Use Ctrl + F and click on the 'Replace' tab. Type 'Payment' under 'Find what' and type 'Payable' under 'Replace with' and click ‘Replace All’. Do the same for 'Receipt'. You may then upload the data into the table successfully.
3. 'Copy & Paste' Function - Follow Reset Layout
You may copy and paste your data directly into our 'Demurrage Claims' table.
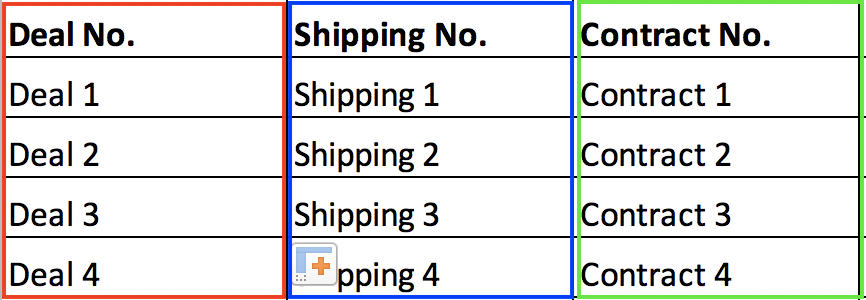
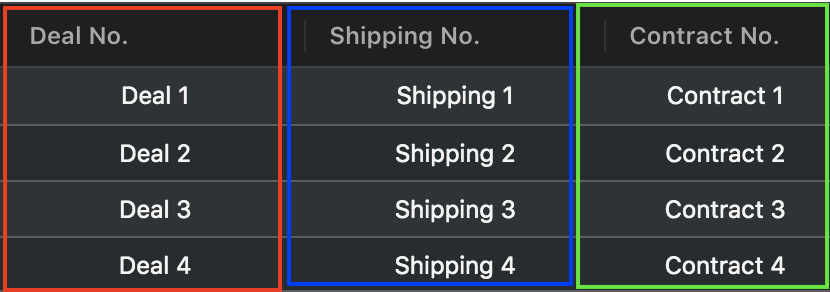
1. You will need to ensure that the headers and positioning of the columns in your Excel spreadsheet match exactly with the 'Reset Layout' in the 'Demurrage Claims' table. This is because the data will be pasted exactly in the order of how it has been copied.

For example, 'Deal No' is the first column, followed by 'Shipping No.' and 'Contract No.'.
2. You are now ready to copy the data from your Excel spreadsheet and paste into the 'Demurrage Claims' table. Select all the data (Ctrl + A) and copy the data (Ctrl + C or right-click and click 'Copy') from your Excel spreadsheet and paste (Ctrl + Shift + V).
You may choose to:
- Add new row (by clicking on '+ New Claim') and click on any cell of the new row that you want to paste the data into and paste (Ctrl + Shift + V), OR
- Click on any cell of an existing row that you want to paste the data from (eg paste from 2nd cell of row 3) and paste (Ctrl + Shift + V). New row(s) will be created with your newly pasted data on top of the existing rows and the data in the existing rows in your table will not be replaced.
You may refer to Keypress Operator Functions for more information.
3. You will be able to see all the uploaded data in the ‘Demurrage Claims’ table. Click 'Save Claims' to save your data in the table. Please note that values in red are invalid and have to be resolved before saving your data. Otherwise, clicking 'Save Claims' will save all the other data successfully but will only save the values in red as empty values.
4. In your Excel spreadsheet, if you have any items that are not named exactly as those in the drop down list in the 'Demurrage Claims' table, you may use the 'Find and Replace' function in Excel. For example, you may change ‘Payment/Receipt’ (listed in your Excel) to ‘Payable/Receivable’ (listed in the 'Demurrage Claims' table). Use Ctrl + F and click on the 'Replace' tab. Type 'Payment' under 'Find what' and type 'Payable' under 'Replace with' and click ‘Replace All’. Do the same for 'Receipt'. You may then upload the data into the table successfully.
4. 'Copy & Paste' Function - Follow Customised Layout
You may copy and paste your data directly into our 'Demurrage Claims' table.
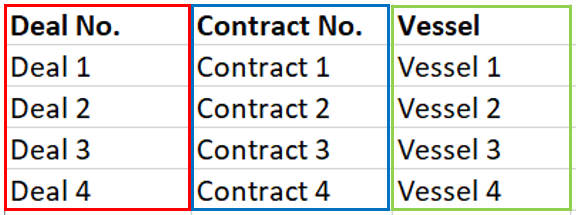
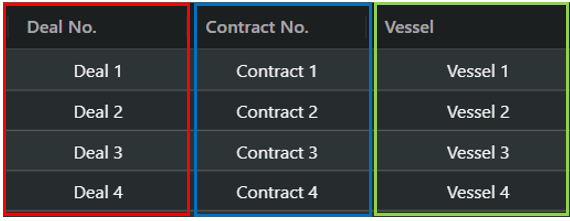
1. You will need to ensure that the headers and positioning of the columns in your Excel spreadsheet match exactly with your customised table layout in the 'Demurrage Claims' table. This is because the data will be pasted exactly in the order of how it has been copied.
In your customised table layout, you may filter the columns and adjust the positioning of the columns according to your preference. For example, 'Deal No' is the first column, followed by 'Contract No.' and 'Vessel'.
Select your customised table layout by clicking the dropdown list.

2. You are now ready to copy the data from your Excel spreadsheet and paste into your customised table layout in the 'Demurrage Claims' table. Select all the data (Ctrl + A) and copy the data (Ctrl + C or right-click and click 'Copy') from your Excel spreadsheet and paste (Ctrl + Shift + V).
You may choose to:
- Add new row (by clicking on '+ New Claim') and click on any cell of the new row that you want to paste the data into and paste (Ctrl + Shift + V), OR
- Click on any cell of an existing row that you want to paste the data from (eg paste from 2nd cell of row 3) and paste (Ctrl + Shift + V). New row(s) will be created with your newly pasted data on top of the existing rows and the data in the existing rows in your table will not be replaced.
You may refer to Keypress Operator Functions for more information.
3. You will be able to see all the uploaded data in the ‘Demurrage Claims’ table. Click 'Save Claims' to save your data in the table. Please note that values in red are invalid and have to be resolved before saving your data. Otherwise, clicking 'Save Claims' will save all the other data successfully but will only save the values in red as empty values.

4. In your Excel spreadsheet, if you have any items that are not named exactly as those in the drop down list in the 'Demurrage Claims' table, you may use the 'Find and Replace' function in Excel. For example, you may change ‘Payment/Receipt’ (listed in your Excel) to ‘Payable/Receivable’ (listed in the 'Demurrage Claims' table). Use Ctrl + F and click on the 'Replace' tab. Type 'Payment' under 'Find what' and type 'Payable' under 'Replace with' and click ‘Replace All’. Do the same for 'Receipt'. You may then upload the data into the table successfully.
Video
(00:01) Upload Data into Demurrage Table
(00:15) Download Data from Demurrage Table