Creating a Payment Record (Invoice) Manually
You may create an invoice manually if you prefer not to input physical trades before creating an invoice. To create an invoice after creating physical trades, please refer to: Creating a Payment Record (Invoice) After Physical Trades Input.
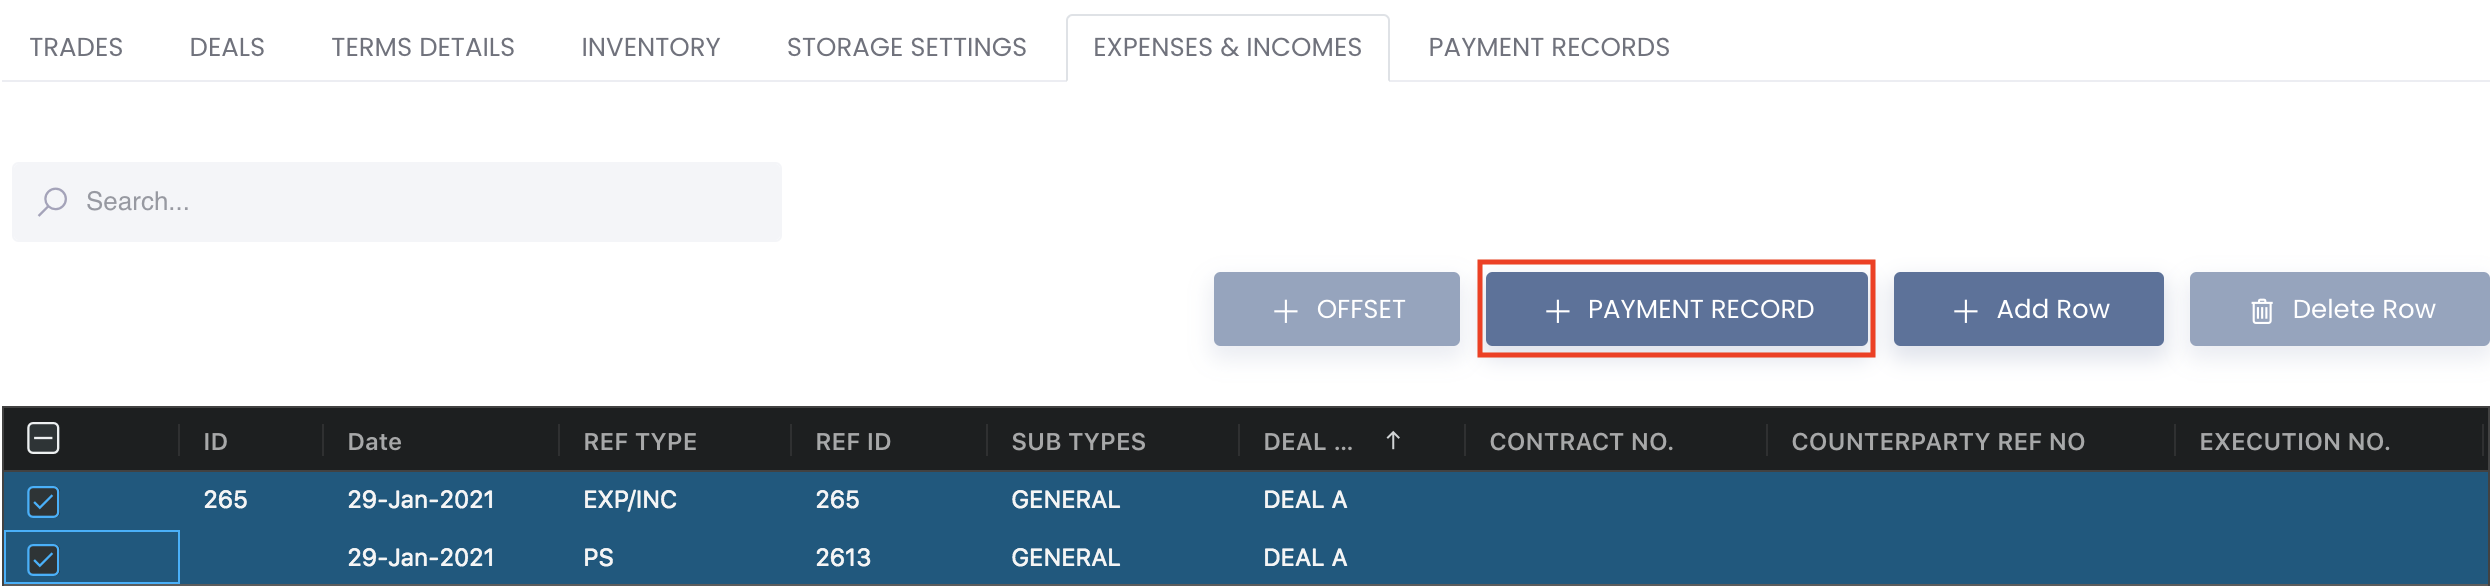
1. To access the page, please click on Trade>Physical Trade followed by Payment Record tab and click on + Payment Record button to create an invoice.
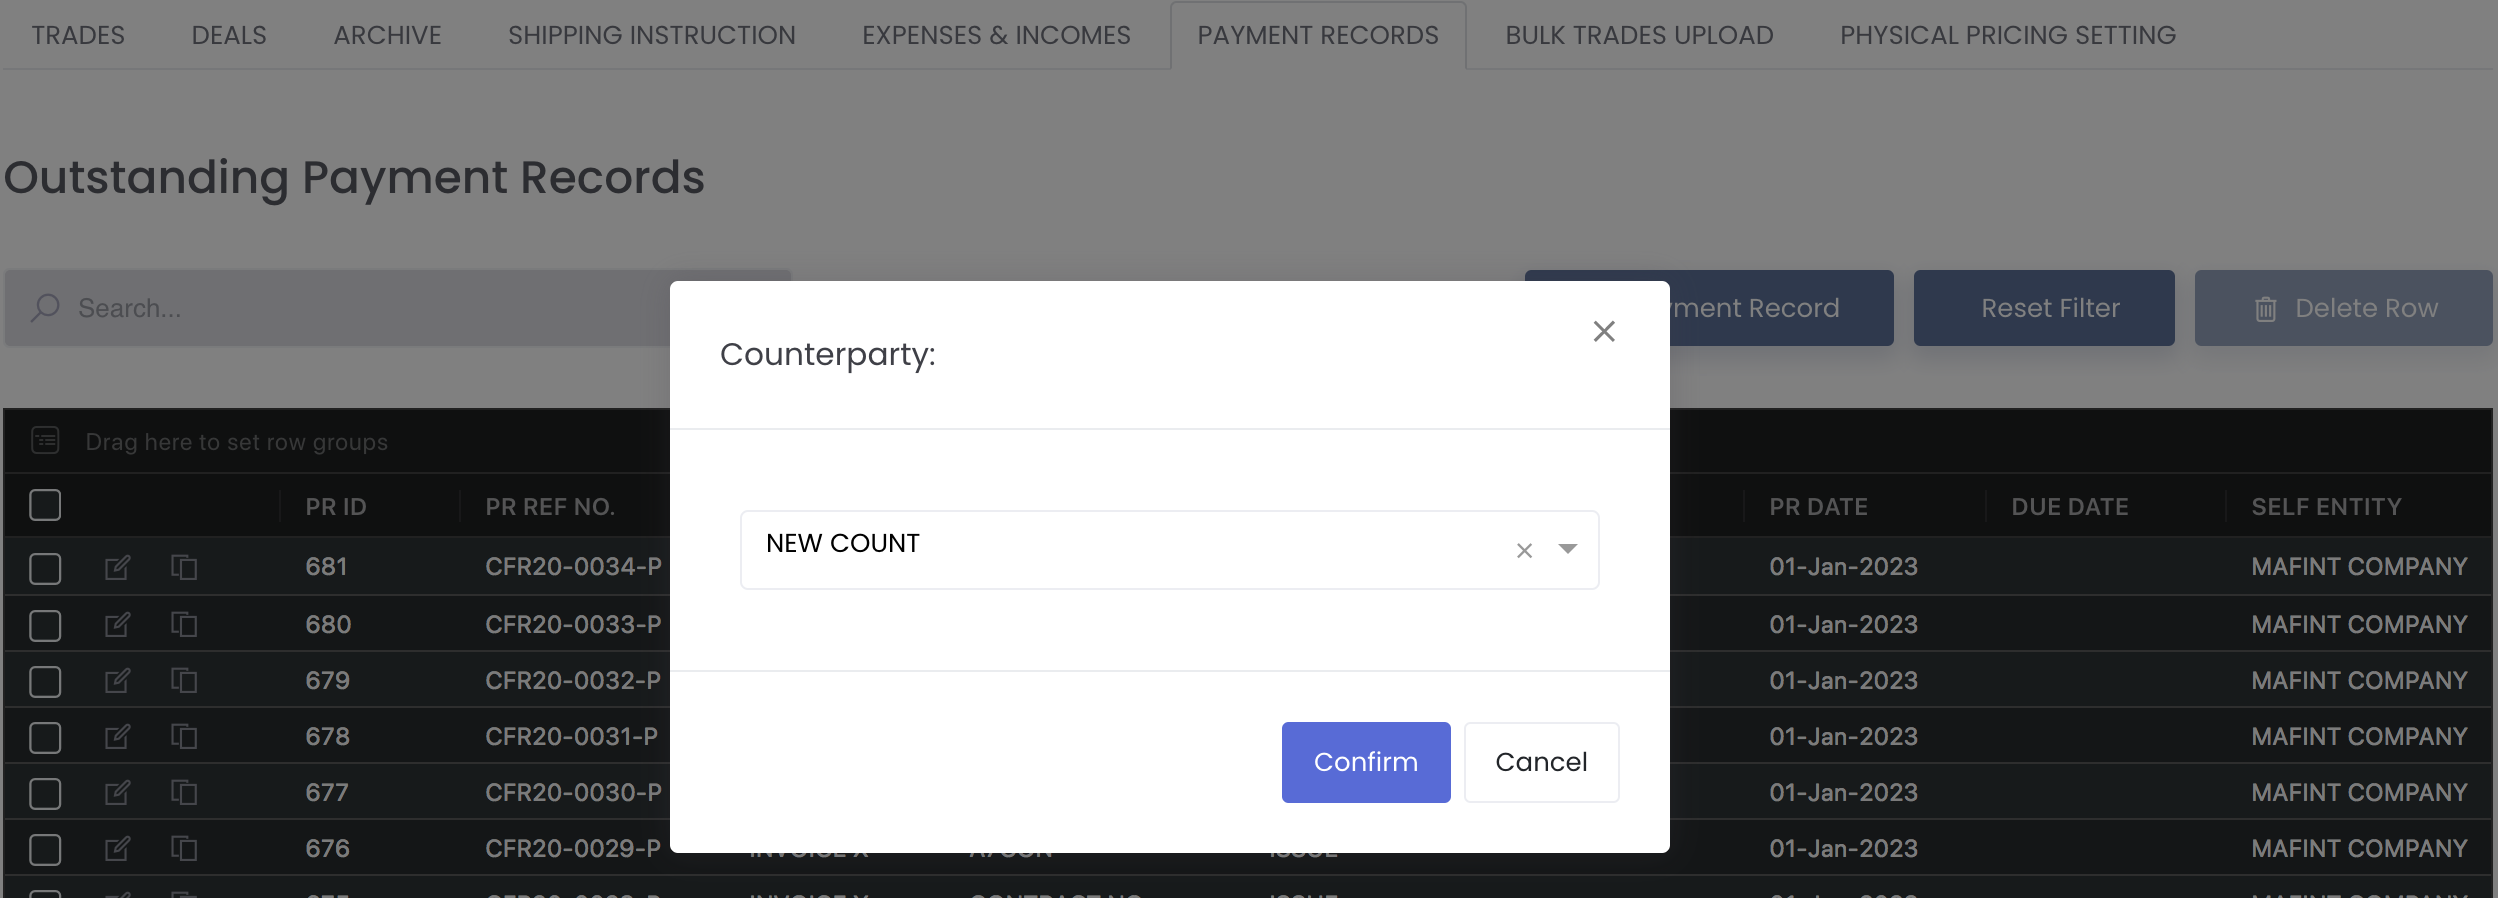
2. You will be prompted to input new or select existing Counterparty.
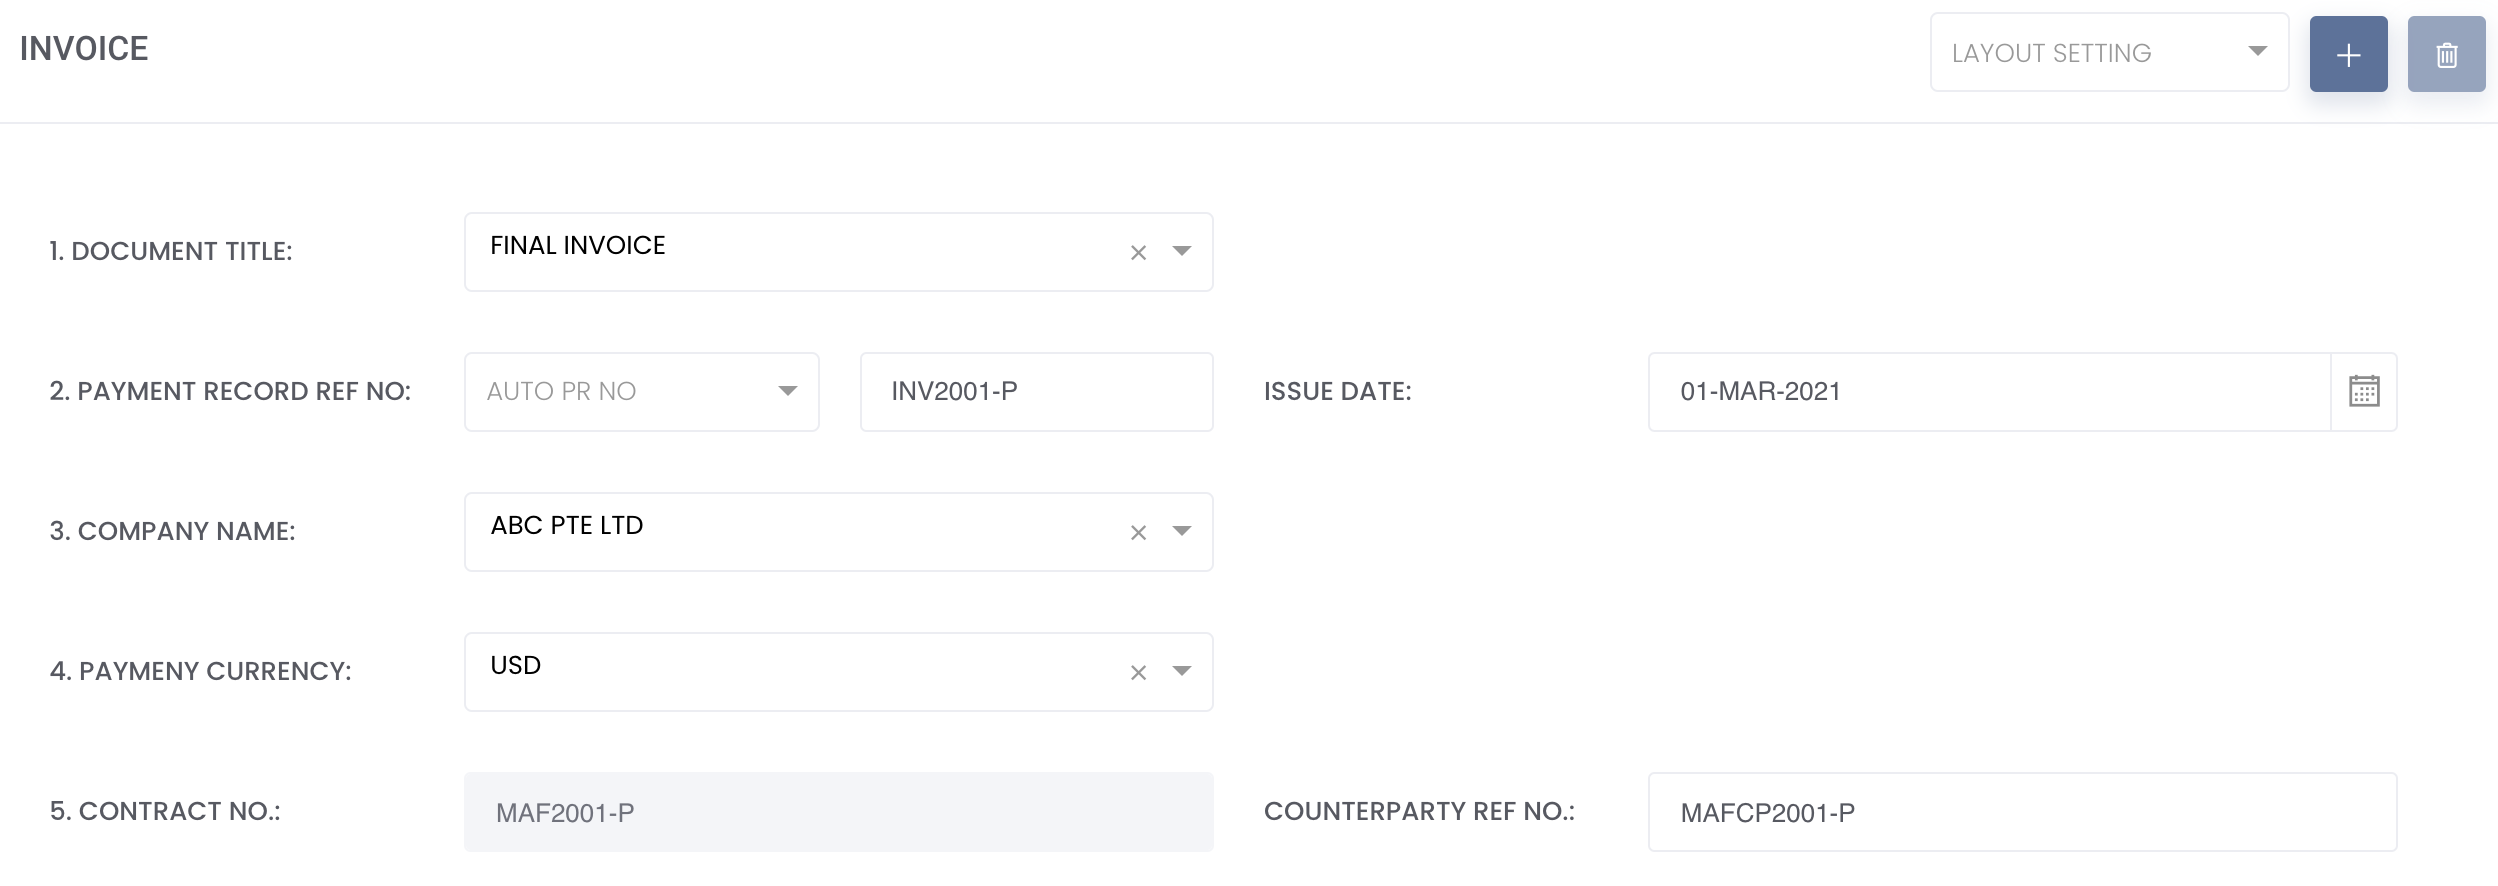
Once done, you will be directed to the invoice page and the Counterparty and Beneficiary will be auto-filled according to your selection accordingly.

These fields are compulsory to be filled before you can save the invoice.
1. DOCUMENT TITLE
2. PAYMENT RECORD REF NO., ISSUE DATE'
3. COMPANY NAME
4. PAYMENT CURRENCY
Once you have completed your invoice, you can save the invoice template by clicking on the blue '+' sign at the top right corner and save the template layout (only values in LABEL boxes will be saved and not VALUE boxes). The next time you create a new invoice, you will be able to use the same template, reducing the need to re-input similar data again. You may create multiple template layouts to suit your needs.
Please note that point 2 to 5 will not be printed in the pdf and is for your reference only. Only items from point 6 onwards will be printed in the invoice pdf file.
BASIC DETAILS
1. DOCUMENT TITLE: Title of the invoice, eg commercial invoice, final invoice. This will be printed as the invoice title in the pdf.
2. PAYMENT RECORD REF NO. & ISSUE DATE: Invoice number and invoice date. Inputting these 2 fields will automatically fill in the '9. REFERENCE NO.' section. To learn how to create an auto-running invoice number, click here. Select the index name under 'AUTO PR NO' and click 'Generate PR No.' to view the auto-generated invoice number. To edit the auto-generated invoice number, you can either save the invoice first or delete the index name you have selected. The auto-generated invoice number's field will become editable.
3. COMPANY NAME: Your company's name will be automatically filled in here based on the trade you have selected. Otherwise, you may select the company name from the drop-down list.
4. PAYMENT CURRENCY: Currency of your invoice amount. Once you input the Payment Currency, the Currency in blue box will be auto filled. You may change the currency as necessary. If you edit the Currency, the blue box's Currency will only be updated if it is empty.
5. CONTRACT NO. & COUNTERPARTY REF NO.: Contract number and counterparty reference number of the trade will be automatically filled in here based on the trade you have selected. Otherwise, you may change these fields as necessary. Note: If you want these fields to be printed in the invoice pdf, please refer to point 4: 8. LOGISTICS section below. Once you fill in Contract No., the Contract No. in point 8 will be auto filled as well. If you edit the Contract No., the point 8's Contract No. will only be updated if it is empty.
Select and input items from point 6 onwards if you want them to be printed in the invoice pdf.
Click on the blue '+' sign and select from the dropdown list to add the details that you want to print in your pdf file as necessary. The LABEL box will be autofilled and you may leave it empty or edit this as necessary. Some inputs in the VALUE box will be auto-filled if the details are available from your previous inputs in the physical trade and trade execution page. Otherwise, you are free to add and edit the details as necessary. You may generate a PDF to test and adjust how certain data can be displayed in the invoice PDF.
Click on the red 'bin' button to delete the row and if multiple rows are available, you can click on the 'up and down' arrows to arrange and move the rows according to your preference.
INVOICE DETAILS
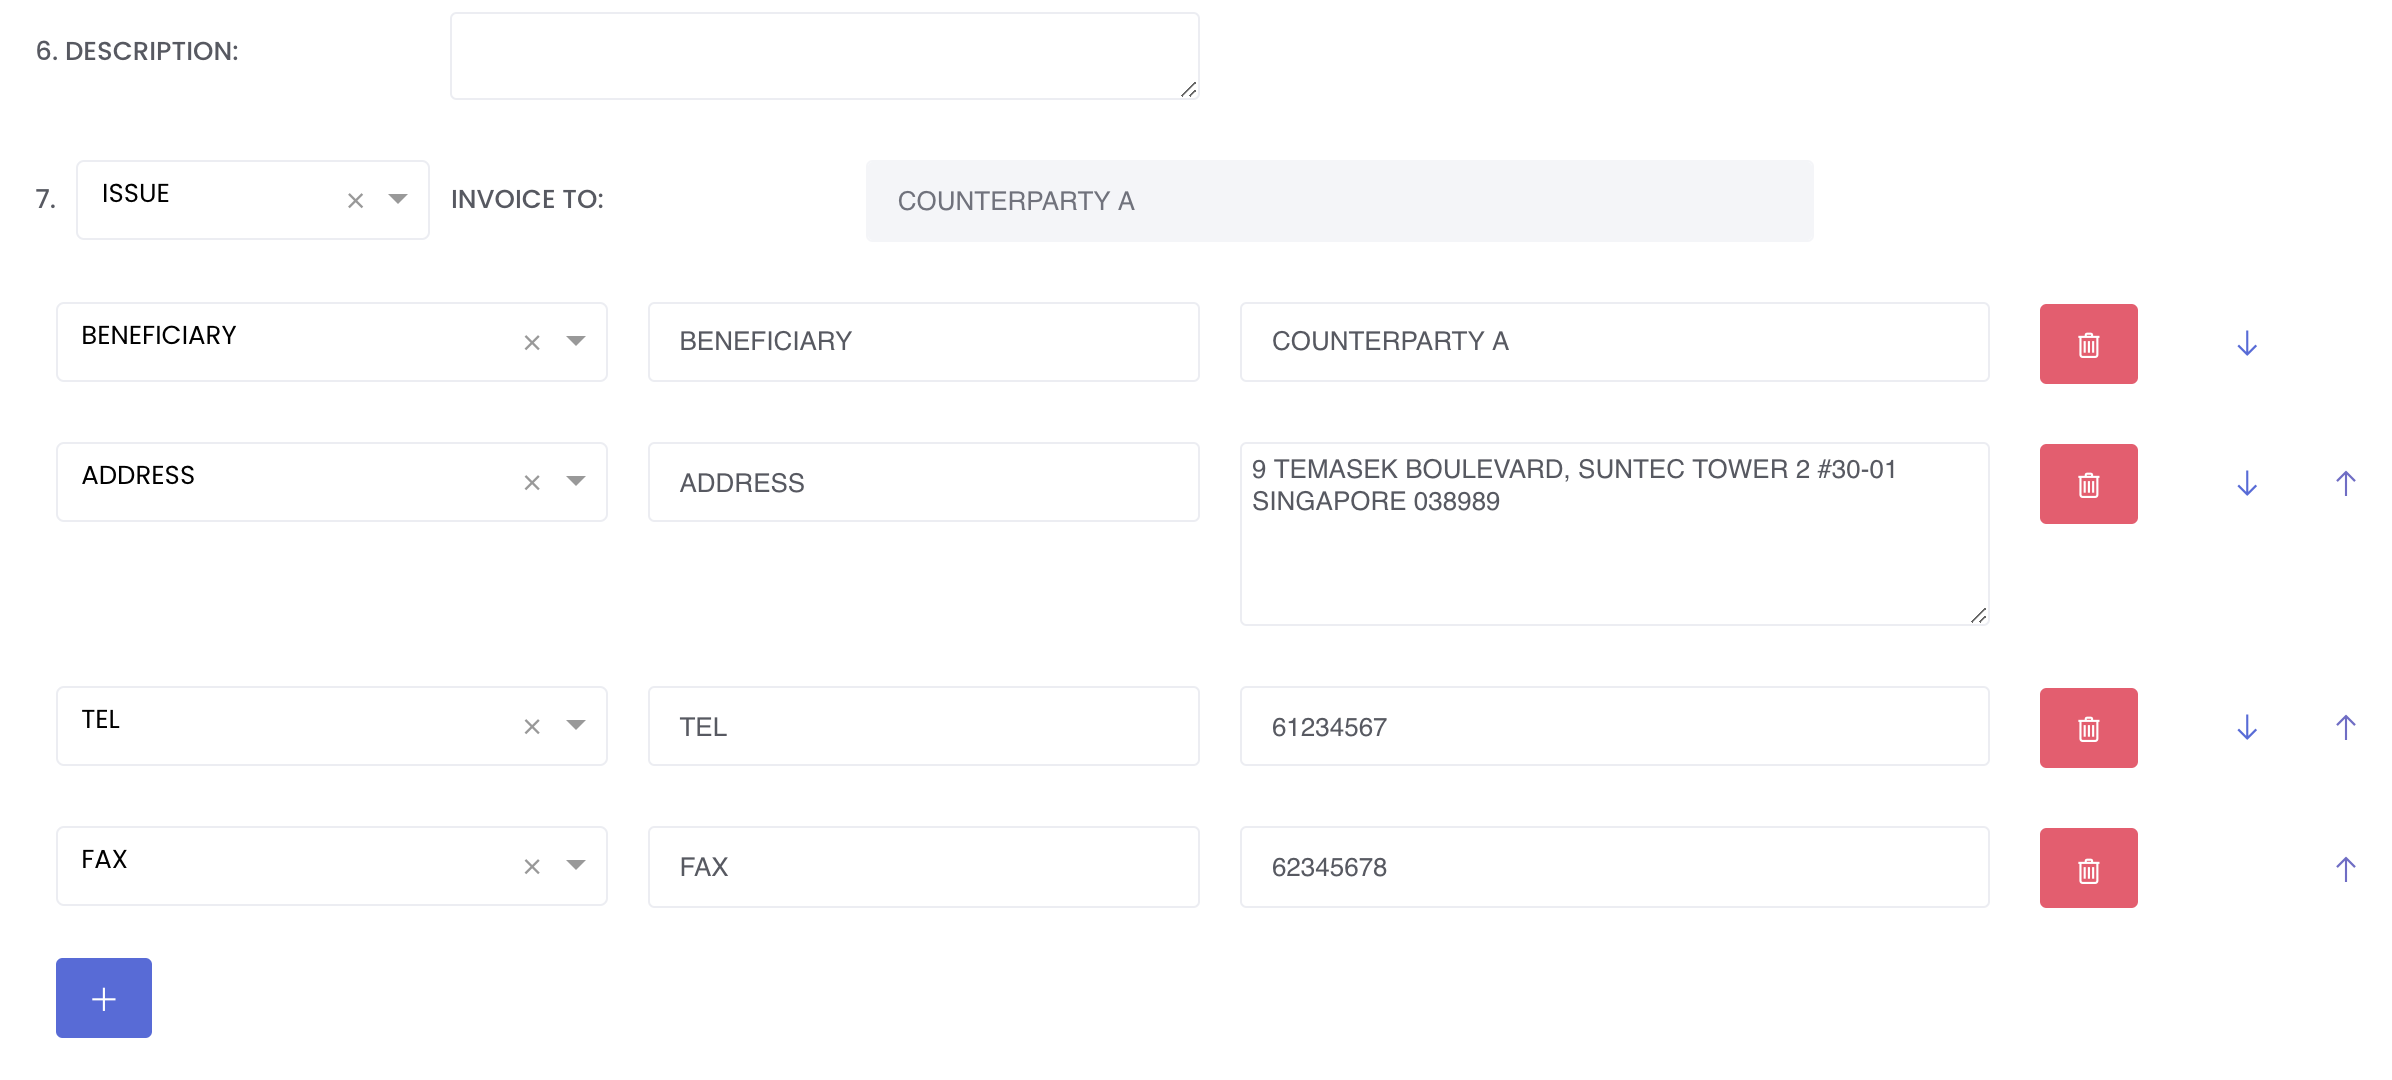
6. DESCRIPTION: Any invoice related description, to be printed directly above LOGISTICS section in the invoice pdf.
7. ISSUE/RECEIVE INVOICE: Select 'ISSUE' if you want to issue an invoice to your counterparty, and 'RECEIVE' if you will receive an invoice from your counterparty. This cannot be changed once the invoice is saved. In Outstanding Payment Record table, If ISSUE invoice, means PR Action will be RECEIVABLE and Balance Amount will be positive. If RECEIVE invoice, means PR Action will be PAYABLE and Balance Amount will be negative.
7. COUNTERPARTY: This will be autofilled once you select the Counterparty from the dropdown list when you create an invoice, and will auto fill Beneficiary as well. You may change it as necessary.
BENEFICIARY: This refers to the counterparty's name. If you select this, the VALUE box will be auto-filled with the Counterparty's name. You may change this as necessary and it will be printed in the invoice pdf accordingly.
ADDRESS: This refers to the counterparty's address. If you select this, the system will check the counterparty's address from your company data table first and auto-fill the address. Otherwise, the address will be returned empty and you may input accordingly. If you create any subsequent invoice with the same counterparty, the system will obtain the counterparty's address from your first invoice and auto-fill it for you. Any updates to the address will be saved into database once you save the invoice, and will be displayed for any subsequent invoice.
TEL: This refers to the counterparty's telephone number. If you select this, you may input your counterparty's office number.
FAX: This refers to the counterparty's fax number. If you select this, you may input your counterparty's fax number.
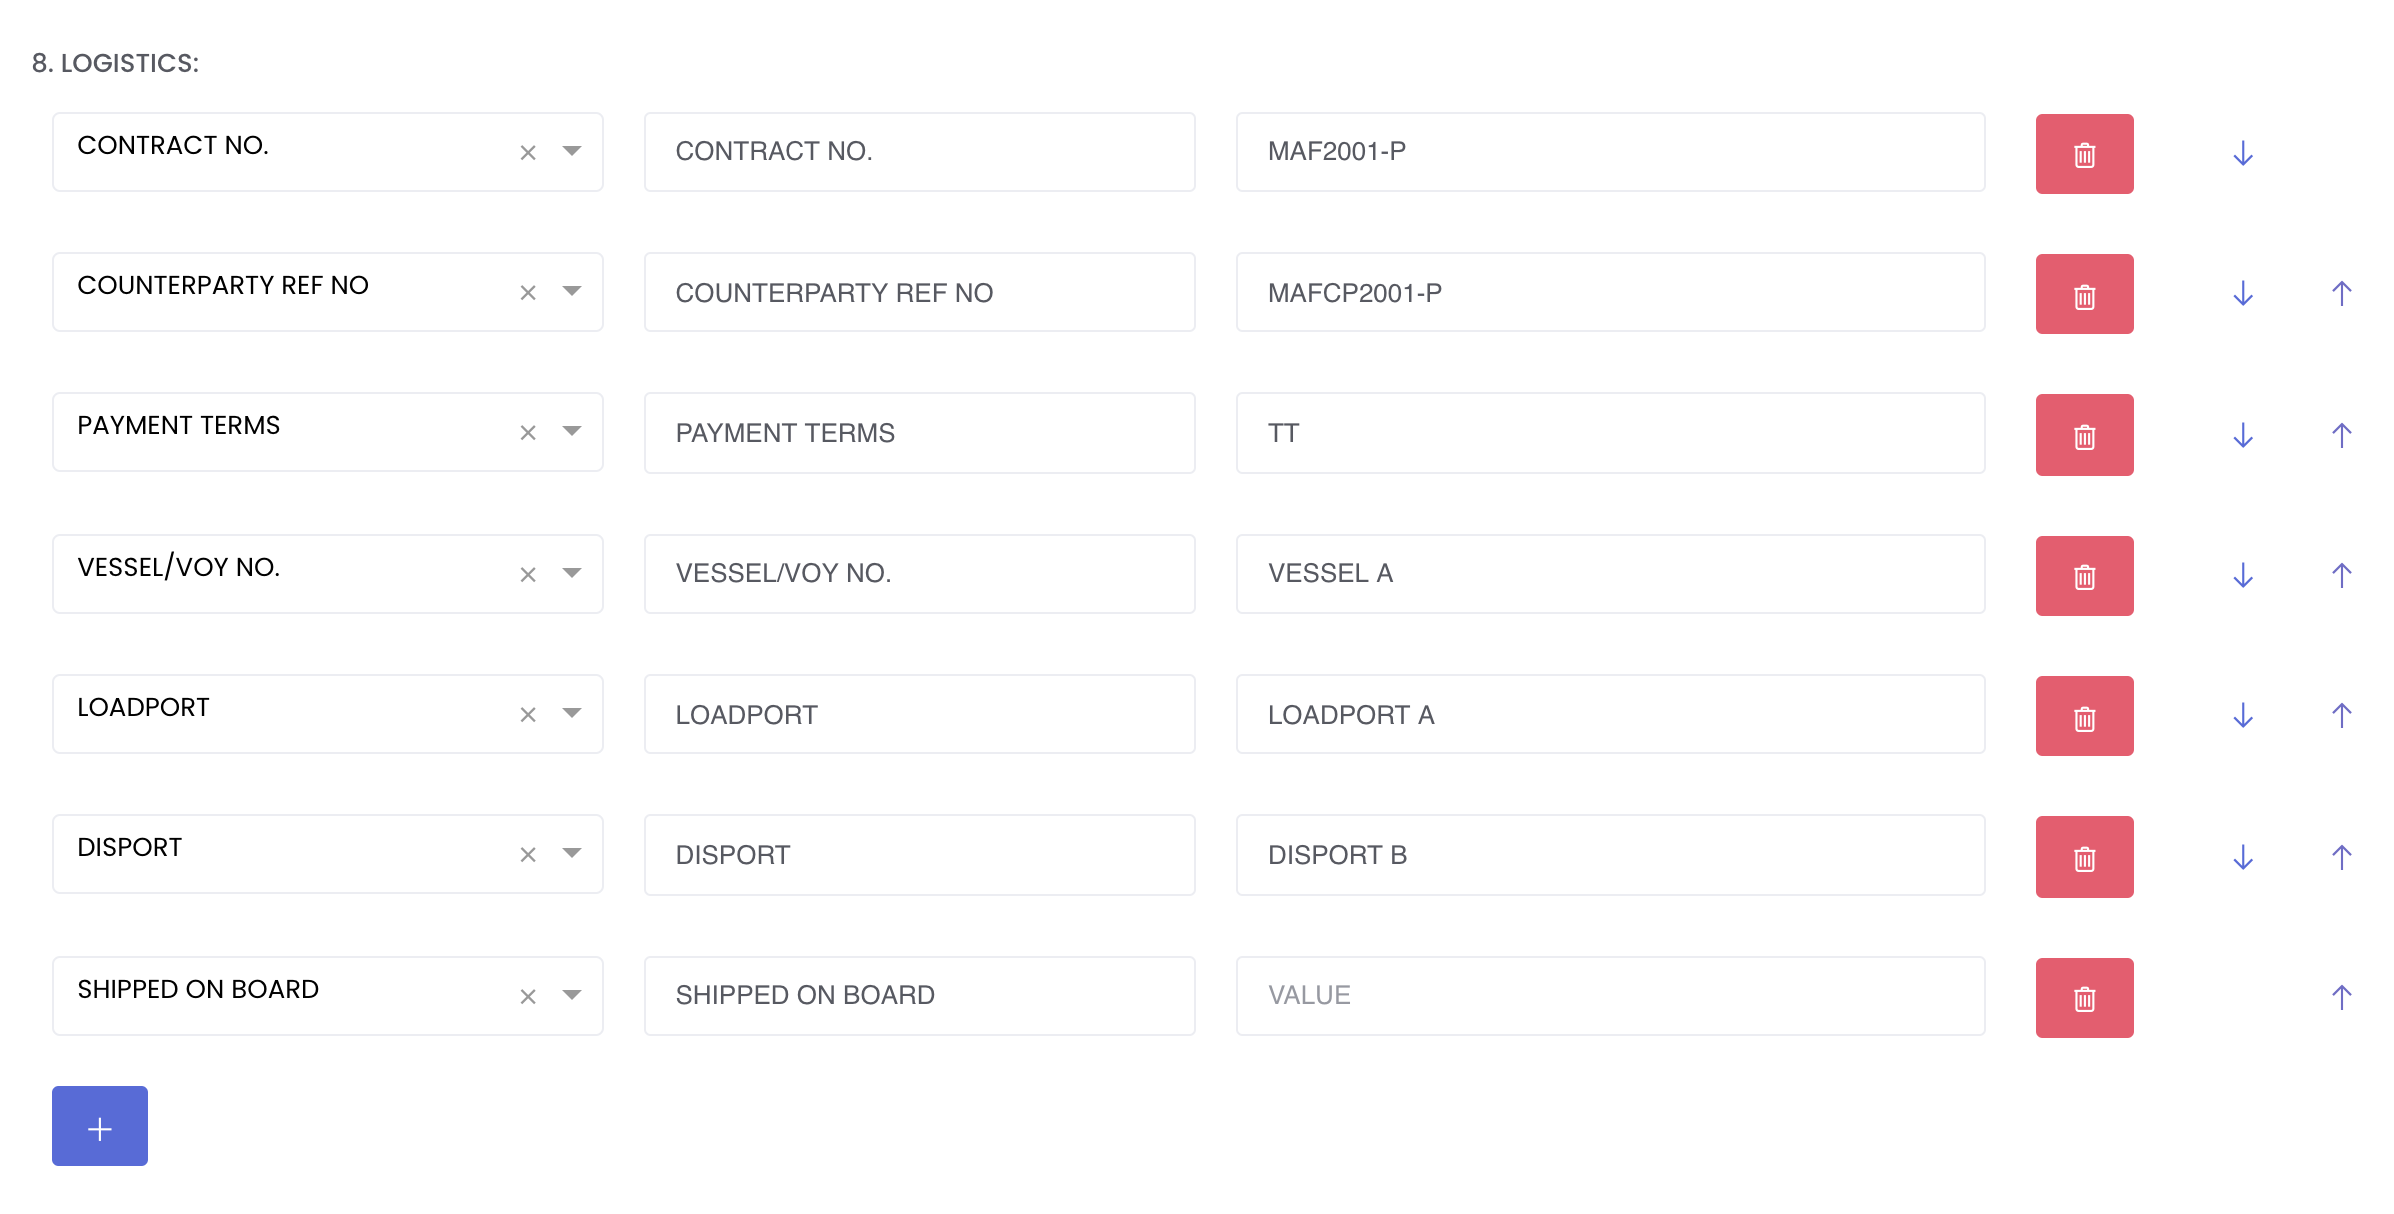
8. LOGISTICS:
In this section, you can fill in the specific logistic details of the invoice. Click on the blue '+' sign and select from the dropdown list to add information such as:
CONTRACT NO.: Contract number of the trade. If you select this, it will be automatically filled according to inputs in point 5's Contract No. Otherwise, you may input this field as necessary.
COUNTERPARTY REF. NO.: Counterparty reference number of the trade. If you select this, it will be automatically filled if you have input this in the create physical trade page. Otherwise, you may input this field as necessary.
PAYMENT TERMS: Payment terms of the trade eg. "TT". If you select this, it will be automatically filled if you have input this in the create physical trade page. Otherwise, you may input this field as necessary.
VESSEL/VOY NO.: Vessel name/voyage number mentioned in Bill of Lading of each shipment, eg. "Evergreen Teresa – V.284". If you select this, it will be automatically filled if you have input this in the trade execution page. Otherwise, you may input this field as necessary.
LOADPORT: Port of loading. If you select this, it will be automatically filled if you have input this in the trade execution page. Otherwise, you may input this field as necessary.
DISPORT: Port of discharge. If you select this, it will be automatically filled if you have input this in the trade execution page. Otherwise, you may input this field as necessary.
SHIPPED ON BOARD: A notation displayed on the Bill of Lading by the issuer of the Bill of Lading to confirm that the cargo has been loaded onboard the ship.
LC NO.: Letter of Credit. If you select this, it will be automatically filled if you have input this in the trade execution page. Otherwise, you may input this field as necessary.
DELIVERY TERM: INCO term and port/country. If you select this, it will be automatically filled if you have input this in the create physical trade page. Otherwise, you may input this field as necessary.
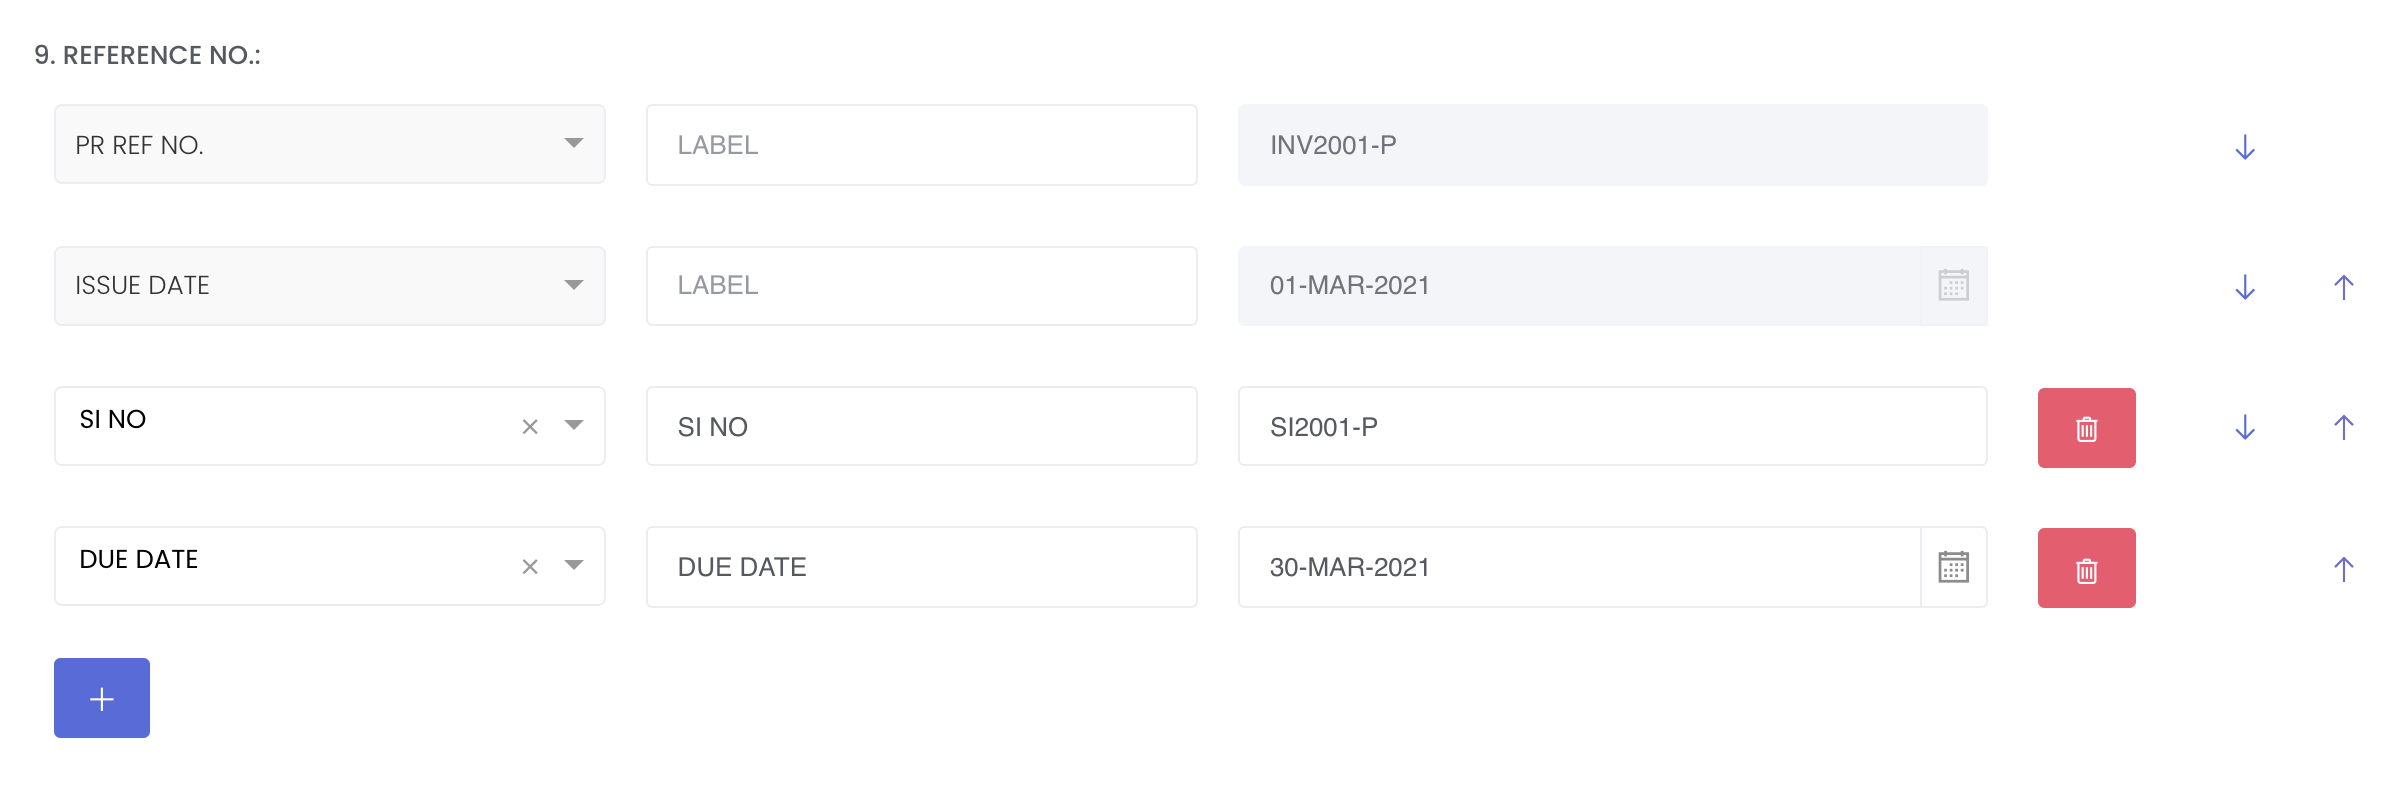
9. REFERENCE NO.:
'PR Ref. No.' and 'Issue Date' will be automatically filled once the 'Payment Record Ref No.' and 'Issue Date' are filled in the above section. Fill in the LABEL box if you want a label name to be placed before your invoice number and invoice date. This will be printed at the top right corner of the invoice.
SI NO.: Shipping instruction number. You may fill this if necessary.
DUE DATE: Deadline for the invoice. You may fill this if necessary.
You can click on the 'up and down' arrows to arrange and move the rows according to your preference.
10. GOODS OR SERVICES DETAILS:
The Goods and Services Details section will auto-reflect the inputs extrapolated from the selected physical trade into the VALUE box. If the VALUE box is empty, you are free to add or edit the inputs as necessary. Please note that you can only select the key item from the dropdown list ONCE, which means you can only select eg COMMODITY item in the dropdown list once. If you select it more than once, the system will only capture and print in the pdf the first COMMODITY item you have input in the section.
GENERAL: General details of the goods. You may key in any details here and change the LABEL box as necessary.
COMMODITY: Product. You may input this field as necessary.
SPEC/BRAND: Specification or brand of the product. You may input this field as necessary.
GROSS WEIGHT: Gross weight of the product. You may input this as necessary.
NET WEIGHT: Net weight or actual quantity of the product. You may input this field as necessary and it will automatically fill the Net Weight below.
PACKING QTY: Packing quantity of the product. You may input this field as necessary.
PACKING: Packing details of the product.You may input this field as necessary.
PACKER: Packer of the product. You may input this field as necessary.
PRICE TERM: Price term of the product. You may input this as necessary.
ORIGIN: Origin country of the product. You may input this as necessary.
REMARKS: Remarks. You may input this as necessary.
To add more blue GOODS OR SERVICES DETAILS box, you can click on the blue + button at the bottom of the blue box.
You can click on the up and down arrows next to each dropdown list item to switch the positions and they will be printed accordingly in the invoice pdf.
ACTION: Select Add or Credit (other invoice/debit note into this invoice). It is ADD by default
CURRENCY: Select currency of goods/services. It will be auto filled according to the 4. Payment Currency.
UNIT: Select product unit
NET WEIGHT: Net weight of product, it will be auto filled according to the Net Weight input in the key items dropdown list above
UNIT PRICE: Input unit price of product
AMOUNT: Input Net Weight and Unit Price, and Amount will be auto-calculated
EX-RATE: Exchange rate will be 1 by default.
BASE AMOUNT: Amount*Ex Rate = Base Amount
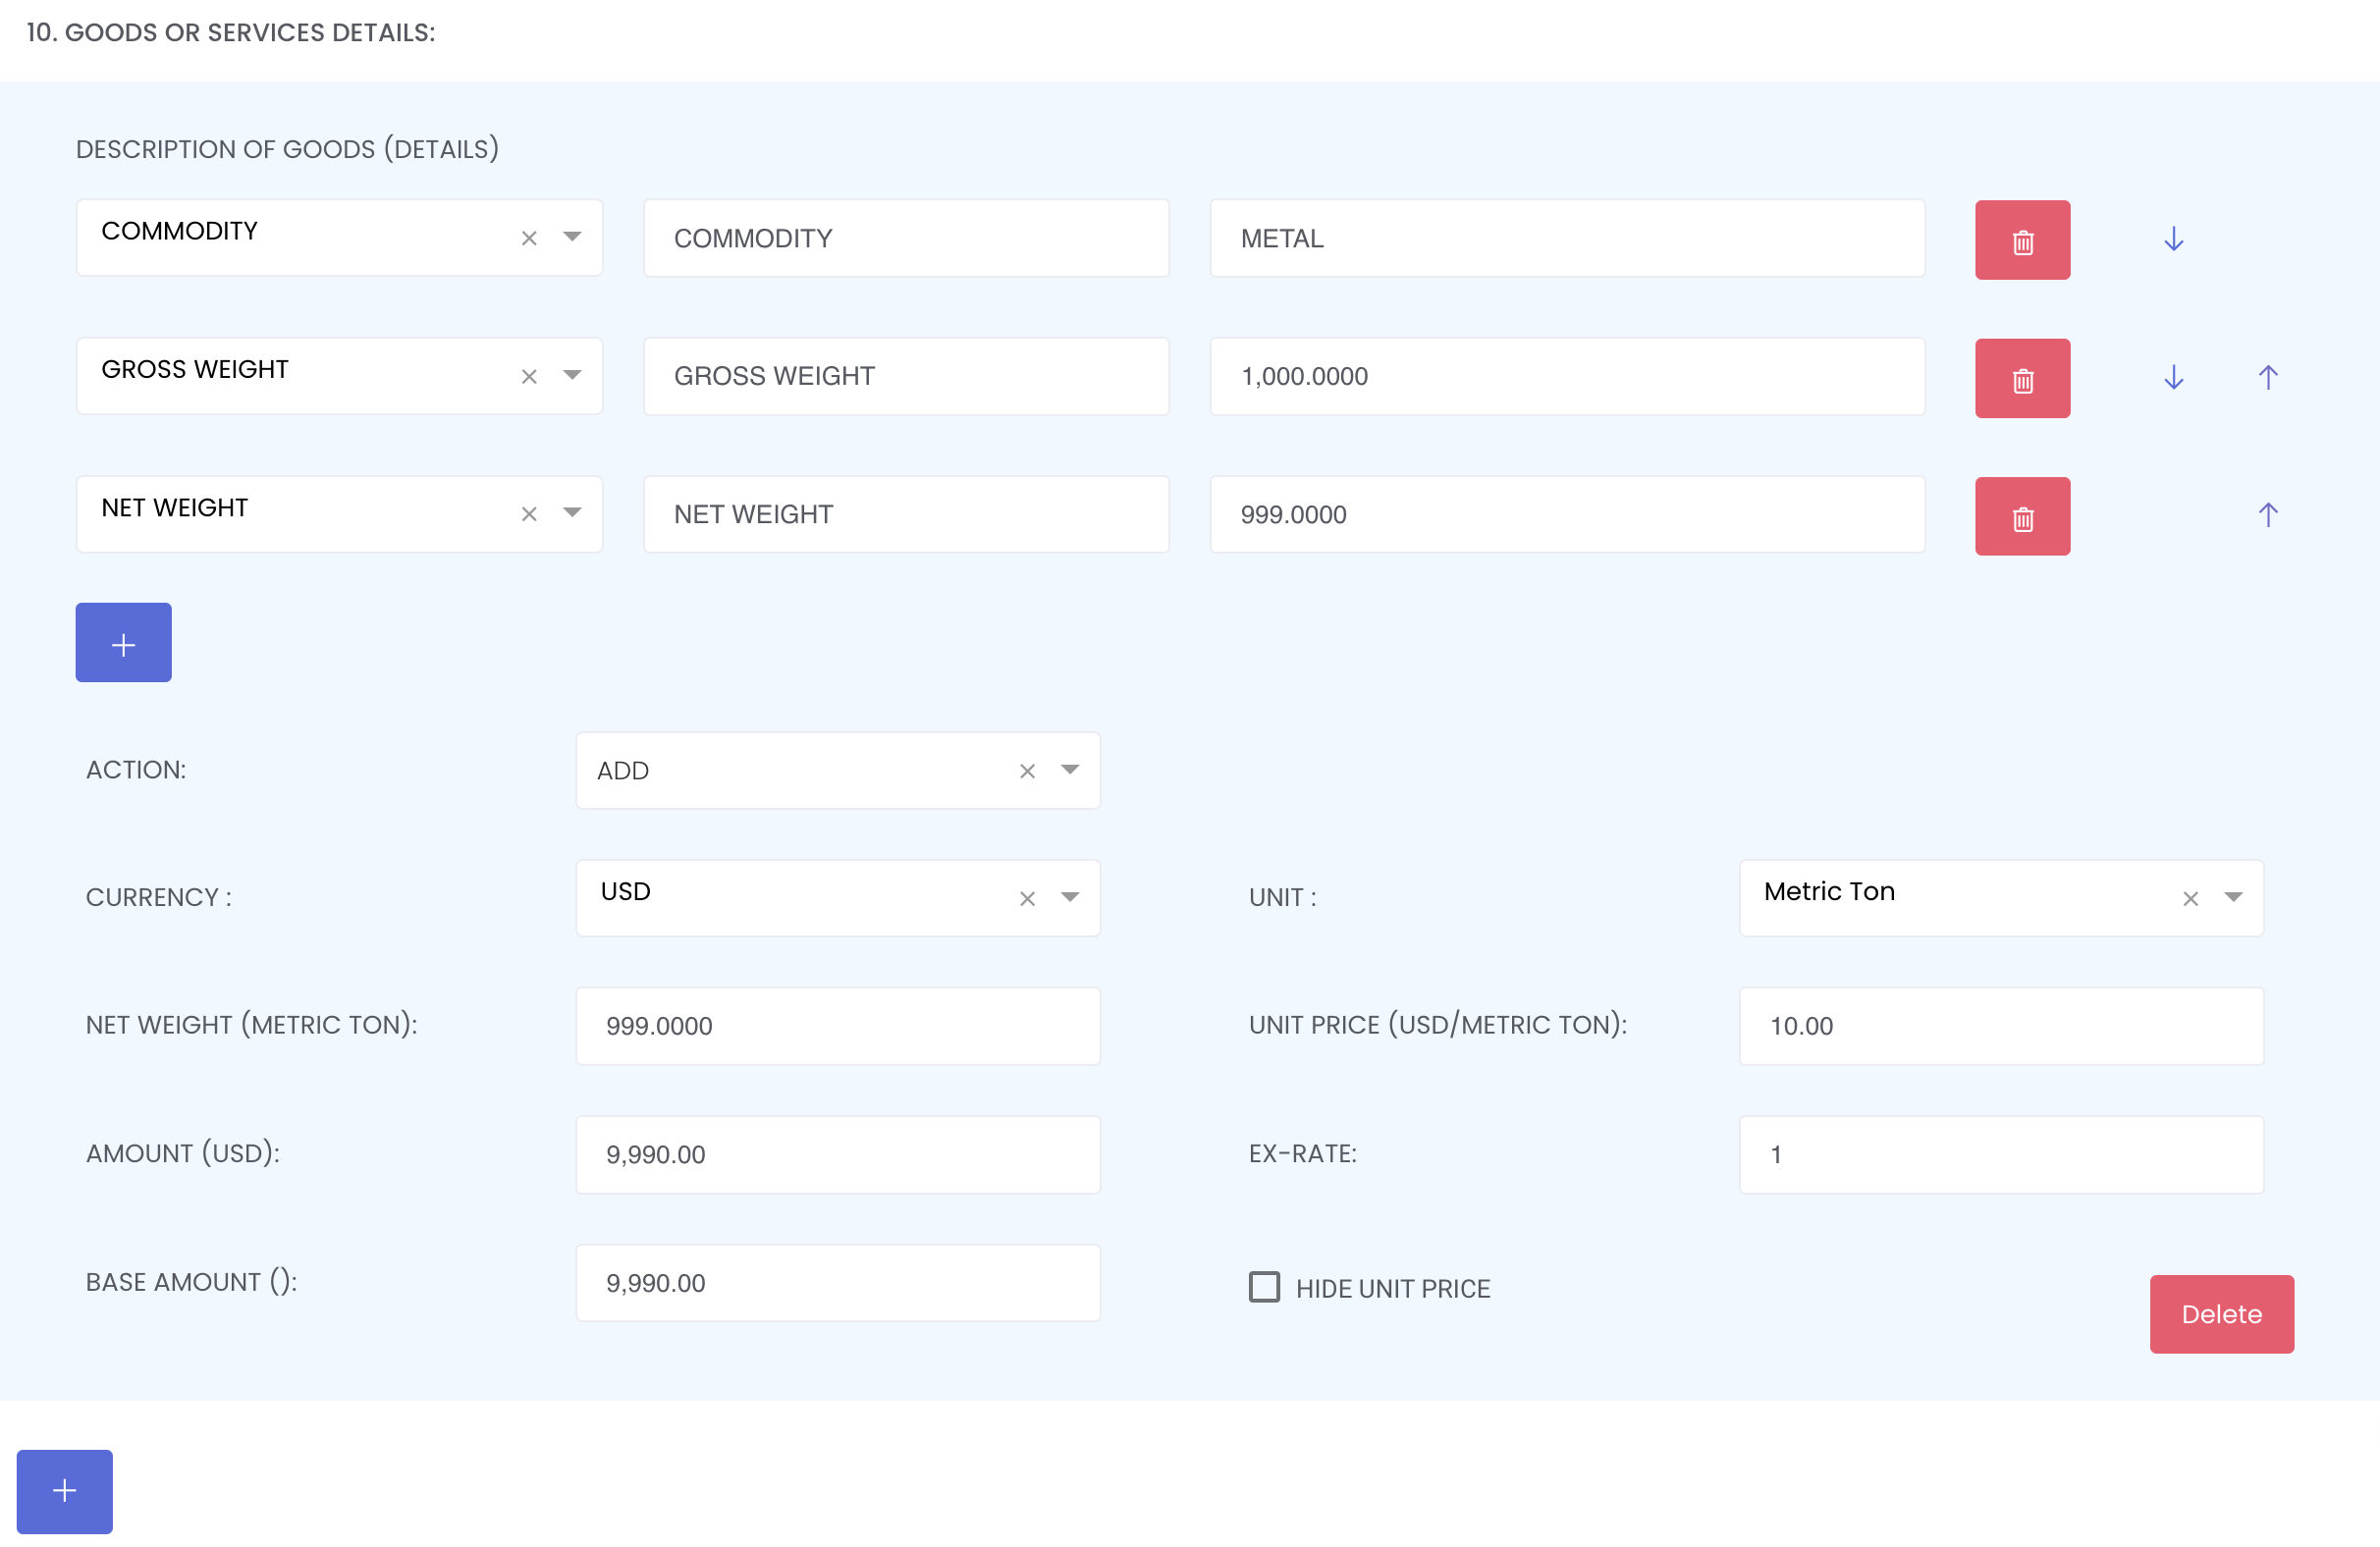
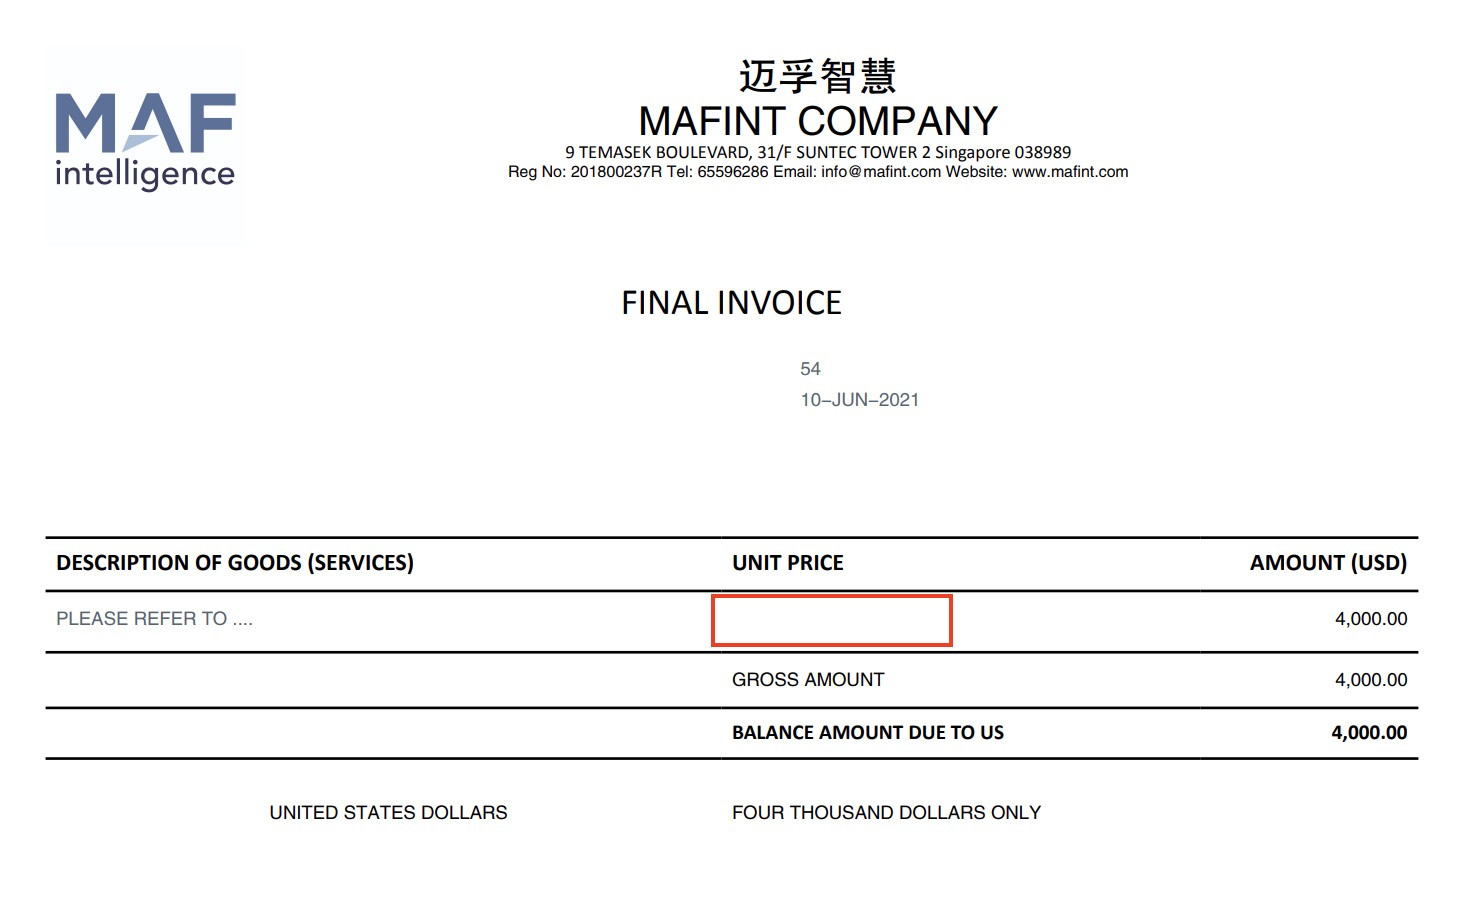
HIDE UNIT PRICE: You can tick the 'HIDE UNIT PRICE' tick box if you do not want the unit price details to appear in the invoice PDF. The tick box will be unticked by default.
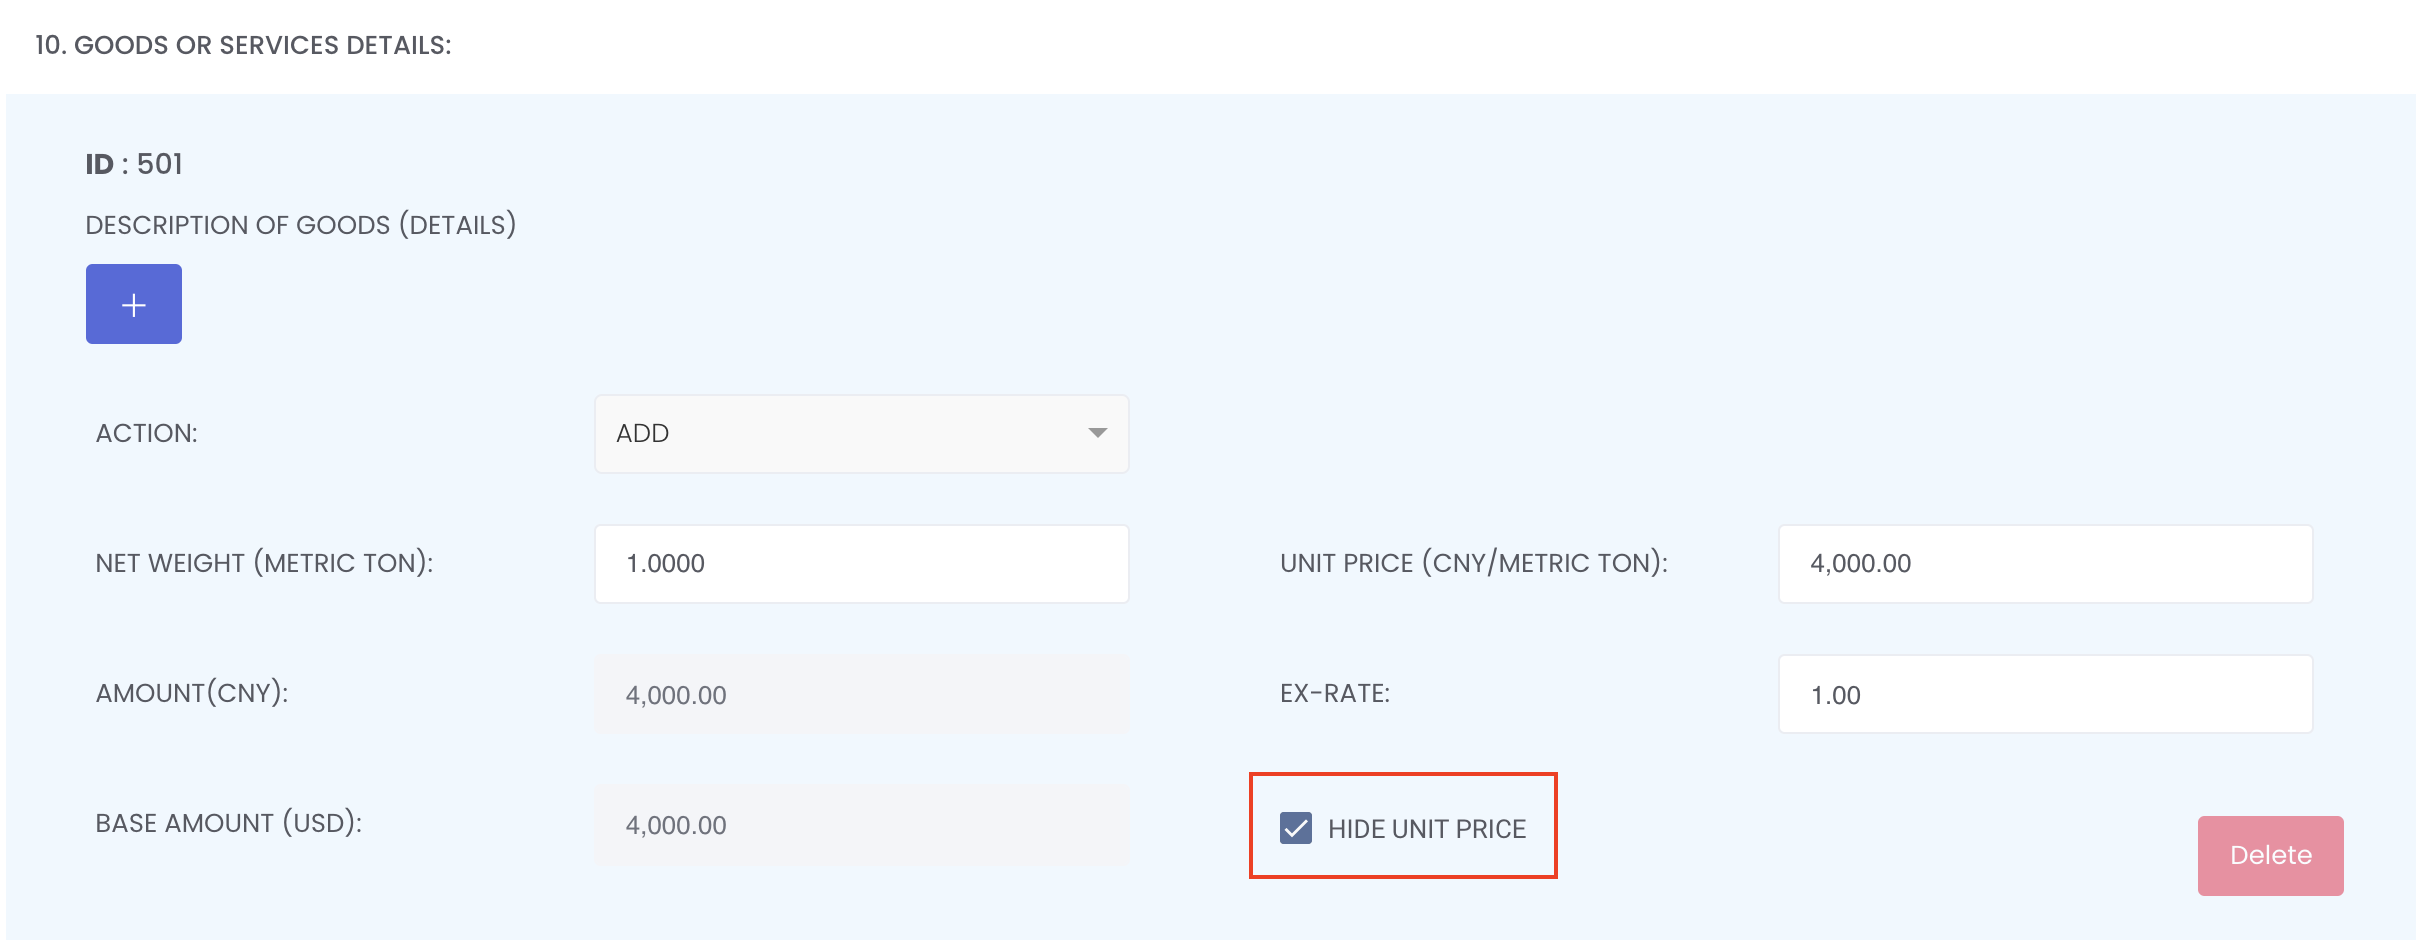
So once you tick the 'HIDE UNIT PRICE' tick box to hide the unit price, the UNIT PRICE section in the invoice PDF will be empty.
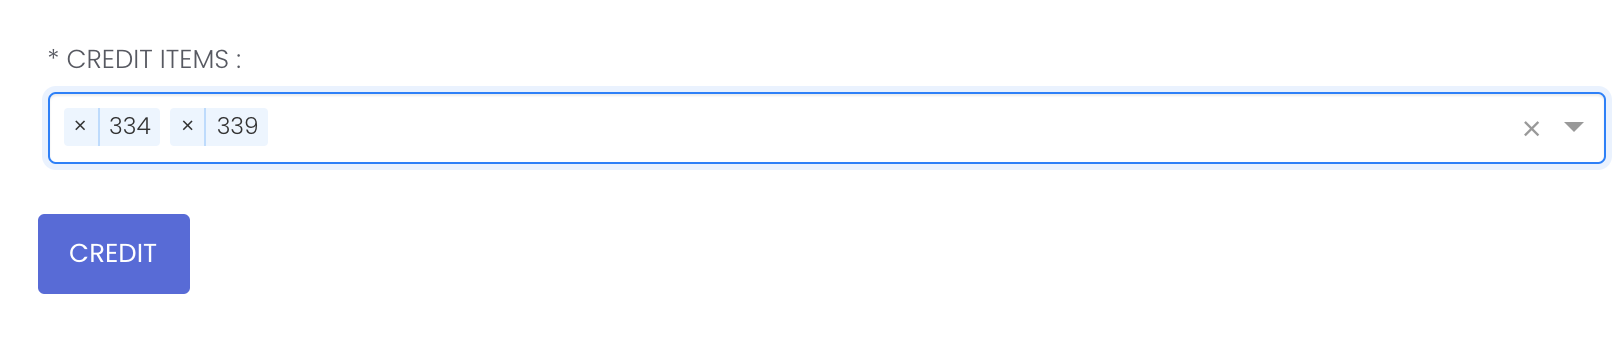
CREDIT
This section allows you to credit payment items into this invoice for the same counterparty and settle/offset it together, reducing the need to produce multiple invoices
Click on the CREDIT button and select the payment item/invoice you want to include into this invoice. Once done, the original invoice amount in the invoice will minus the credited payment item you have selected, and the gross amount in 11. SUMMARY section will be auto-calculated accordingly. The CREDIT item will appear as a blue box (similar to 10. GOODS OR SERVICES DETAILS) and you may select the items and edit the details as necessary.
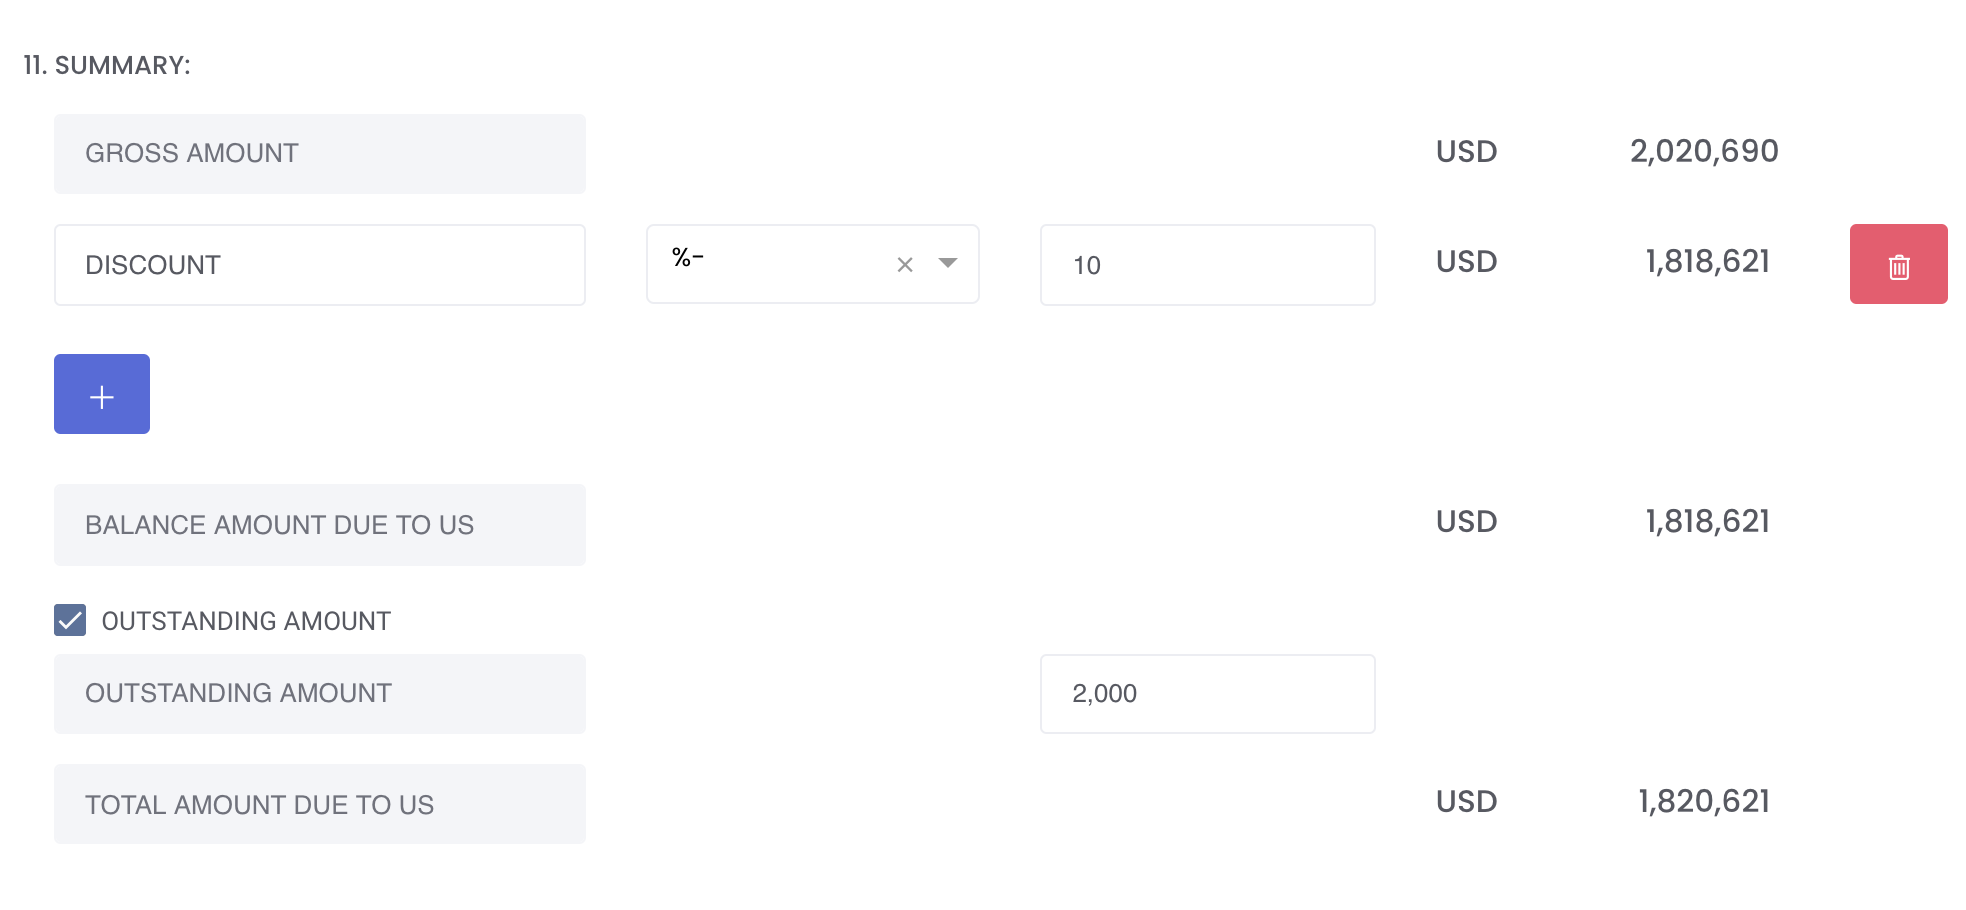
11. SUMMARY:
The summary provides an overview of the gross amount and balance amount due to you/your counterparty. Gross amount from point 10 will be automatically calculated and displayed here.
To add any other adjustment, click on the blue '+' button and fill in the adjustment as necessary. Select the mathematically operator and the amount after adjustment will be auto-calculated and displayed.
+ : Adjustment is added to previous value*
- : Adjustment is subtracted from previous value*
% & +: (1 + Adjustment) as a percentage of previous value*
% & -: (1 - Adjustment) as a percentage of previous value*
If there are any outstanding amount due for this invoice, tick "OUTSTANDING AMOUNT" and fill in the value. This amount will be added to the invoice amount accordingly.
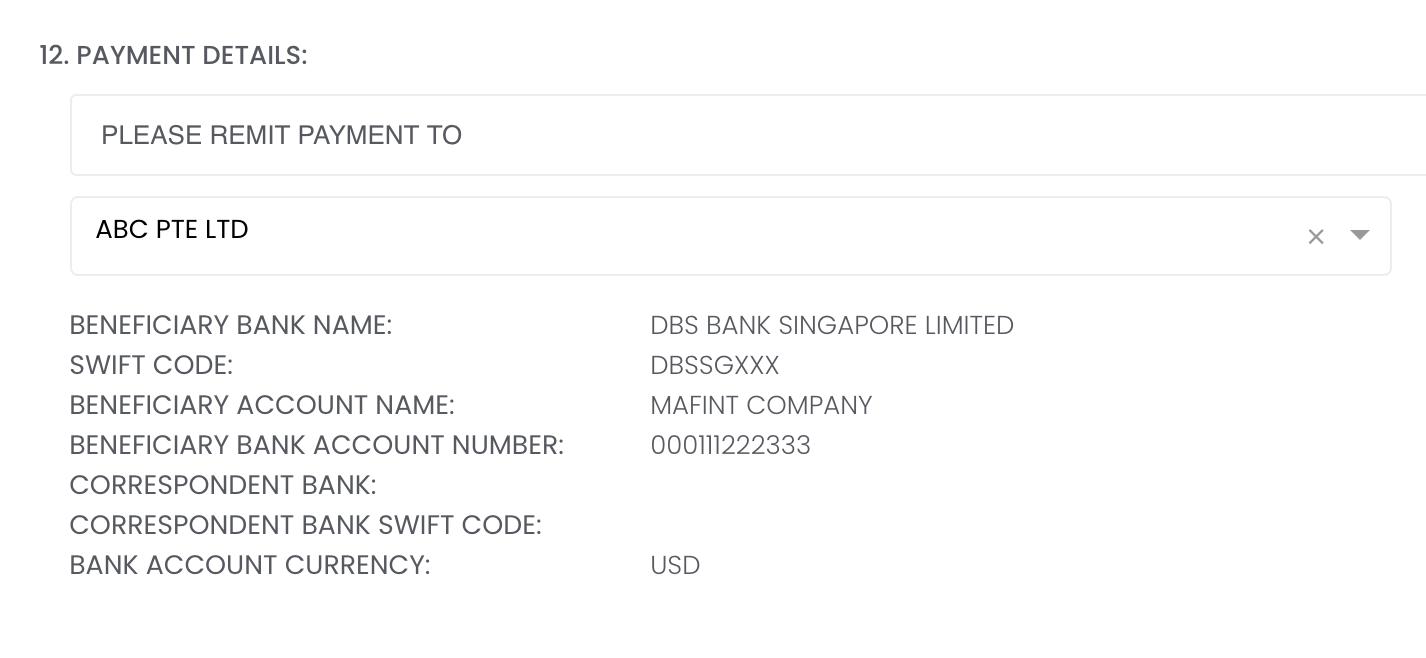
12. PAYMENT DETAILS:
In this section, you may provide the payment/transfer/remittance details to your counterparty. Select the bank account details that you have created in the accounting page and the details will be automatically reflected here.
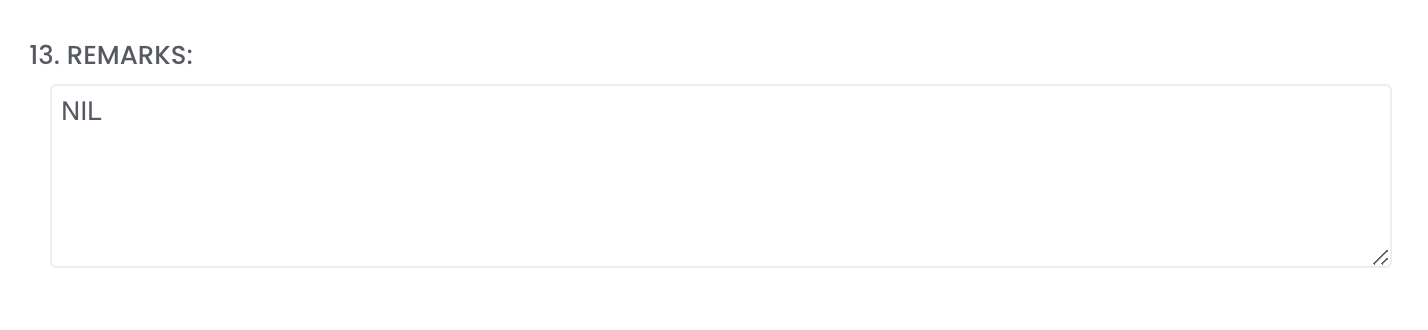
13. REMARKS:
In this section, you may fill in any additional remarks, to be printed in the invoice pdf.
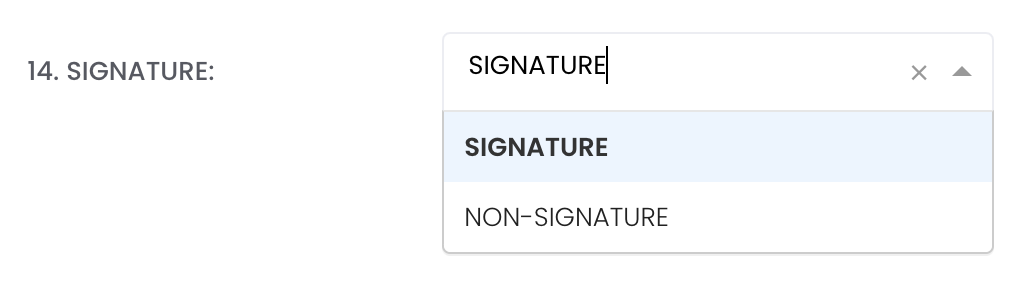
14. SIGNATURE:
In this section, you may select 'SIGNATURE' or 'NON-SIGNATURE' based on whether you want to have a signature field in the invoice pdf file.
By selecting 'SIGNATURE', the pdf file will contain a signature field with your company name.
By selecting 'NON-SIGNATURE', the signature field will not appear in the invoice pdf file.
5. Once the invoice has been completed, click on 'Save' below to save the invoice. Click 'PDF' to generate the invoice in PDF format. Click 'Cancel' if you do not want to save a new invoice or update the details, and be directed back to the 'Payment Records' page.
Note: Once you have completed your invoice, you can save the invoice template by clicking on the blue '+' sign at the top right corner and save the template layout (only values in LABEL boxes will be saved and not VALUE boxes). The next time you create a new invoice, you will be able to use the same template, reducing the need to re-input similar data again. You may create multiple template layouts to suit your needs. All members in the same group will have access to each other's saved template layouts for convenience.

6. You may easily change the invoice details on the 'Payment Records' table, using the same procedures. To edit the payment record, click on the 'Edit' button (represented by a 'pen and paper' icon) located on the left of each row in the 'Payment Records' table.
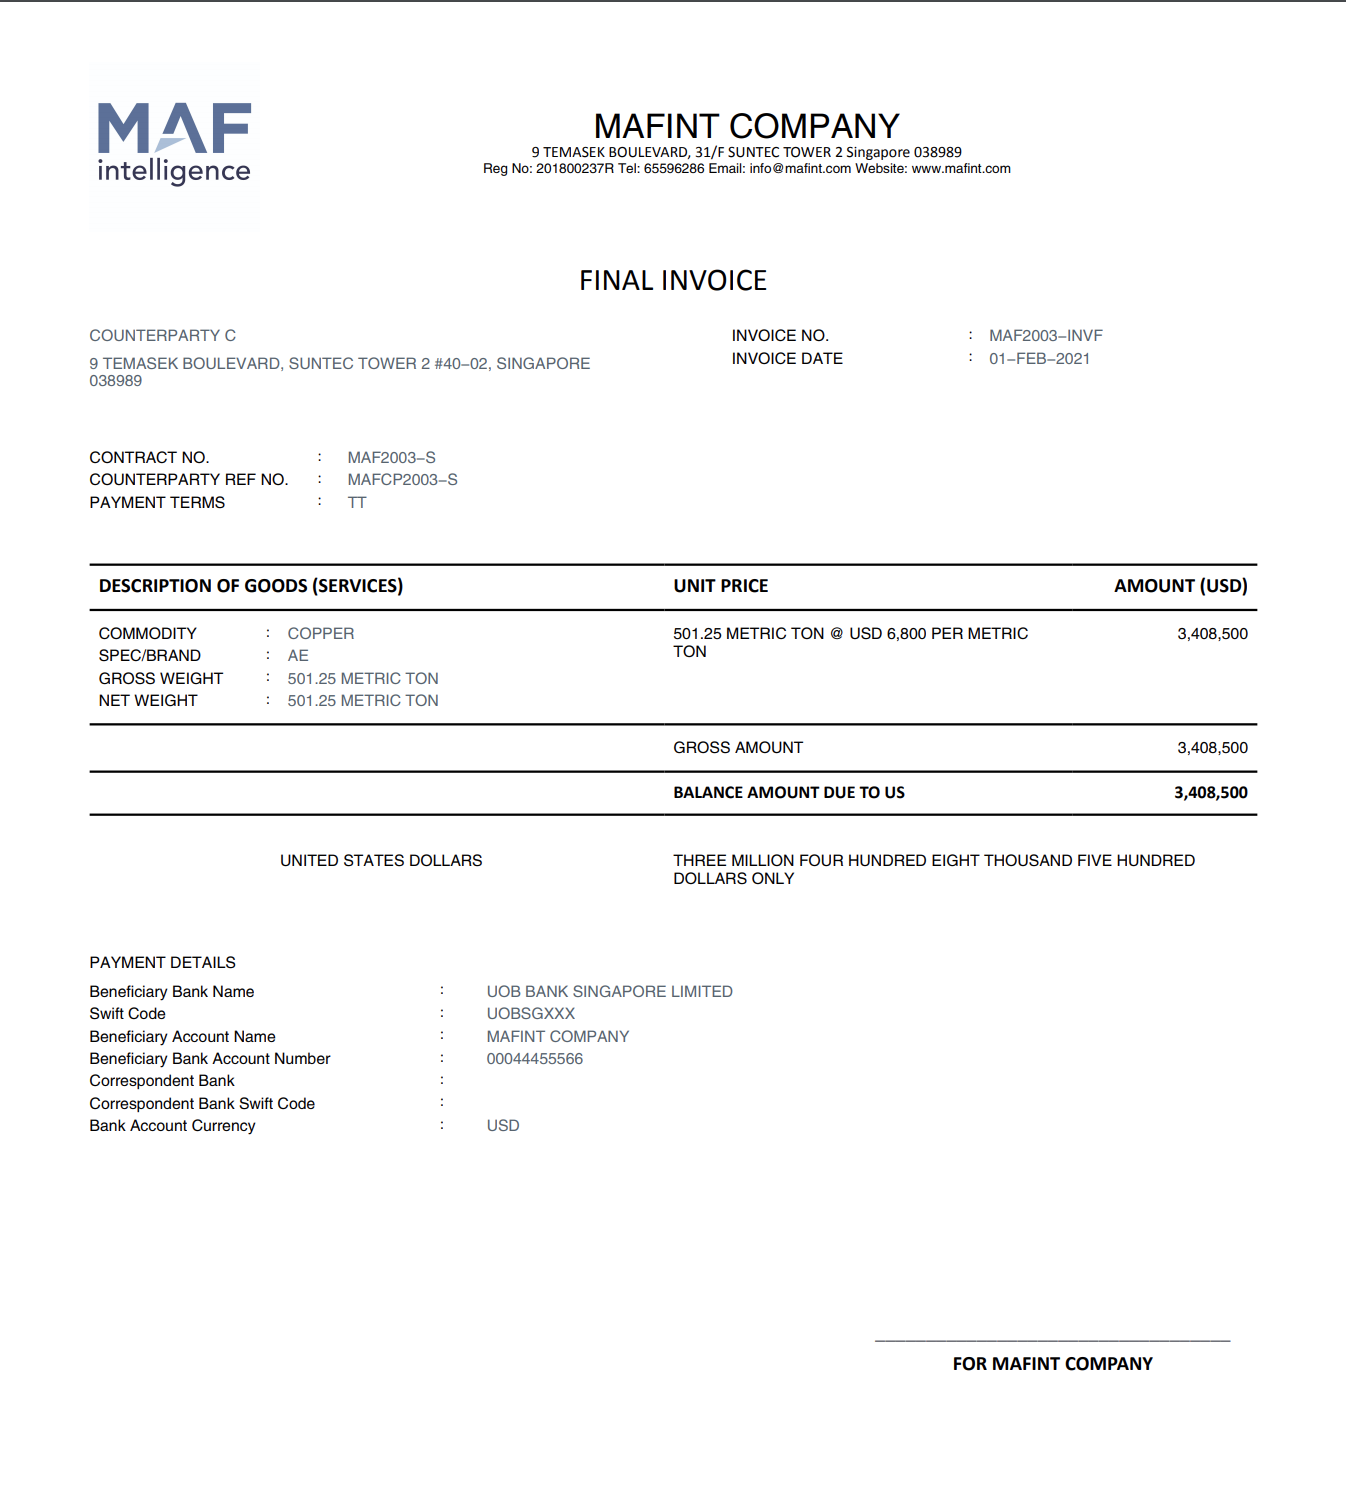
This is a sample of the Invoice generated:
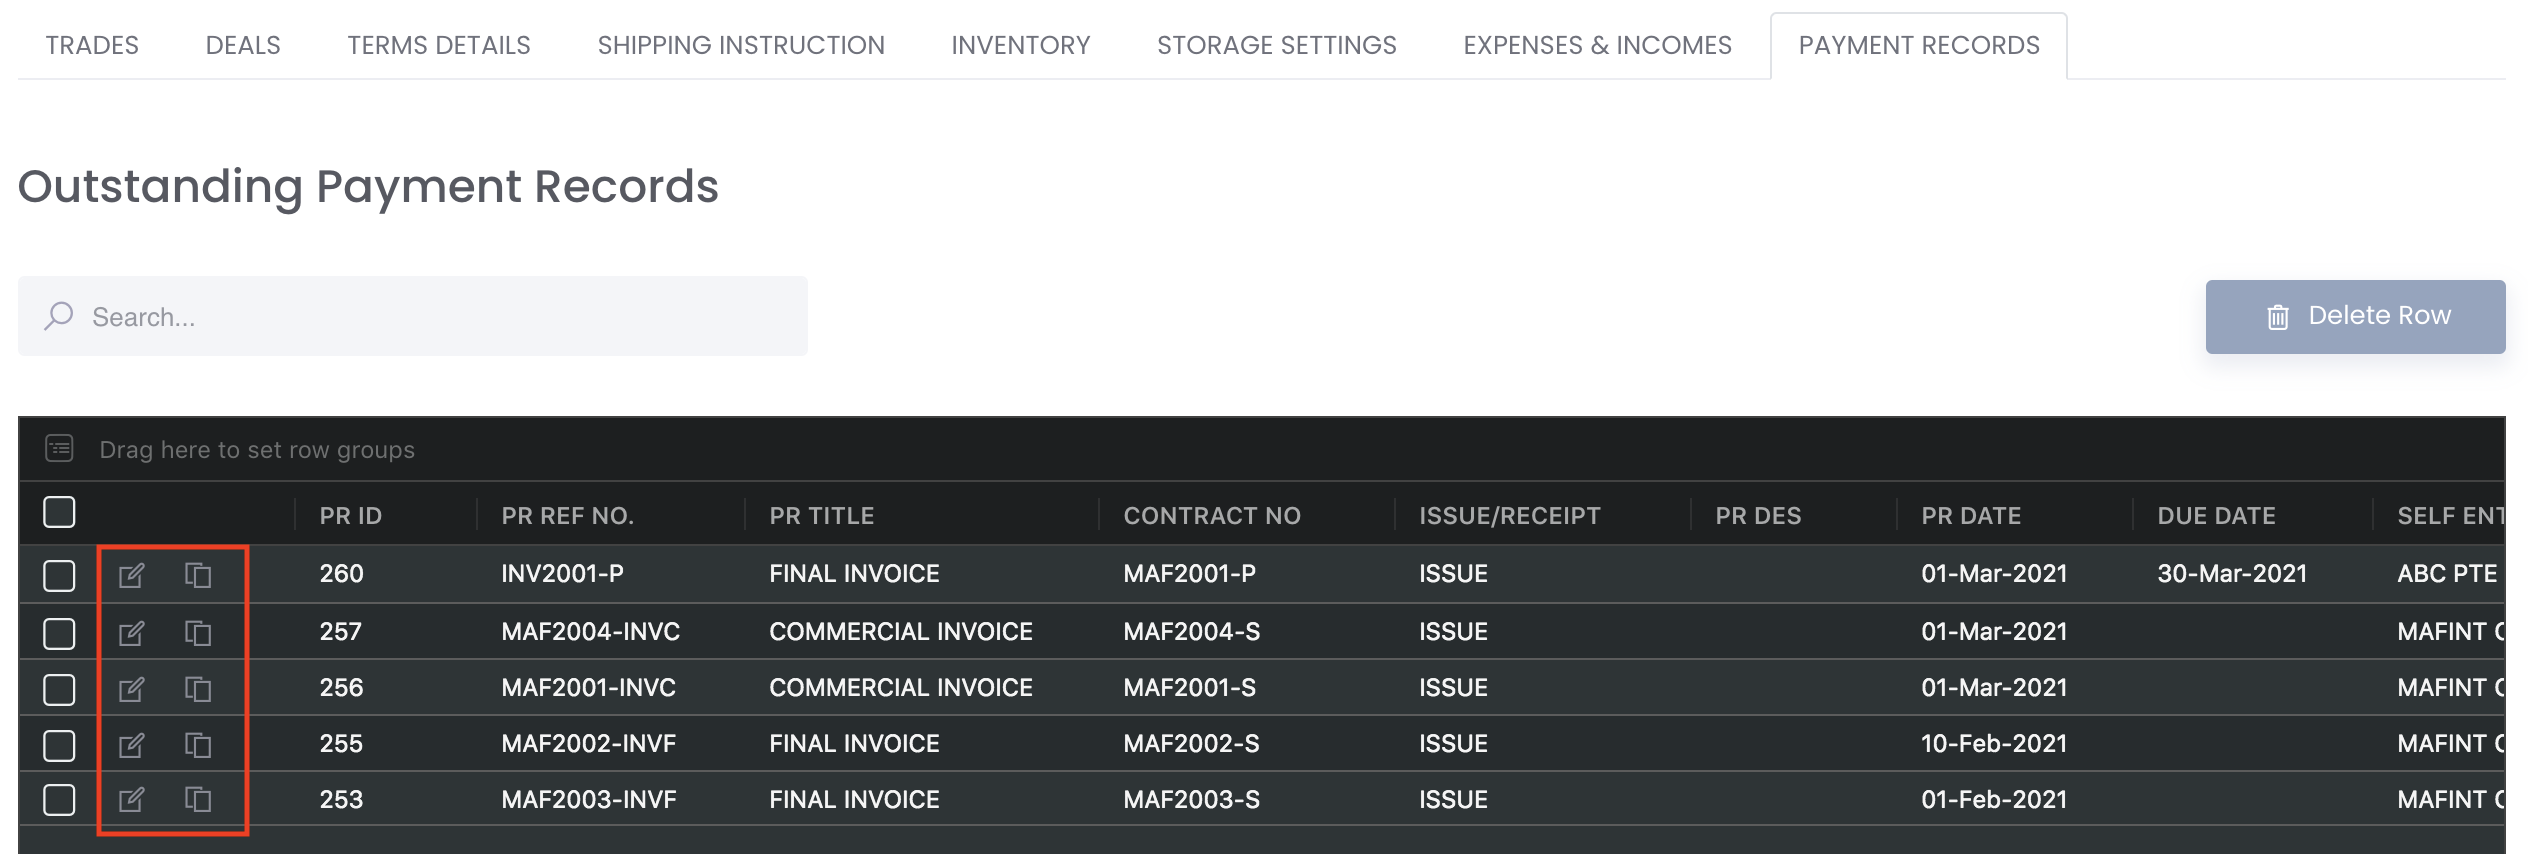
Viewing & Duplicating Payment Records
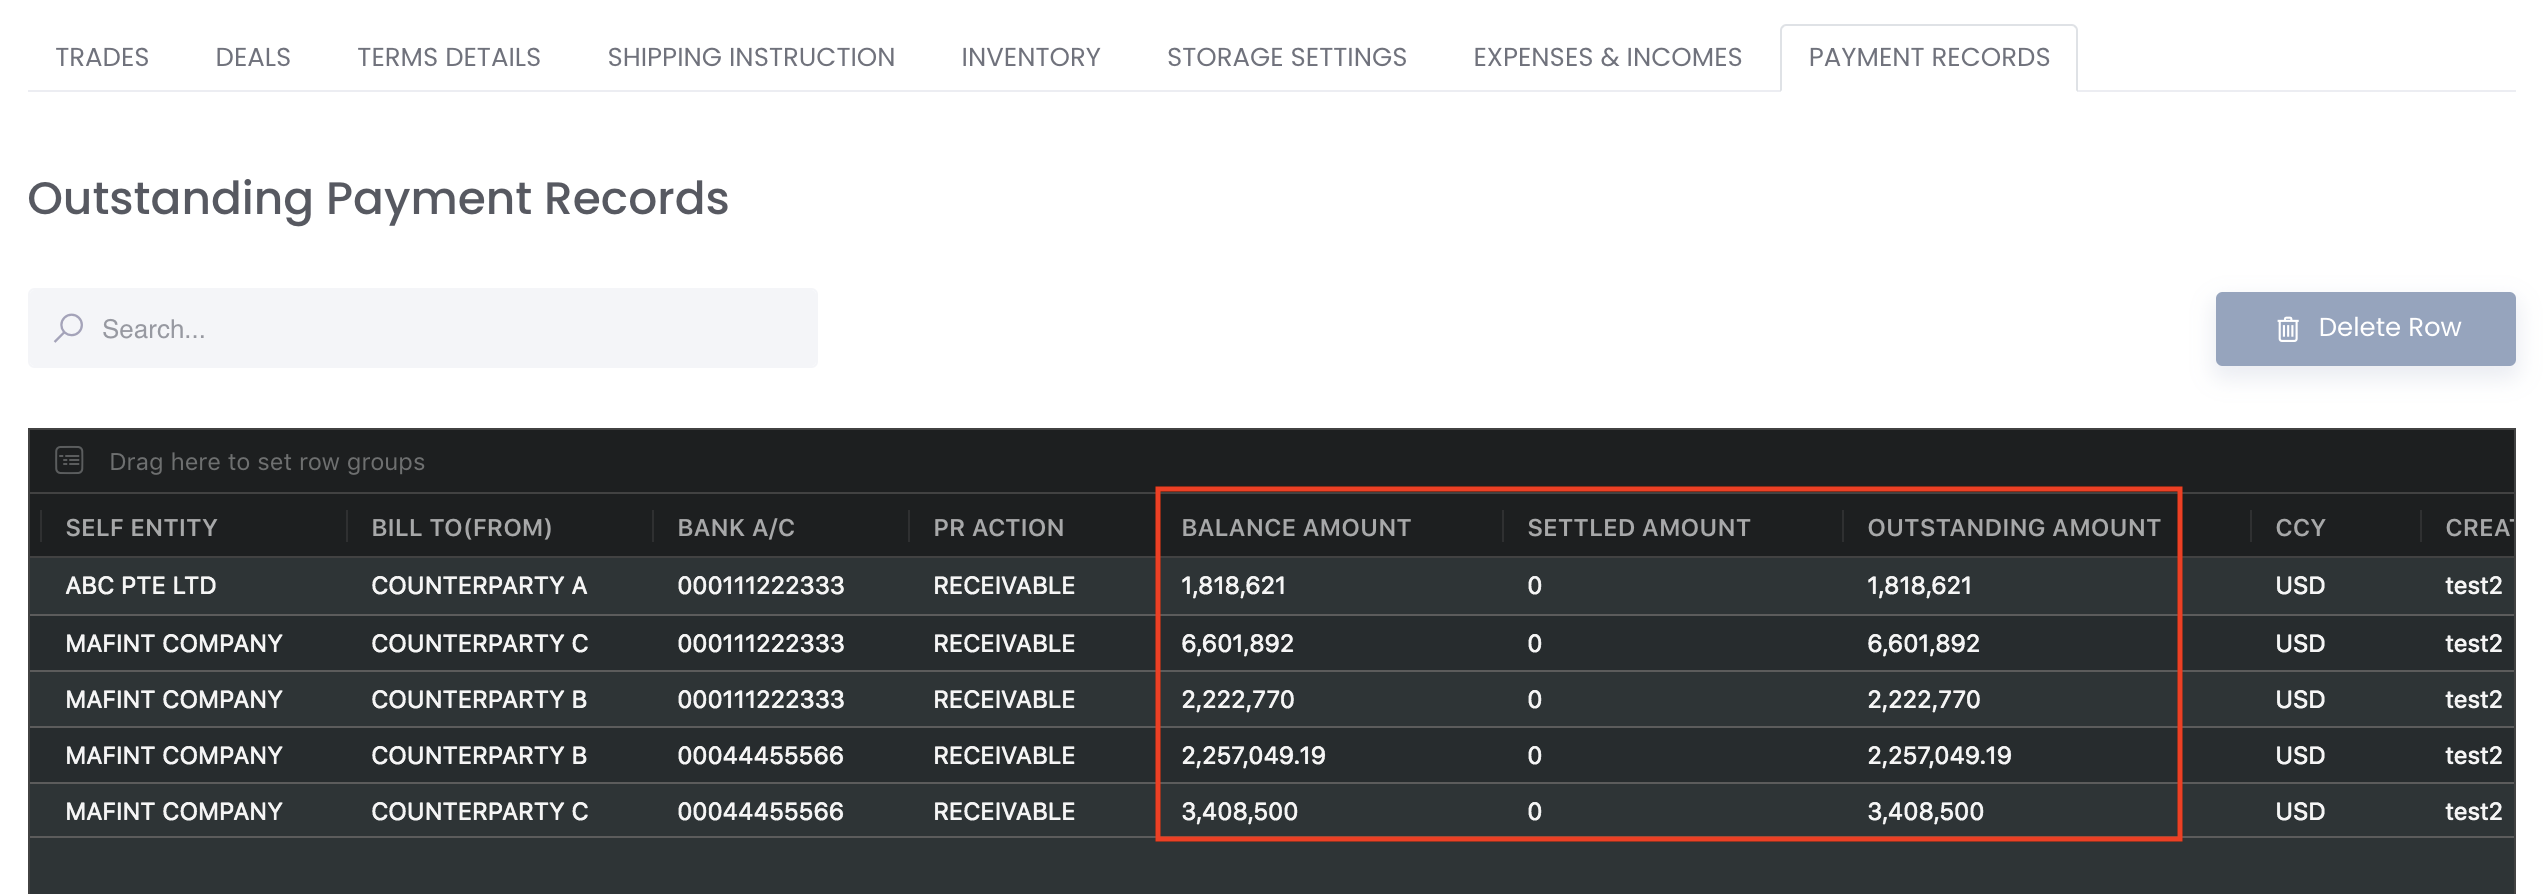
Newly created payment records will be displayed in either the Outstanding Payment Records table (top). Once the invoice has been settled, it will be shifted to the Settled Payment Records table (below).
The Outstanding Payment Records table displays all the outstanding payment records (invoices) that you have created in EXPENSES & INCOMES TAB. This means that the invoice(s) has not been fully settled (not fully paid or received) or is partially settled by you and/or your counterparties (Outstanding Amount =/= 0; Balance Amount =/= Settled Amount).
Scroll to the right in the table to view:
- 'BALANCE AMOUNT': Total invoice amount to be received/paid from/by counterparties. This will always be shown as positive even if the amount is negative (payable)
- 'SETTLED AMOUNT': Amount received/paid from/by counterparties
- 'OUTSTANDING AMOUNT': Amount not received/paid from/by counterparties
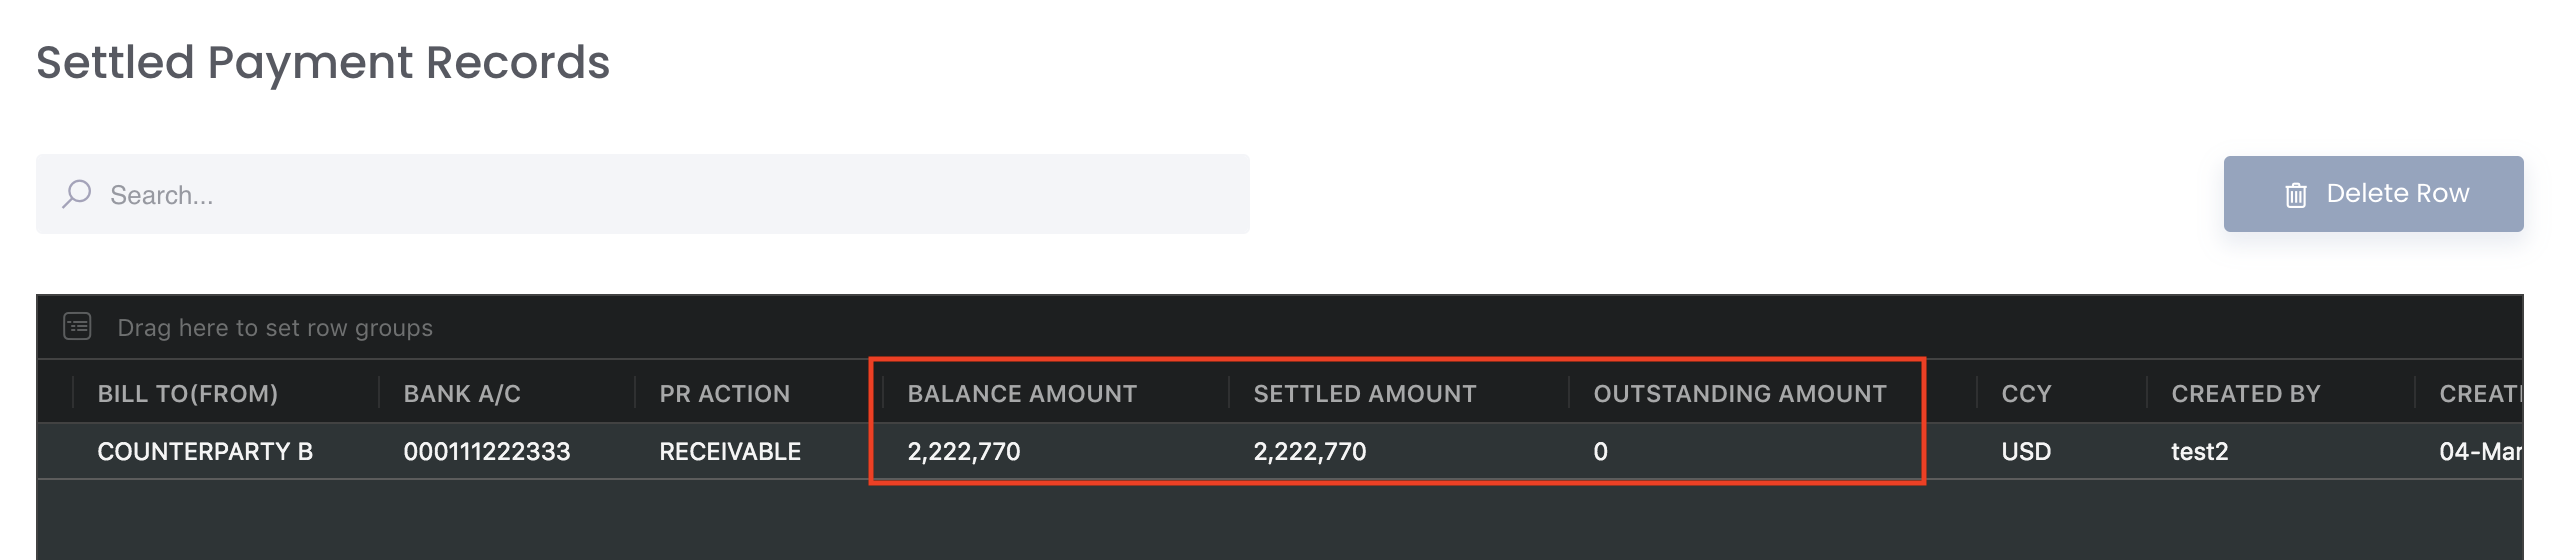
The Settled Payment Records table displays all the settled payment records (invoices) that you have created in EXPENSES & INCOMES TAB. This means that the invoice(s) has been fully settled (fully paid or received) by you and/or your counterparties (Outstanding Amount = 0; Balance Amount = Settled Amount).
Scroll to the right in the table to view:
- 'BALANCE AMOUNT': Total invoice amount to be received/paid from/by counterparties
- 'SETTLED AMOUNT': Amount received/paid from/by counterparties
- 'OUTSTANDING AMOUNT': Amount not received/paid from/by counterparties
To duplicate a payment record, click on the "Duplicate Payment Record" icon (represented by two documents) under 'Actions' of the payment record that you want to duplicate. You will be redirected to a new duplicated payment record page to fill in the details. All items in the duplicated payment record will be duplicated, except for the invoice date, bank details and credit items. Once the invoice has been completed, click on 'Save' below to save the invoice. Click 'PDF' to generate the invoice in PDF format. Click 'Cancel' if you do not want to save the new invoice or update the details, and be directed back to the 'Payment Records' page. Please note that you have to save the invoice first before you can generate the PDF.
Settling Outstanding Payment Records
To settle each invoice for the closure of the deal, received/paid bank transaction amount (actual amount received or paid by/from your company's bank accounts) has to be allocated in the 'Bank Transaction' tab. Please refer to Bank Transaction for the guide on how to settle outstanding payment records.
Functionality
Please refer to Table Settings for table functionalities.
Definition of Terms
Please refer to List of Definitions: Trades.
Click to access: